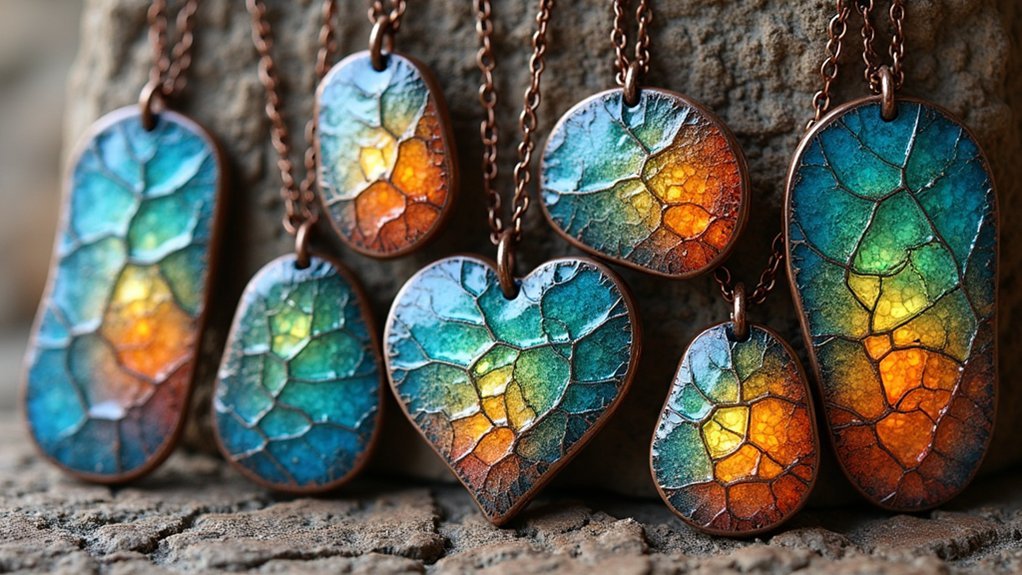
You’ll create stunning raku enamel jewelry by firing pieces at 750-800°C, then introducing them to combustible materials like sawdust or leaves for dramatic reduction effects. Use manganese and copper oxides for vibrant colors, avoid gold and cadmium-based enamels, and apply silver nitrate solutions for metallic lusters. Layer multiple enamel coats between firings, incorporate stencils with gold leaf accents, and try torch firing for precise control on smaller pieces. These fundamental techniques will reveal countless artistic possibilities.
Essential Safety Precautions for Raku Enamel Firing
While raku enamel firing creates stunning artistic effects, you’ll need to prioritize safety throughout the entire process.
Always work in a well-ventilated area to minimize smoke inhalation risks from burning combustible materials. Keep a water bucket nearby for emergency fire extinguishing during unexpected flare-ups.
Proper ventilation and emergency water access are essential safety measures when working with raku firing’s combustible materials and potential flare-ups.
Protect yourself with proper equipment: wear heat-resistant gloves and safety glasses to guard against high temperatures and molten enamel splashes.
Consider investing in a half-mask respirator if you’re sensitive to smoke—masks start around $9.50 with replacement filters at $17.95.
Monitor your kiln closely throughout firing, but don’t remove pieces until they’ve cooled sufficiently to prevent thermal shock.
These precautions guarantee you’ll create beautiful raku enameled jewelry while protecting your health and workspace.
Preparing Your Kiln and Workspace for Raku Techniques
Before you begin raku firing your enamel jewelry, you’ll need to establish a properly ventilated workspace and gather essential safety equipment including heat-resistant gloves, safety glasses, and a water bucket for emergencies.
Set your kiln temperature to the appropriate range of 750-800°C (1380-1472°F) for ideal enamel results.
Position firing racks or trivets inside your kiln to elevate pieces off the floor and guarantee even heat distribution throughout the firing process.
Safety Equipment and Ventilation
Five essential safety measures will protect you during raku firing and guarantee your workspace remains secure.
First, establish proper ventilation in your workspace to prevent harmful fume inhalation from combustible materials. Position your kiln where fumes can safely disperse away from sensitive surfaces and materials.
Invest in essential safety equipment, including a half-mask respirator that costs approximately $9.50, with replacement filters at $17.95. This protects against smoke sensitivity during firing.
You’ll also need heat-resistant gloves and safety glasses to shield your hands and eyes from high temperatures and flying debris.
Keep an emergency water bucket nearby to extinguish any flames from combustible materials.
These precautions assure you can focus on creating beautiful raku-fired enamel jewelry while maintaining a secure working environment.
Kiln Temperature Settings
Since enamel requires precise thermal conditions to achieve ideal raku effects, you’ll need to set your kiln temperature to approximately 1830°F (999°C). This specific temperature creates the thermal expansion necessary for enamels to properly adhere and develop stunning visual effects.
Proper kiln temperature settings require careful attention to these key factors:
- Gradual preheating – Increase temperature incrementally to prevent thermal shock damage to your enamel pieces.
- Temperature monitoring – Regularly check and adjust kiln settings to maintain ideal firing conditions for your specific enamel materials.
- Strategic placement – Use firing racks or stilts to prevent pieces from sticking to kiln floors.
- Consistent heating – Position pieces appropriately to guarantee even temperature distribution throughout the firing chamber.
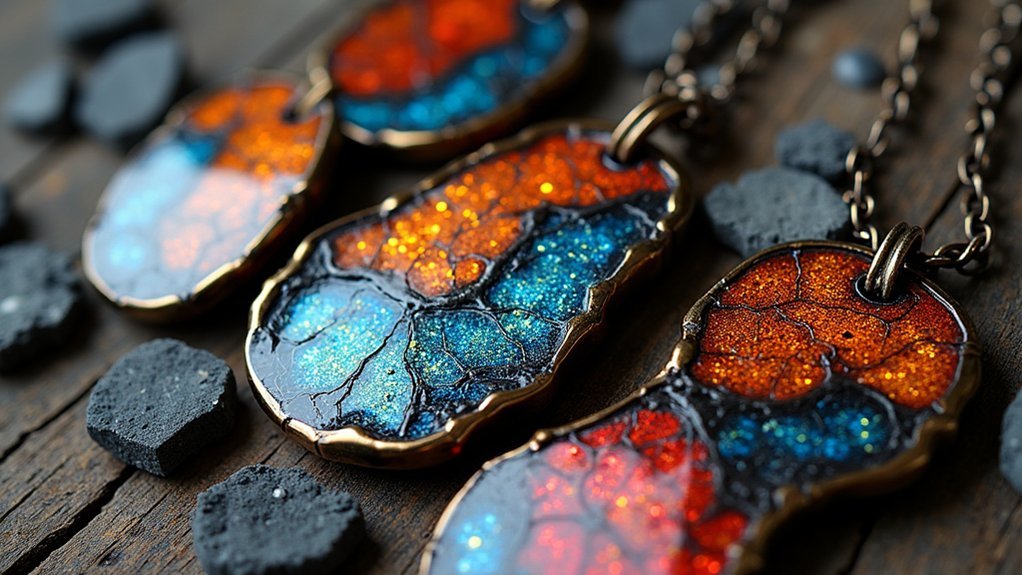
Selecting the Best Enamel Colors for Raku Effects
You’ll achieve the most striking raku effects by focusing on manganese and copper oxides, which produce rich chestnut browns, russet tones, turquoise, and peacock greens that respond beautifully to the reduction process.
When considering metallic luster options, silver nitrate solutions create exceptional surface tracery effects, while you should avoid gold, cadmium-selenium reds, and cobalt-based colors that don’t perform well in raku conditions.
Your choice between opaque and transparent enamels greatly impacts your final results, with opaque varieties maintaining better color consistency throughout the dramatic temperature changes of raku firing.
Oxide-Based Color Choices
When selecting enamel colors for raku firing, you’ll find that certain oxide-based formulations create dramatically different results than traditional kiln firing.
Manganese and copper oxides excel at producing vibrant metallic surfaces, delivering stunning chestnut brown, turquoise, and peacock green finishes that truly shine in raku applications.
Consider these oxide-based color choices for ideal results:
- Manganese oxides – Create rich, lustrous browns with metallic depth
- Copper oxides – Produce brilliant turquoise and peacock green effects
- Opaque formulations – Maintain color intensity throughout firing
- Layered applications – Build complex visual textures and enhanced depth
You’ll want to avoid gold, cadmium-selenium reds, and cobalt-based colors, as they’re less effective in raku contexts.
While transparent oxide-based enamels create unpredictable effects, opaque versions offer reliable intensity.
Metallic Luster Considerations
Although metallic luster effects represent one of raku firing’s most enchanting features, achieving them requires careful color selection and strategic application techniques. You’ll want to focus on manganese and copper oxides, which create vibrant metallic surface finishes that make raku firing so intriguing.
| Oxide Type | Recommended Enamel Colors |
|---|---|
| Manganese | Chestnut brown, russet brown |
| Manganese | Rose purple, oil gray |
| Copper | Turquoise, beryl |
| Copper | Peacock green, nile green |
| Special Effects | Silver nitrate solutions |
When layering enamels, you’ll enhance depth without overwhelming your design. Don’t cover entire surfaces with metallic luster—this maintains visual balance. Experiment with silver nitrate solutions for unexpected surface effects that add dimensional beauty to your pieces.
Opaque Versus Transparent
Beyond metallic effects, the fundamental choice between opaque and transparent enamels shapes your entire raku firing outcome. Opaque enamels retain their color and texture consistently, delivering stable visual effects without metallic glints. They’re your reliable foundation for predictable results.
Consider these strategic approaches:
- Use manganese and copper oxides in opaque enamels for striking chestnut brown and turquoise colors.
- Layer transparent enamels carefully over opaque bases to create depth without overpowering.
- Monitor transparent layers closely during firing to prevent them from dominating underlying colors.
- Experiment with combinations to achieve distinctive patterns and enhanced textures.
While transparent enamels can lose vibrancy during raku’s unpredictable process, they create beautiful layered depth when properly controlled.
Your choice determines whether you’ll achieve consistent, bold statements or complex, nuanced interactions.
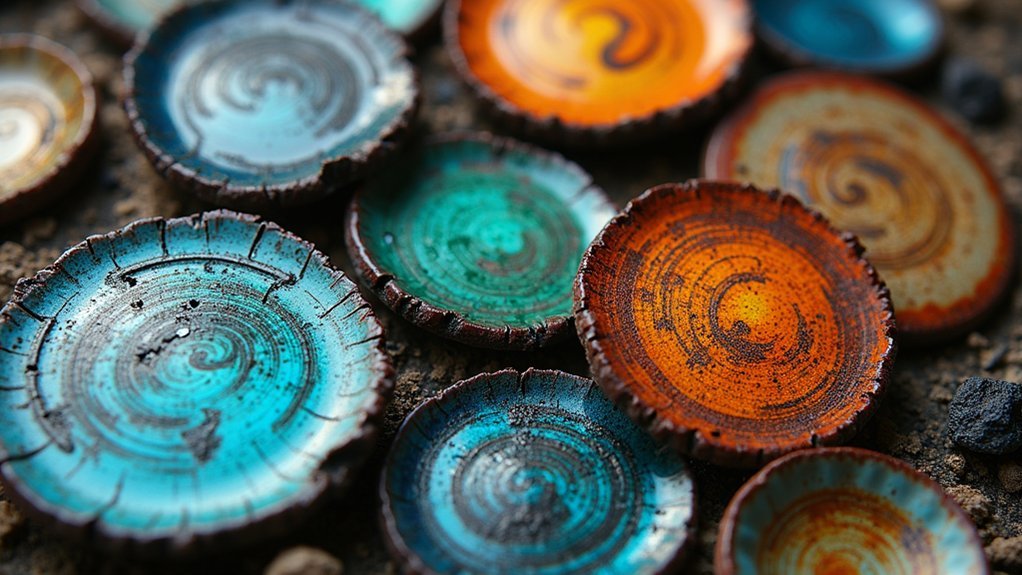
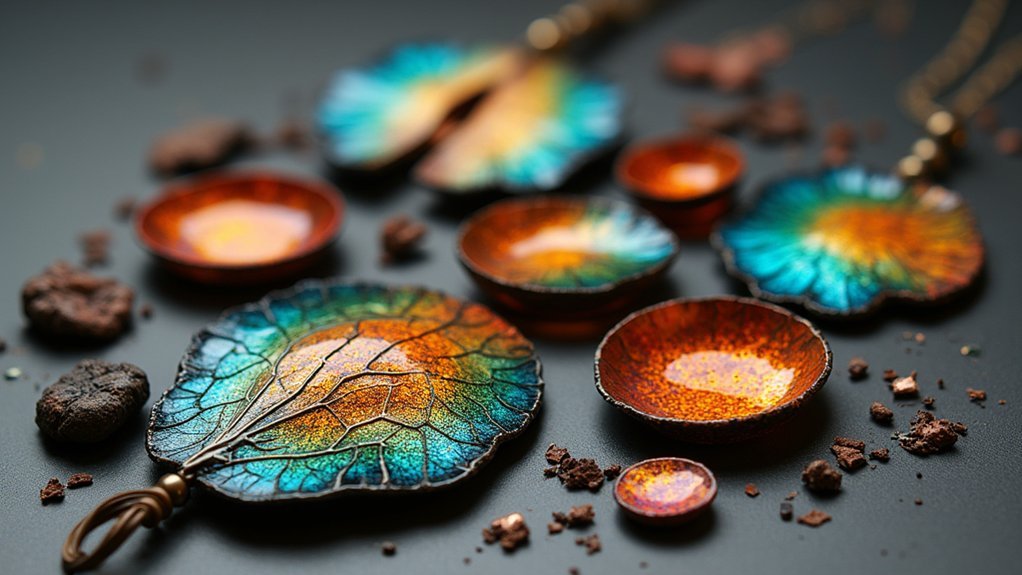
Controlling Surface Textures With Combustible Materials
How can you achieve those distinctive, organic textures that make raku enameled jewelry so enchanting? The secret lies in strategically placing combustible materials on your enamel surface before firing.
Dry leaves create stunning skeletal imprints, while pine needles produce elegant linear effects across your piece. For fine, controlled texturing perfect for detailed line work, you’ll want to use sawdust.
The magic happens when carbon interacts with glass during the reduction process. You can layer different materials for unexpected, whimsical results that’ll surprise even experienced artists.
The key is adding the right amount of combustible material—too little won’t create depth, while too much can obscure your desired patterns. Experimentation is essential for mastering this tactile surface control technique.
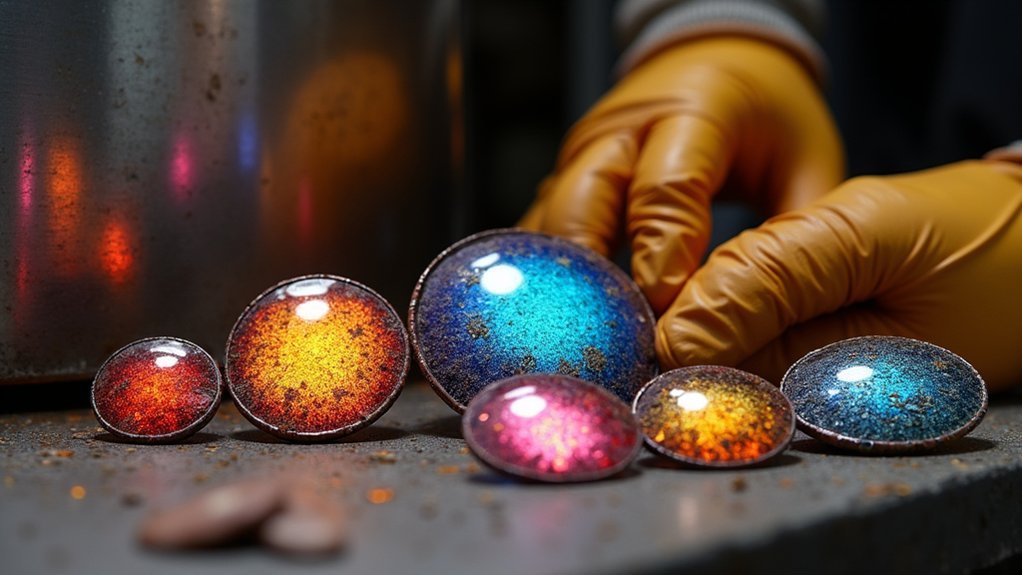
Creating Metallic Sheens With Silver Nitrate Solutions
You can transform ordinary enamel surfaces into stunning metallic displays by applying silver nitrate solutions before raku firing.
The key lies in mastering your application technique—whether you’re brushing, sponging, or spraying the solution onto specific areas of your piece.
Start with diluted concentrations to understand how the silver nitrate reacts with your particular enamel formula, then gradually experiment with stronger solutions to achieve more dramatic lustrous effects.
Silver Nitrate Application Methods
When you’re ready to create stunning metallic effects on your enamel jewelry, silver nitrate solutions offer an exciting pathway to achieve lustrous sheens and intricate tracery patterns.
You’ll need to dilute the silver nitrate in water before application, creating a workable solution that’s easy to control.
Your application method determines the final results:
- Brush technique – Use a fine brush for precise control over specific areas and detailed work
- Spray application – Creates even coverage across larger enamel surfaces for uniform effects
- Thin layers – Apply multiple light coats rather than heavy applications for better results
- Proper drying – Allow each layer to dry completely before firing to prevent uneven reactions
You’ll achieve the most consistent metallic sheens by working methodically and testing your technique on practice pieces first.
Achieving Lustrous Surface Effects
Beyond proper application techniques, silver nitrate solutions transform ordinary enamel surfaces into extraordinary metallic showcases when fired correctly.
You’ll achieve the most stunning raku effect by carefully controlling your firing temperature to allow natural cracks to heal slowly, preserving the enamel’s structural integrity while enhancing metallic brilliance.
The thickness of your silver nitrate application directly impacts the final result. Thin layers create subtle sheens, while heavier applications produce dramatic metallic tracery.
Your firing duration and temperature work together to determine the intensity of these effects.
Experiment with various enamel surface textures and base colors to maximize visual impact.
Textured surfaces catch and reflect light differently, creating dynamic metallic patterns that shift as viewing angles change, resulting in truly enchanting jewelry pieces.
Mastering Temperature Control for Optimal Cracking Patterns
Three critical factors determine whether you’ll achieve stunning cracking patterns or disappointing results in raku firing: initial temperature contrast, controlled heating rates, and precise timing.
Start with your enamel piece as cool as possible before introducing it to the hot kiln. This temperature shock creates the foundation for controlled crack formation.
You’ll want to carefully adjust your kiln temperature to allow cracks to heal slowly, producing more defined and visually appealing patterns.
- Monitor natural cracks during firing to influence your final aesthetic results
- Apply silver nitrate precisely to enhance cracking effects with silver tracery
- Limit enamels to just a few minutes in the container
- Prevent excessive fuming while promoting distinctive surface textures
Your success depends on balancing these elements throughout the raku firing process.
Using Stencils and Gold Leaf for Design Elements
While temperature control creates the foundation for raku firing, applying stencils and gold leaf transforms your enamel jewelry into refined artistic statements.
You’ll achieve precise design control by positioning stencils over your enamel pieces before applying additional layers. Apply enamel over the stencil, then carefully remove it to reveal crisp, defined shapes that’ll stand out beautifully after firing.
Gold leaf adds luxury and visual impact to your finished pieces. Apply it after initial firing to guarantee proper adhesion to the enamel surface. This timing enhances both texture and aesthetic appeal effectively.
Gold leaf application after initial firing ensures optimal adhesion while creating luxurious texture and enhanced visual appeal in your enamel pieces.
Experiment with different stencil placements and gold leaf positioning. Raku firing’s unpredictable nature interacts with these elements unexpectedly, creating unique outcomes that’ll make each piece distinctly yours.
Torch-Fired Reduction Techniques for Small Pieces
When working with small enamel pieces, torch-fired reduction techniques offer you the perfect alternative to kiln firing, giving you precise control over intimate details while creating stunning raku effects.
You’ll heat your piece with a torch until it reaches a red-hot state, then immediately transfer it into a container filled with combustible materials. This creates the essential reduction atmosphere that produces those coveted raku characteristics.
Key steps for successful torch-fired reduction techniques:
- Monitor the torching process closely to prevent overheating and enamel discoloration
- Experiment with sawdust, leaves, or other combustible materials for unique textures
- Quickly transfer red-hot pieces to your reduction container
- Wave pieces in air after firing to rapidly cool and stabilize surfaces
This method eliminates kiln setup while delivering professional results.
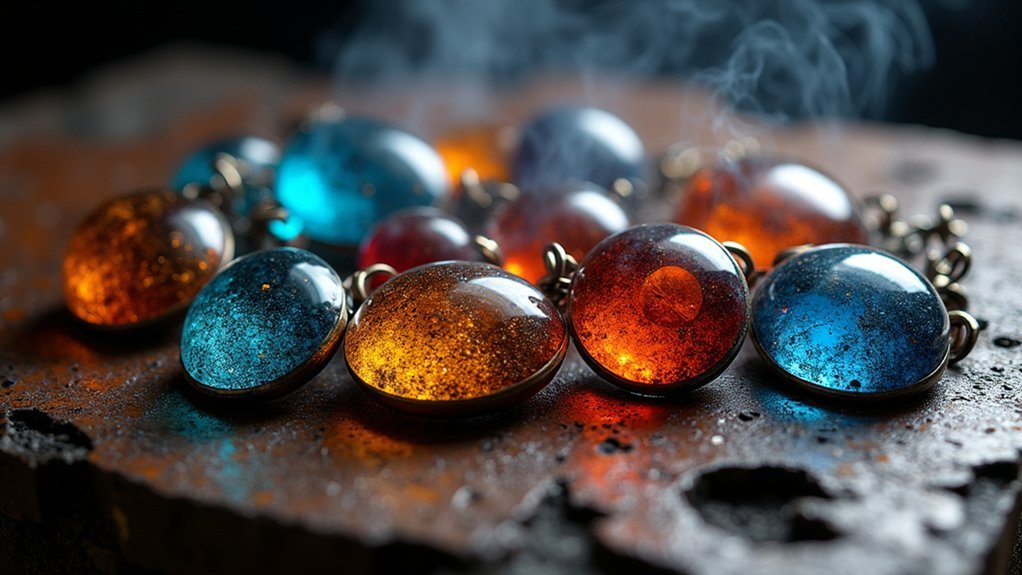
Layering Multiple Enamel Coats for Complex Visual Effects
Building depth in your raku enamel work requires strategic layering techniques that transform simple surfaces into complex visual masterpieces.
Layering multiple coats of enamel creates stunning depth and complexity, with each layer contributing unique texture and color interactions during firing.
You’ll need to fire each layer separately to guarantee proper adhesion and prevent bubbling or uneven surfaces. This gives you complete control over your final appearance.
Try using transparent enamels between opaque layers—you’ll achieve fascinating cell shapes and enhanced color blending.
Your application technique and enamel mixture consistency dramatically impact results. Well-mixed liquid enamel produces smoother surfaces and more vibrant colors.
Don’t hesitate to experiment with different color combinations and layering methods. These experiments often yield unexpected, stunning results that make each piece truly one-of-a-kind.
Post-Firing Cleaning and Surface Treatment Methods
After completing your layered enamel masterpiece, the post-firing stage determines whether your piece achieves its full artistic potential.
Post-firing cleaning requires careful attention to preserve your delicate enamel surfaces while removing unwanted residue.
Use these essential techniques for ideal results:
- Gentle cleaning approach – Use a glass brush to carefully remove soot and carbon patterns without scratching the enamel surface.
- Strategic carbon retention – Leave some carbon patterns on wall pieces to enhance the unique raku aesthetic.
- Handle protection – Clean gold or silver foil with extra care to maintain surface material integrity.
- Corrective refiring – Remove unwanted effects by refiring the piece for further experimentation.
Regularly inspect your enamel surfaces and make aesthetic decisions based on observed patterns, as these greatly influence your artwork’s final appearance.
Frequently Asked Questions
How to Kiln Fire Enamel?
You’ll clean the metal surface thoroughly, apply thin enamel layers, place on firing racks, heat your kiln to 750-800°C, fire each layer separately, and cool gradually to prevent cracking.
What Are the Techniques of Enamel Jewelry?
You’ll use cloisonné, champlevé, and plique-à-jour techniques for enamel jewelry. You can apply wet or dry enamels, create color gradients through layering, add metallic effects with silver solutions, and control textures using firing temperatures.
What Temperature Is Needed for Enamelling?
You’ll need temperatures between 750-800°C (1380-1472°F) for proper enameling. Monitor your kiln closely to prevent overheating, which causes burning and discoloration. Different enamel types may require specific temperatures for ideal results.
What Are the Techniques of Raku Glazing?
You’ll fire pieces at 750-800°C, then place them in containers with combustible materials like leaves or sawdust. You can experiment with silver nitrate solutions for tracery effects and incorporate pine needles for unique textures.
In Summary
You’ve now mastered the essential raku firing techniques that’ll transform your enamel jewelry into stunning, one-of-a-kind pieces. Remember that practice makes perfect – don’t get discouraged if your first attempts don’t match your vision. Keep experimenting with different combustible materials, metallic solutions, and layering techniques. Each firing teaches you something new about controlling the unpredictable beauty of raku. Your unique artistic voice will emerge through consistent exploration and creative risk-taking.


Leave a Reply