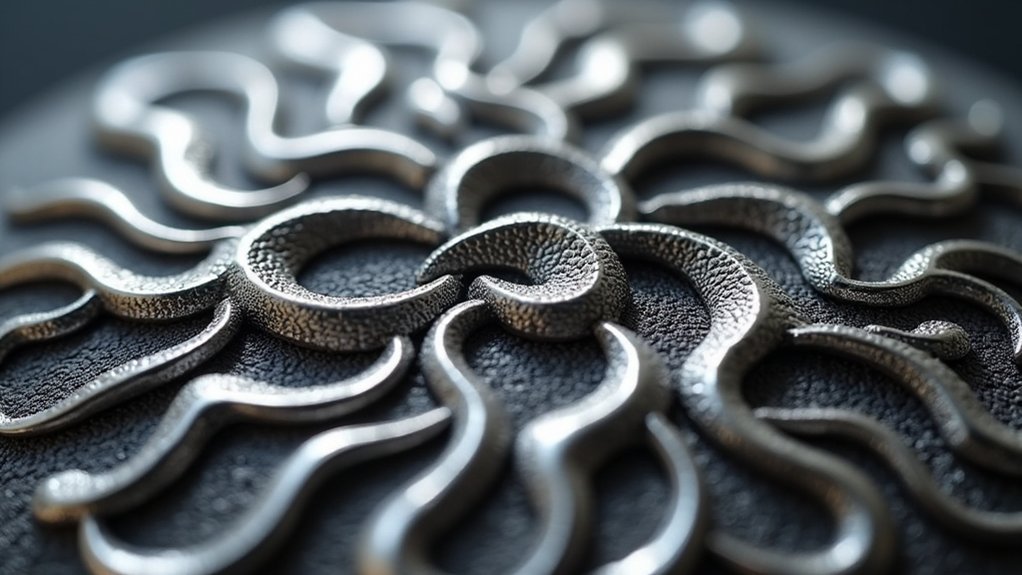
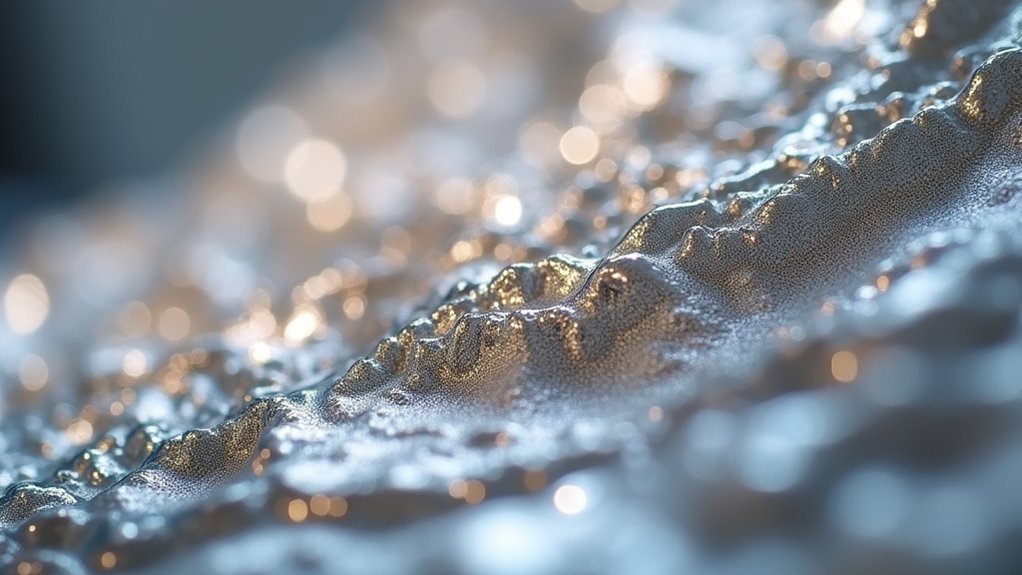
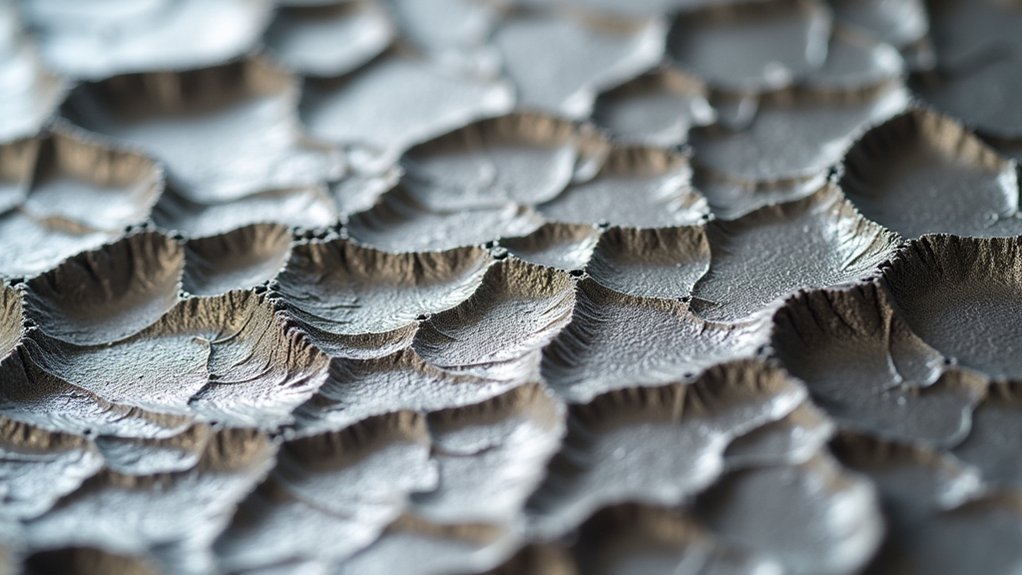
Silver reticulation creates stunning jewelry textures through a fascinating metallurgical process. You’re witnessing the magic of different melting points—when the pure silver surface layer wrinkles while the copper-rich core remains solid. This controlled heating technique produces unique, organic patterns resembling natural landscapes that can’t be replicated. Each piece becomes a one-of-a-kind artistic expression, combining technical mastery with unpredictable beauty. Discover how this 19th-century Russian technique transforms ordinary silver into wearable art.
The Ancient Art of Surface Manipulation
While many jewelry techniques focus on adding elements to metal, reticulation stands apart by transforming the metal’s surface itself. This remarkable process, developed in late 19th-century Russia by master craftsmen like Fabergé, creates textures resembling natural landscapes through controlled heating.
You’ll find the magic happens through depletion gilding, where a fine silver layer forms on the surface while leaving a copper-rich core beneath. When you apply precise heat, the different expansion rates create undulating ridges and valleys across the surface.
What makes reticulation particularly fascinating is its unpredictability. You’ll never create the same pattern twice, as each piece responds uniquely to heat variations.
This element of controlled chaos is why reticulated jewelry commands such appreciation, combining technical mastery with artistic expression.
Chemical Principles Behind Silver Reticulation
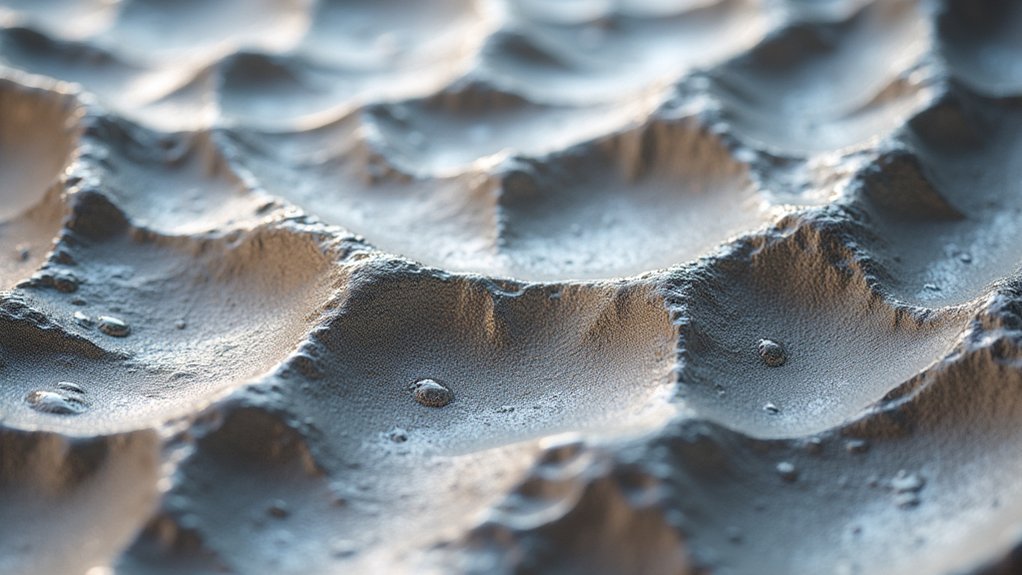
The artistry of reticulation rests on a foundation of precise metallurgical science. When you heat silver alloys during the reticulation process, you’re taking advantage of the different melting temperatures between metals.
Reticulated silver typically contains 80% silver and 20% copper, creating more dramatic textures than traditional sterling silver.
The magic happens during depletion gilding, where heat causes surface copper to oxidize, leaving a pure silver layer on top. This thin layer melts at 1,720°F while the copper-rich core remains solid at lower temperatures.
As you continue heating, the difference in expansion rates between these layers creates those characteristic ripples and wrinkles you see in finished pieces. The oxidized copper also produces attractive contrast between textured and smooth areas, enhancing your jewelry’s visual depth.
Essential Tools for Successful Reticulation
Selecting the right tools makes all the difference between frustration and success when creating reticulated silver jewelry.
Proper equipment transforms the challenging art of reticulated silver jewelry from an exercise in disappointment to a rewarding creative experience.
You’ll need a GoSystem Tech Torch, which offers excellent flame control for precise heating of your metal sheet. This control is vital when you’re trying to reticulate silver surfaces effectively.
A reliable soldering block provides a safe, stable surface for heating your metal, while a safety pickle solution is essential for removing fire stains between annealing cycles.
After pickling to remove impurities, use a brass brush to clean oxidation and achieve an attractive satin finish on your textured pieces.
For materials, consider working with sterling silver or specialized reticulation silver alloys, which feature a fine silver layer that enhances the dramatic surface textures that make this technique so engaging.
Preparing Your Silver Sheet for Texturing
Before diving into the creative aspects of reticulation, you’ll need to properly prepare your silver sheet through a process called depletion gilding. This critical preparation guarantees your silver will form those distinctive, dramatic textures that make reticulated jewelry so enchanting.
- Heat your silver sheet to approximately 1,100°F to create a fine silver surface layer.
- Quench the heated metal in a hot pickling solution to remove copper oxides.
- Clean under running water with a brass scratch brush to enhance the final texture.
- Repeat these steps multiple times to build up a consistent layer of fine silver.
- Pre-heat your soldering pad or charcoal block before beginning the actual reticulation.
This preparation process creates different melting points between the surface and interior of your sheet, allowing the controlled rippling effect that yields those stunning organic textures in your finished jewelry.
Mastering the Depletion Gilding Process
To master depletion gilding, you’ll need to heat your silver sheet to approximately 1,100°F, which oxidizes surface copper and creates a pure silver layer.
You must immediately quench the heated metal in a hot pickling solution, then clean thoroughly with running water and a brass scratch brush before repeating the process.
This cycle of heating, pickling, and cleaning typically requires multiple iterations to achieve the ideal fine silver surface needed for successful reticulation.
Surface Copper Removal Technique
Three essential steps form the foundation of successful depletion gilding in silver reticulation. The process transforms ordinary silver sheets into dynamic, textured surfaces by systematically removing copper from the exterior while concentrating it in the core.
- Heat your silver sheet to 1,100°F, watching carefully to prevent burning through as the surface and interior have different melting points.
- Immediately quench in hot pickling solution to remove oxidized copper and avoid cross-contamination.
- Repeat the heating and pickling cycle multiple times to create a fine silver surface layer.
This repeated copper removal creates the necessary differential between surface and core.
The concentrated copper in the core enables the distinctive wrinkling effect when you apply final reticulation heat.
This controlled depletion gilding process is what creates the dramatic contrast between the pure silver surface and copper-rich interior.
Multiple Heat-Pickle Cycles
While many metalsmiths rush through the depletion gilding process, mastering the multiple heat-pickle cycles requires both patience and precision.
You’ll need to heat your silver sheet to approximately 1,100°F, which oxidizes the copper at the surface, then immediately quench it in pickling solution to remove impurities.
Each cycle deliberately brings fine silver to the surface while separating copper from the outer layer. You’ll likely need to repeat this process several times to achieve sufficient depletion for effective reticulation.
Monitor temperatures carefully—overheating can burn through your sheet, ruining your work.
The goal is creating a fine silver surface while maintaining the copper core beneath. This unique combination of metals is what allows the stunning ripples and textures to form during the final reticulation phase.
Your patience during these cycles directly influences your final results.
Layered Silver Transformation
When practiced correctly, depletion gilding transforms ordinary sterling silver into a canvas for extraordinary texture. By heating your silver to 1,100°F, you’re creating a layer of pure metal on the surface while maintaining a copper core beneath—the perfect foundation for dramatic reticulation texture.
The magic happens through systematic transformation:
- Heat your silver until the copper oxidizes at the surface
- Pickle the metal to remove the oxidized copper
- Repeat this cycle multiple times to fully develop the fine silver surface
- During the melting process, the different expansion rates create distinctive rippling
- The reticulated metal exhibits unique wrinkling patterns impossible to achieve otherwise
You’ll find that mastering this technique not only enhances your jewelry’s visual appeal but also streamlines your workflow when working with reticulation silver alloys.
Perfect Flame Control Techniques
Mastering flame control stands at the heart of successful silver reticulation.
You’ll need to begin with a large, bushy reducing flame that evenly heats your metal, preparing it for transformation without burning through.
As your silver approaches reticulation temperature, switch to a smaller, pointed flame for precise texture creation. This shift gives you the control needed to develop intricate patterns while preventing excessive melting.
Watch the metal’s surface closely—proper heat management maintains surface tension, preventing unwanted holes.
Adjust your torch distance strategically to target specific areas while leaving others untouched.
Practice with various flame sizes and intensities to develop the finesse required for creating dynamic shadows and textures.
Your ability to manipulate the flame directly translates to the unique character of your reticulated silver jewelry.
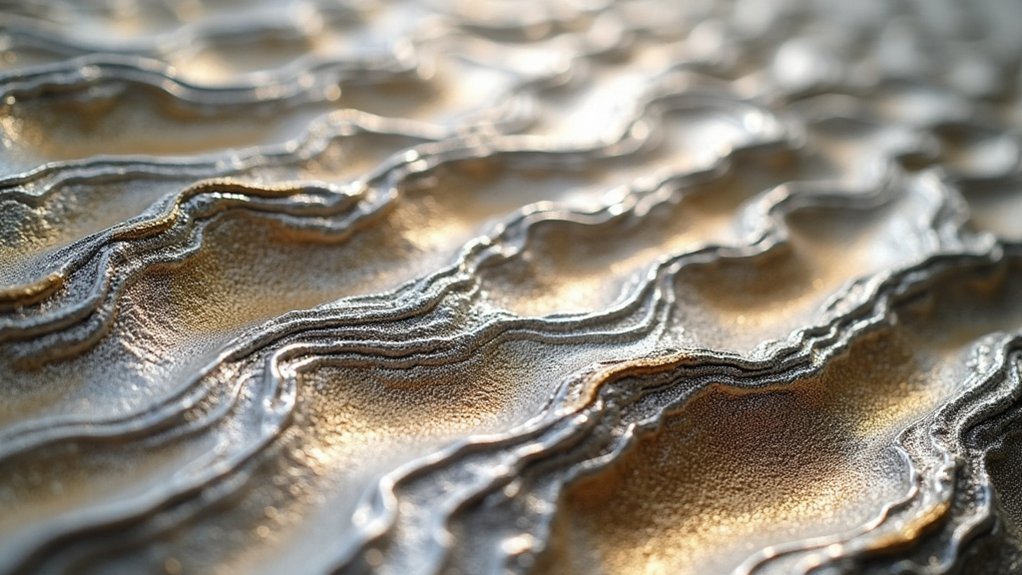
Creating Controlled Patterns vs. Organic Textures
Although both techniques create stunning results, controlled patterns and organic textures represent two distinct approaches to silver reticulation.
You’ll discover that mastering both gives you tremendous creative flexibility.
- Controlled patterns emerge through selective heating of specific areas, allowing you to create deliberate, defined textures.
- Depletion gilding enhances pattern visibility by bringing fine silver to the surface through heating and pickling.
- Organic textures form spontaneously due to different melting points within your silver alloy, creating natural rippling.
- Higher copper content (like the Finnish 82/18 silver alloy) produces more dramatic organic textures than standard sterling.
- Skillful torch manipulation lets you balance between predictable patterns and free-flowing organic forms.
Your choice between controlled and organic approaches determines whether your jewelry showcases meticulous design or embraces the unpredictable beauty of molten metal’s natural movement.
Reticulation Silver vs. Sterling: Choosing Your Material
Your material choice creates the foundation for successful reticulation work, affecting both the process and final appearance of your jewelry pieces.
When deciding between reticulation silver and sterling silver, consider their distinct compositions and benefits.
Reticulation silver’s 80% silver and 20% copper ratio produces more dramatic textures than sterling’s 92.5% silver and 7.5% copper composition. The higher copper content in reticulation silver requires fewer heat and pickle cycles, making your texturing process more efficient.
While sterling silver maintains a higher purity after reticulation, it often can’t achieve the same intricate surface effects.
Remember that reticulation silver can’t be labeled as sterling due to its different alloy makeup. Choose reticulation silver when you’re aiming for distinctive, dramatic textures in your unique jewelry designs.
Incorporating Reticulated Elements in Modern Designs
When designing with reticulated silver, you’ll create more visual impact by juxtaposing textured elements against polished, smooth surfaces.
This dramatic contrast highlights the organic patterns of reticulation while giving the eye restful areas to appreciate the complex textures.
For maximum effect, consider placing your reticulated elements as focal points where they’ll naturally draw attention, such as the center of a pendant or along the outer edges of a cuff bracelet.
Contrast With Smooth Surfaces
The juxtaposition of chaotic, reticulated surfaces against smooth, polished silver creates one of the most compelling visual dynamics in contemporary jewelry design.
You’ll notice how these contrasting textures transform ordinary pieces into extraordinary wearable art.
When you combine these distinct finishes, you’ll experience:
- Light play that creates dramatic shadows across the textured ridges while reflecting brilliantly off polished areas
- Enhanced dimensionality as your eye travels between raised reticulated patterns and sleek smooth sections
- Deeper patina absorption in textured areas, creating natural color contrasts against bright polished surfaces
- Visual storytelling through the tension between controlled craftsmanship and organic unpredictability
- Tactile interest that invites touch, making each piece physically engaging beyond its visual appeal
This strategic contrast elevates your jewelry from merely decorative to truly distinctive.
Focal Point Placement
Strategic placement of reticulated silver transforms ordinary jewelry into alluring focal points that command attention. When you design pieces, position reticulated sections alongside smoother areas to create dramatic contrast that emphasizes the intricate textures. This intentional placement draws the eye directly to the unique surface patterns.
| Placement Strategy | Visual Effect | Design Impact |
|---|---|---|
| Center mounting | Immediate focus | Highlights reticulation as primary element |
| Asymmetrical edges | Dynamic interest | Creates unexpected visual journey |
| Layered application | Depth perception | Adds dimensional complexity |
You’ll find that incorporating reticulated elements with mixed metals like gold or copper enhances visual complexity. The unpredictable nature of reticulation means you can experiment with different patterns, making each design truly one-of-a-kind. Consider using the material’s natural porosity to embed stones, further elevating your distinctive creations.
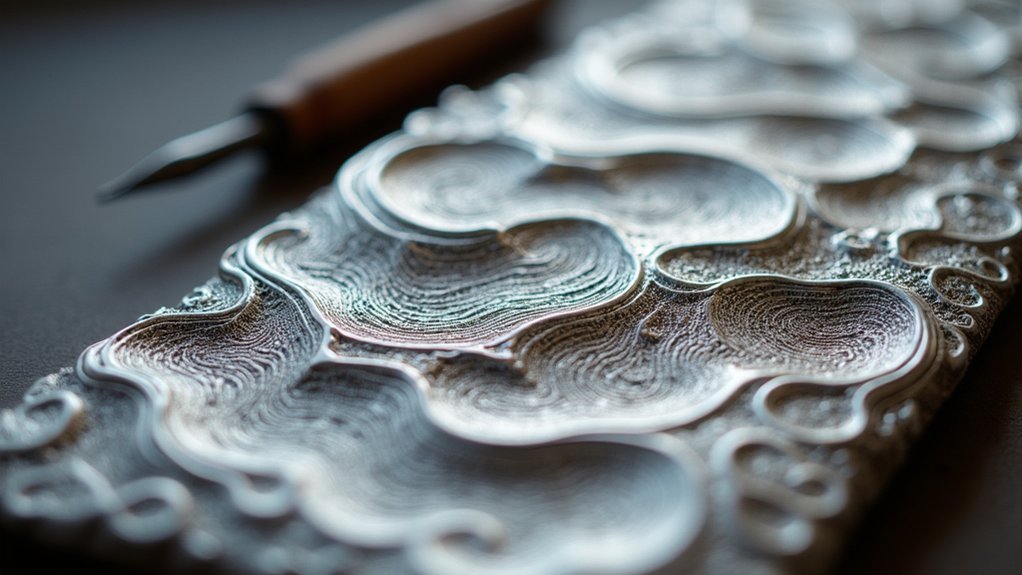
Finishing and Enhancing Reticulated Surfaces
Once your silver piece has undergone the dramatic transformation of reticulation, proper finishing becomes essential to showcase its unique textures.
Start by pickling your piece to remove fire scale and oxidation, creating a clean canvas for further enhancement.
- Begin with thorough pickling to eliminate any residual fire scale
- Polish using various techniques to achieve your desired finish—from high shine to subtle satin
- Apply patina strategically to create dramatic contrasts that highlight the reticulated textures
- Burnish specific areas to emphasize the three-dimensional quality of your piece
- Experiment with colored patinas like blue-green copper to add depth and visual interest
The finishing process transforms your raw reticulated surface into a refined piece that showcases the organic, one-of-a-kind textures that make this technique so sought after in contemporary jewelry design.
Troubleshooting Common Reticulation Challenges
When your silver begins forming an uneven surface during reticulation, you’re likely struggling with weak heat control that requires immediate adjustment of your torch flame.
You’ll need to monitor temperature shifts carefully, switching from a bushy reducing flame to a smaller, more precise flame as the metal approaches its critical reticulation point.
Thinner metals (below 20 gauge) can tear unexpectedly during the process, while thicker pieces might need additional heat cycles to achieve the dramatic texture you’re seeking.
Uneven Surface Formation
Three primary factors contribute to uneven surface texturing during silver reticulation: inconsistent heating, improper flame technique, and inadequate metal preparation.
You’ll notice areas of your piece developing different textures when heat isn’t distributed uniformly across the metal’s surface.
- Start with a bushy reducing flame to heat the entire piece evenly
- Watch for signs of interior melting while maintaining surface integrity
- Shift gradually from large to small flame to prevent localized melting
- Apply extra solder to compensate for the porous nature of reticulated surfaces
- Practice on flat pieces to master the heating rhythm before attempting complex forms
Achieving consistent reticulation texture requires patience and careful observation.
If you notice parts of your silver developing unwanted holes or remaining flat, adjust your heating technique and guarantee proper annealing, pickling, and cleaning between attempts.
Weak Heat Control
Many novice silversmiths struggle with weak heat control, the most critical factor in successful reticulation. When your torch flame isn’t properly managed, you’ll risk uneven texture or, worse, burning holes through your sterling silver once it reaches its 1,640°F melting point.
Start with a large, bushy reducing flame, then shift to a small, pointed flame as the metal approaches reticulation temperature. You’ll need to closely monitor the surface—never taking your eyes off those textured areas forming beneath your torch.
Balance your excitement with precision timing.
Effective depletion gilding creates a fine silver surface layer that aids in texture development while making heat management more forgiving.
With practice, you’ll develop the torch handling skills needed to create stunning rippled surfaces without compromising your piece’s integrity.
Metal Thickness Issues
Selecting the proper metal thickness stands as a fundamental yet often overlooked aspect of successful silver reticulation. Working with the right gauge dramatically impacts your texture quality and overall results.
- Begin with 0.5mm thick silver sheets for ideal texture control and reduced risk of damage.
- Avoid metals thicker than 1.2mm which can heat unevenly, creating inconsistent textures.
- Remember that thicker pieces require more careful temperature monitoring to prevent burning through.
- Plan for additional annealing, pickling, and cleaning cycles when working with thicker metals.
- Consider how uneven metal thickness affects soldering, as reticulated silver’s porosity readily absorbs solder.
Beyond the Basics: Advanced Reticulation Methods
While beginners might be satisfied with standard sterling silver results, serious jewelry artists often venture into the domain of advanced reticulation techniques to achieve more distinctive textures.
Experimenting with 82% silver and 18% copper alloys provides dramatically varied surface patterns compared to conventional sterling silver. You’ll find that multiple depletion gilding cycles enhance the fine silver layer’s thickness, resulting in deeper contrasts during the heating process.
For extraordinary texture, 82% silver/18% copper alloys surpass standard sterling when processed through multiple depletion gilding cycles.
Control your flame size deliberately to target specific areas for reticulation while maintaining smooth sections elsewhere.
Consider using pre-prepared reticulation silver sheets to eliminate some annealing stages and gain more uniform textures.
Frequently Asked Questions
What Is Reticulated Silver?
Reticulated silver is an alloy you’ll find with 80% silver and 20% copper. When you heat it, you’ll create unique wrinkled textures because the metals melt at different temperatures.
What Properties of Silver Make It a Good Metal for Making Jewelry?
You’ll love silver for jewelry making because it’s highly malleable, ductile, strong when alloyed with copper, and has excellent thermal conductivity. It’s also beautifully reflective and can maintain its lustrous shine with proper care.
Why Is Silver Prettier Than Gold?
Silver’s brighter luster reflects light better than gold’s warmer tones. You’ll notice its exceptional reflectivity creates dynamic light play, making textures pop. It’s also more affordable, allowing for larger, more intricate designs.
Why Is Silver Good for Jewelry?
Silver’s perfect for jewelry because you’ll appreciate its malleability, brilliant shine, and affordability. It’s hypoallergenic with antimicrobial properties that protect your skin. Sterling silver’s copper blend provides the durability you’ll love for daily wear.
In Summary
You’ve now explored the remarkable world of silver reticulation—a technique that transforms ordinary metal into organic, one-of-a-kind textures. With practice, you’ll master the delicate balance of heat and chemistry that creates these stunning surfaces. Whether you’re creating statement pieces or subtle accents, reticulation offers endless creative possibilities. Don’t be discouraged by early challenges; each experiment brings you closer to your unique artistic voice.


Leave a Reply