You’ll start by 3D printing your jewelry design using castable resin at 25-micron resolution, then clean it with 95% isopropyl alcohol and cure under UV light. Next, you’ll attach the model to a sprue system and encase it in investment plaster. Heat the mold in a kiln following a three-stage burnout schedule to eliminate the resin, then pour molten metal into the cavity. After cooling, you’ll remove, file, and polish your finished piece for a professional result that reveals the full potential of this transformative technique.
Understanding Lost Wax Casting for 3D Printed Jewelry
Lost wax casting transforms your 3D printed designs into stunning metal jewelry through a time-tested process that’s remained virtually unchanged for thousands of years.
You’ll begin by 3D printing your design using castable resin, creating a precise wax-like model that captures every detail of your vision. This model gets encased in investment plaster, which hardens around it to form your mold.
During the burnout phase, you’ll heat the mold in a kiln, melting away the resin and leaving behind a perfect cavity. When you pour molten metal into this space, it fills every intricate detail your 3D printing created.
Finally, you’ll break apart the investment mold to reveal your cast jewelry piece, ready for finishing touches that’ll bring your design to life through professional jewelry production techniques.
Selecting the Right 3D Printer for Jewelry Applications
Success in lost wax casting depends heavily on the 3D printer you choose to create your initial models. When evaluating 3D printing options for jewelry applications, you’ll need machines with exceptional precision and specialized material compatibility.
| Factor | Requirement |
|---|---|
| Resolution | Minimum 25 microns |
| Materials | Compatible with castable resins |
| Speed | Fast printing for productivity |
| Brands | EnvisionTEC, Asiga preferred |
| Investment | Balance cost vs. long-term value |
Prioritize printers offering compatibility with specialized castable resins from trusted manufacturers like EnvisionTEC or Asiga. These materials guarantee clean burnout during casting. Research brand reputation through professional reviews and testimonials. While higher-end models require greater investment, they typically deliver superior quality and durability, making them worthwhile for serious jewelry production.
Choosing Castable Resins and Materials
Three critical factors determine your casting success: resin formulation, burnout characteristics, and surface quality.
You’ll want castable resins specifically designed for jewelry applications, such as W20 Green, W40 Orange, and Jewelry Violet. These formulations deliver exceptional detail reproduction and smooth surfaces essential for your jewelry design.
Pay close attention to viscosity during your printing process—too thick hinders fine details, while too thin creates structural weaknesses.
Choose resins with low ash content that burn out cleanly, following manufacturer-specified burnout schedules to prevent casting defects.
Always clean your printed models with 95% isopropyl alcohol to remove uncured resin before post-curing.
Following manufacturer guidelines for mixing, curing, and burnout procedures guarantees ideal casting results and prevents costly failures in your final pieces.
Designing Jewelry Models for Optimal Casting Results
Your digital design directly impacts casting quality, making proper model preparation essential before sending files to the printer.
You’ll need professional design software like Rhino or Matrix to create precise jewelry designs that translate well into castable models.
Maintain a minimum 0.6mm wall thickness throughout your designs to guarantee structural integrity during the casting process.
Wall thickness below 0.6mm compromises casting integrity and can lead to structural failures in your final jewelry piece.
Add support structures for overhangs and delicate details to prevent print failures. Complex geometries impossible with traditional methods become achievable through CAD modeling.
Export your finished models in STL or OBJ formats, then check for mesh errors before printing.
You should plan finishing techniques like polishing and stone setting during the design phase, not after casting. This forward-thinking approach guarantees your final piece meets professional standards.
3D Printing Process and Best Practices
Once your digital model meets casting requirements, the 3D printing process becomes the essential bridge between your CAD design and physical jewelry piece.
You’ll use DLP 3D printing technology, which employs UV light to cure liquid photopolymer resin layer by layer, achieving remarkable detail with 25-micron resolution.
Before printing, verify your CAD software file is saved in STL or OBJ format and check for mesh errors.
Orient your model strategically to minimize support structures while maintaining that critical 0.6mm minimum wall thickness.
Post-processing is equally important—clean your printed piece thoroughly with isopropyl alcohol to remove uncured resin, then cure it under UV light.
This two-step post-processing guarantees your model reaches maximum hardness and preserves intricate details for successful casting integration.
Post-Processing and Cleaning Printed Models
When your printed jewelry model emerges from the DLP printer, it’s covered in uncured resin that must be completely removed before casting.
Fresh DLP prints require complete uncured resin removal through proper cleaning protocols before any casting operations can begin.
Start post-processing by submerging the model in 95% isopropyl alcohol and agitating it for several minutes. This cleaning process allows the solvent to penetrate crevices and eliminate liquid resin residue that could compromise your casting results.
After thorough cleaning, cure the model under a UV lamp following manufacturer specifications to solidify any remaining uncured resin.
Carefully remove support structures using precision tools like flush cutters or scalpels, taking care not to damage intricate details.
Inspect your model thoroughly and verify it’s completely dried and cured before proceeding to investment casting, as any remaining moisture or uncured material will cause complications during burnout.
Removing Supports and Preparing Models for Casting

Once you’ve cleaned and post-cured your 3D printed jewelry models, you’ll need to carefully remove supports without damaging intricate details.
You’ll then drill precise attachment holes and secure the models to wax sticks for proper handling during the casting process.
These critical preparation steps guarantee your models maintain their integrity and produce high-quality cast jewelry pieces.
Careful Support Removal Techniques
The delicate process of removing supports from your 3D printed jewelry model requires precision tools and careful technique to preserve intricate details that define your final piece. You’ll need specialized tools like the Sonic Saber to execute careful support removal techniques without damaging delicate features. Clean the 3D printed models with 95% isopropyl alcohol immediately after support removal to eliminate uncured resin residue.
| Tool Type | Purpose | Technique |
|---|---|---|
| Sonic Saber | Precision cutting | Gentle vibration cuts |
| Fine cutters | Support trimming | Close, controlled cuts |
| Sanding tools | Surface finishing | Light smoothing motions |
After cleaning, post-cure your models following standard procedures to enhance durability. Check that your model maintains a smooth surface throughout this process, addressing any imperfections before proceeding to investment casting.
Drilling Attachment Holes Properly
After completing support removal and cleaning, you’ll need to create a precise attachment point that connects your jewelry model to the sprue system during casting.
When drilling attachment holes, select a location that won’t compromise the ring’s structural integrity or design elements. Use a precision drill bit sized appropriately for your wax stick diameter—typically 1-2mm for most jewelry pieces.
Mark the drilling point clearly before beginning, making certain it’s positioned where it can be easily removed after casting. Drill slowly and steadily to prevent cracking or chipping the resin model. The hole depth should accommodate roughly half the wax stick’s diameter for secure attachment.
Before proceeding to wax attachment, clean the model thoroughly with 95% isopropyl alcohol to remove drilling debris. This preparation guarantees ideal adhesion during the casting process.
Wax Tree Assembly Methods
With your drilled attachment point ready, melt a small pool of wax around the hole’s perimeter to establish the foundation for your wax stick connection. This creates a secure grip that’ll anchor your model to the wax tree effectively. When casting multiple pieces simultaneously, proper wax tree assembly becomes critical for successful metal casting results.
Position each model strategically to optimize metal flow throughout the entire tree structure. Connect your wax models using heated wax sticks, ensuring each joint forms a solid bond without air gaps.
| Assembly Step | Temperature | Duration |
|---|---|---|
| Melt wax pool | 150°F | 30 seconds |
| Attach stick | 140°F | 45 seconds |
| Final check | Room temp | 2 minutes |
Inspect each connection thoroughly before proceeding to investment casting, as weak joints compromise the entire casting process.
Creating Wax Trees and Sprue Systems
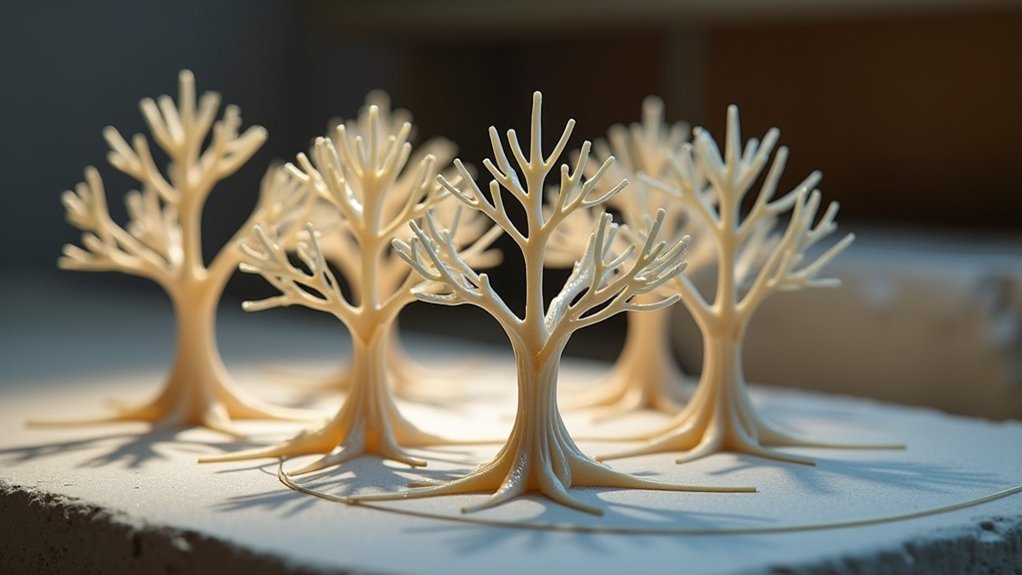
Once you’ve perfected your 3D printed wax models, you’ll need to create an efficient wax tree system that connects multiple pieces to a central sprue for simultaneous casting. This setup enhances both time and material usage during the casting process.
Start by drilling small holes in each wax model, then secure them to the central wax stick by melting wax around the connections. This creates a strong grip that’ll withstand the investment process.
Drill precise holes in wax models and melt wax around connections for secure attachment to the central sprue system.
Design your sprue system with strategically placed channels that facilitate ideal metal flow while minimizing air bubbles. Position the sprue away from your main pieces to prevent imperfections and guarantee efficient mold filling.
Balance multiple smaller models on a single wax tree to maximize investment material while considering overall weight distribution for effective casting.
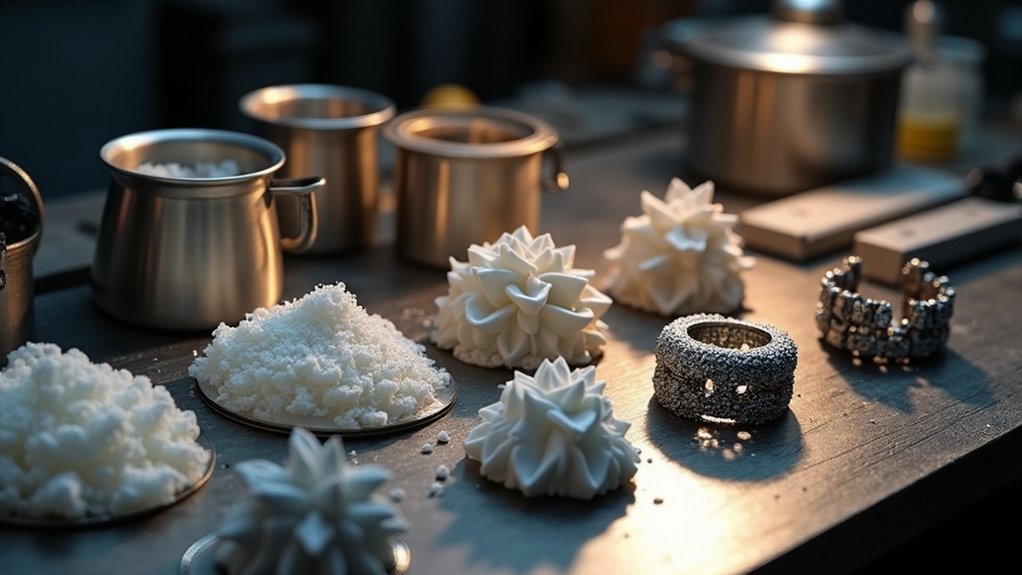
Investment Plaster Application and Vacuum Processing
Your completed wax tree now requires encasement in investment plaster to create the casting mold.
Begin by thoroughly mixing plaster powder with water until you achieve a consistent mixture. Pour this mixture into your mold tube, ensuring the wax tree is completely covered to prevent any air exposure that could compromise your models.
Investment plaster application demands precision timing. You’ll need to apply vacuum processing within two minutes of pouring to effectively eliminate air bubbles that can weaken your mold’s integrity.
Use a plastic cup during vacuum processing to catch overflow and maintain workspace cleanliness.
- Mix plaster thoroughly for consistent texture and strength
- Complete vacuum processing within 2 minutes to remove air bubbles
- Allow 20 minutes drying time before starting burnout process
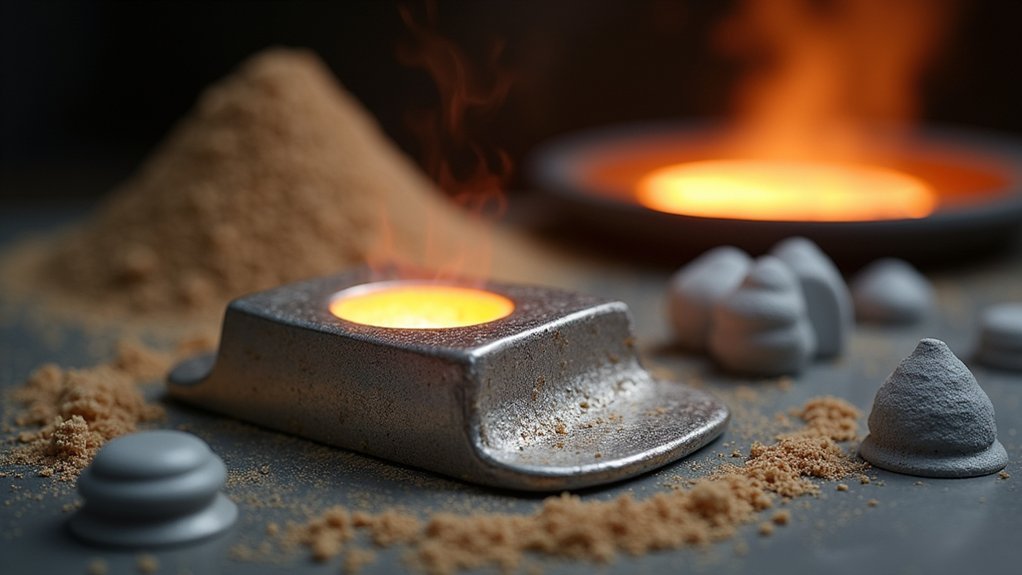
Burnout Schedule and Temperature Control
You’ll need to execute a precise three-stage burnout schedule to eliminate all wax from your investment mold while preserving its structural integrity.
The timing and temperature control methods you implement will directly impact whether your mold can withstand the molten metal pour without cracking or distorting.
Your mold preparation requirements depend on carefully monitoring each temperature change to achieve ideal casting conditions.
Optimal Temperature Stages
Since successful jewelry casting depends entirely on proper burnout scheduling, you’ll need to master three critical temperature stages that systematically eliminate wax while preserving mold integrity.
The burnout process starts at 150°C for 4.5 hours, gradually removing wax without shocking the investment material. Next, you’ll raise temperatures to 600°C for one hour, eliminating stubborn residual wax. Finally, heat to 750°C and maintain for four hours, achieving complete burnout and ideal mold hardness.
Accurate temperature control prevents cracking and distortion throughout these stages. Maintaining consistent heating rates is essential—rapid changes cause mold failure and compromise your final cast quality.
- Start low at 150°C to gently begin wax removal
- Progress to 600°C for thorough residual elimination
- Finish at 750°C for complete burnout and hardening
Timing Control Methods
While temperature stages form the foundation of successful burnout, precise timing control alters these stages into a foolproof system that consistently produces flawless molds.
Your timing control methods for investment casting require strict adherence to specific durations at each temperature phase. You’ll start with 4.5 hours at 150°C for moisture removal, then shift to 600°C for exactly one hour to burn out wax completely. The final stage demands four hours at 750°C to solidify your investment material fully.
During the burnout process, you can’t rush temperature increases—rapid changes cause mold cracking and failure. Complex or larger wax assemblies may need extended timing beyond the standard 6.5-hour cycle, so adjust accordingly for best results.
Mold Preparation Requirements
Proper mold preparation builds directly on your timing control foundation and requires meticulous attention to both burnout scheduling and temperature management.
The burnout process for investment molds follows a precise three-stage temperature progression that’s critical for successful casting outcomes.
You’ll start at 150°C for 4.5 hours to eliminate wax completely, then raise temperatures to 600°C for one hour of additional preparation.
Finally, increase to 750°C and maintain for four hours to fully cure your mold. Temperature precision prevents cracking and deformation that can compromise your final cast quality.
- Monitor temperature changes carefully to avoid thermal shock damage
- Maintain consistent heating rates throughout each burnout phase
- Check mold integrity before proceeding to metal pouring stage
Metal Selection and Melting Procedures
Although metal choice directly impacts your jewelry’s final appearance and durability, you’ll find that gold, silver, platinum, and brass each offer unique advantages for casting 3D printed pieces.
Your metal selection determines the melting process requirements, with gold needing approximately 1,064°C and silver requiring 960°C. You’ll need either a centrifuge or furnace to achieve these temperatures effectively.
Before pouring, you must preheat your mold to prevent thermal shock and guarantee smooth metal flow. This step’s vital for creating a flawless cast piece.
Once you’ve poured the molten metal, cool it quickly in water to reduce defects and maintain ideal structural integrity. Proper temperature control throughout the entire melting process guarantees your finished jewelry meets professional quality standards.
Centrifugal Casting Techniques
When you master centrifugal casting, you’ll harness rotational force to push molten metal into every intricate detail of your 3D printed jewelry molds. This technique spins your mold at high speeds, using centrifugal force to eliminate air pockets and create superior-quality castings.
You’ll find it especially effective for intricate designs and thin-walled pieces, as the force drives metal into fine details for smoother finishes.
Heat your mold before pouring to prevent premature solidification and improve metal flow. You can use this versatile process with gold, silver, and platinum, making it perfect for durable, detailed jewelry production.
- Monitor casting speed and temperature in real-time for consistent results
- Achieve exceptional detail reproduction in complex geometric patterns
- Produce professional-grade metal piece quality with minimal defects
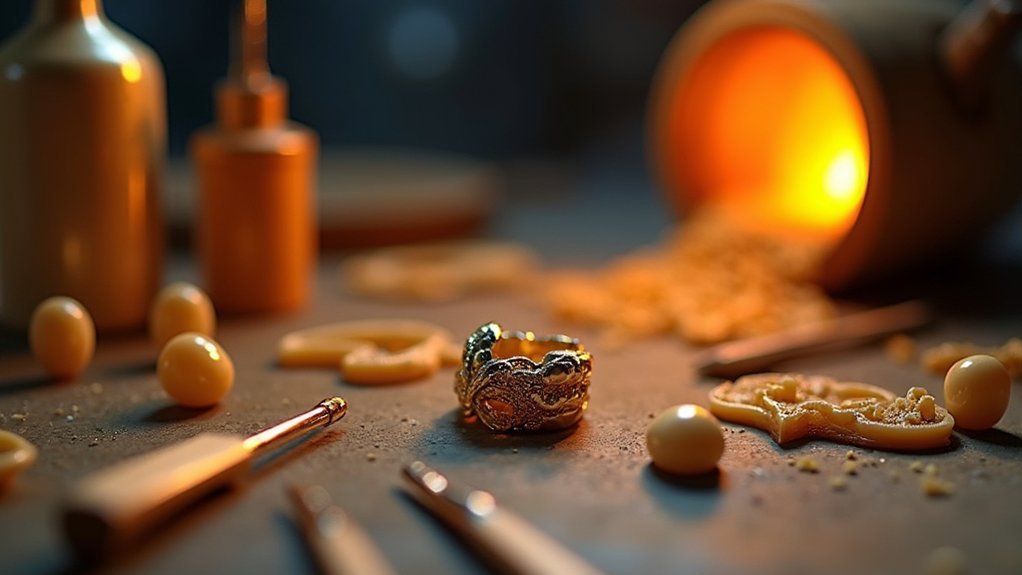
Finishing and Polishing Cast Jewelry Pieces
Once your cast jewelry emerges from the mold, you’ll need to transform the rough casting into a polished masterpiece through careful finishing techniques.
Start by using pliers to cut the ring from the metal tree, taking care not to damage the piece during removal. Next, file down any remaining supports and marks on your cast jewelry using a metal file to create smooth surfaces.
Begin polishing with coarse-grit sandpaper, gradually progressing to finer grits for maximum smoothness.
Apply jeweler’s rouge on a soft cloth or polishing wheel to achieve that coveted glossy finish that enhances your cast jewelry’s overall appearance.
Finally, inspect every surface to verify even polishing throughout, checking for scratches or imperfections before considering your finishing process complete.
Frequently Asked Questions
What Are the Typical Costs Involved in Setting up a 3D Jewelry Casting Operation?
You’ll need $5,000-15,000 for equipment including 3D printer, casting machine, burnout kiln, and investment materials. Additional costs include workspace setup, safety equipment, precious metals inventory, and ongoing consumables like resin and investment powder.
How Long Does the Entire Process Take From 3D Printing to Finished Jewelry?
Your entire process typically takes 3-5 days total. You’ll spend 6-12 hours printing, 2-4 hours burnout, 1-2 hours casting, then 4-8 hours finishing depending on complexity and your skill level.
What Safety Equipment and Ventilation Requirements Are Needed for Home Casting Setups?
You’ll need a respirator mask, safety glasses, heat-resistant gloves, and proper ventilation with an exhaust fan. Don’t cast indoors without adequate airflow—toxic fumes from burning resin and molten metal require serious protection.
Can Existing Traditional Jewelry Designs Be Easily Converted to 3D Printable Models?
You’ll need to redesign traditional jewelry pieces for 3D printing constraints. Most designs require modifications for proper support structures, wall thickness, and casting considerations, but the conversion process is straightforward.
What Are the Most Common Failures and How Can They Be Prevented?
You’ll face support failures from inadequate structures, layer adhesion problems from incorrect temperatures, and warping from poor bed adhesion. Prevent these by optimizing support placement, calibrating temperature settings, and ensuring proper first-layer adhesion.
In Summary
You’ve now mastered the complete process of casting 3D printed jewelry, from selecting the right printer and materials to achieving professional finishing results. Remember that consistent practice with burnout schedules and temperature control will improve your casting quality over time. Don’t rush the finishing process—proper polishing separates amateur work from professional pieces. With these techniques, you’ll create stunning cast jewelry that rivals traditional methods while benefiting from 3D printing’s design flexibility.


Leave a Reply