You’ve probably admired those intricate silver jewelry pieces with impossibly delicate wirework patterns, but you might not realize you’re looking at an ancient art form that’s remained virtually unchanged for centuries. Silver filigree jewelry making transforms simple wire into breathtaking miniature sculptures through a precise sequence of twisting, soldering, and assembling techniques. The process demands both artistic vision and technical mastery, requiring specific tools and methods that separate true artisans from casual crafters.
History and Origins of Silver Filigree Jewelry
Although silver filigree jewelry might seem like a modern artisan craft, this intricate metalworking technique actually traces back over 5,000 years to ancient Greece and Mesopotamia.
You’ll discover that skilled artisans in these civilizations first began creating delicate designs using thin precious metal threads, establishing the foundation for today’s filigree craftsmanship.
The term itself comes from Latin words “filum” (thread) and “granum” (grain), perfectly describing the technique’s delicate nature.
As you explore this unique history, you’ll find that silver filigree spread throughout the Roman Empire before flourishing in 12th-century Russia.
Today, regions like Mompox, Colombia continue this ancient tradition, creating nature-inspired patterns while incorporating modern tools alongside time-honored techniques.
Understanding the Filigree Technique and Materials
When you’re learning filigree, you’ll discover this ancient wire working technique transforms simple metal threads into breathtaking jewelry through precise manipulation and soldering.
You’ll work primarily with sterling silver or gold wires, each offering distinct properties that affect your design’s durability and appearance.
Your success depends on mastering specialized tools like draw plates, torches, and fine pliers that allow you to shape delicate 26-gauge wires into intricate patterns.
Ancient Wire Working Origins
Since precious metals first became accessible to ancient artisans, the art of wire working has captivated craftspeople across civilizations, with archaeological evidence revealing filigree techniques dating back over 5,000 years to Mesopotamian and Egyptian cultures.
You’ll discover that ancient craftspeople developed sophisticated methods for manipulating precious metal wires into intricate patterns, laying the foundation for today’s silver filigree work.
These early artisans understood how to twist and shape fine wires, creating delicate pieces that showcased their technical mastery.
The Latin etymology of “filigree” – combining “filum” (thread) and “granum” (grain) – reflects this ancient focus on thread-like constructions.
When you create modern silver filigree pieces, you’re continuing traditions that connect directly to these pioneering ancient metalworking techniques.
Metal Types and Properties
Silver stands as the cornerstone material for filigree jewelry, providing the perfect balance of malleability and strength that craftspeople need for intricate wirework.
You’ll typically work with fine silver wire in 26-gauge thickness, which can be twisted to create elaborate patterns and delicate structures.
While silver dominates this craft, you’re not limited to just one metal option.
- Fine silver provides exceptional workability and creates stunning white metal filigree designs
- Gold offers luxurious warmth and excellent corrosion resistance for premium pieces
- Copper delivers affordability and unique reddish tones for practice and artistic expression
- Brass combines durability with golden hues for decorative applications
- Traditional solders like vintage silver coins guarantee authentic joining techniques
Each of these precious metals brings distinct characteristics that’ll influence your final creation’s appearance and longevity.
Tools and Equipment Used
After selecting your preferred metals, you’ll need to assemble the specialized toolkit that makes filigree work possible.
Your most essential tools include a hand crank drill for twisting fine silver wire to achieve precise tightness and intricate design details. A rolling mill flattens metal bars into incredibly thin wires, reaching diameters as fine as 0.15 mm for delicate work.
Specialized filigree tweezers allow you to manipulate and position these fragile wires with exceptional precision, ensuring your detailed patterns come together perfectly.
You’ll also need specialized glue to secure backing materials during assembly before soldering begins.
Finally, a torch with a bushy flame provides controlled heat for soldering, enabling wire fusion while protecting your delicate filigree structure from overheating damage.
Preparing Silver Wire for Filigree Work
Before you can create stunning filigree patterns, you’ll need to properly prepare your silver wire through a series of vital steps.
Starting with 26-gauge round silver wire, you’ll begin preparing the wire by using a hand crank drill for twisting the wire to achieve the desired texture and tightness. This creates thin metal strips with enhanced aesthetic quality.
Next, annealing the twisted wire becomes essential for improving pliability and working properties. This heating process makes the wire easier to shape and manipulate during your filigree work.
Vital wire preparation steps include:
- Using 26-gauge round silver wire for ideal strength and flexibility
- Twisting with a hand crank drill for texture enhancement
- Annealing to improve pliability and working characteristics
- Flattening with a rolling mill for uniform diameter
- Ensuring proper preparation affects final jewelry quality
Creating Custom Filigree Solder
You’ll need to select the right historical coin for your custom solder, with Russian 50 Kopeks from 1924-1926 being a popular choice among artisans.
Start by rolling and cutting your chosen silver coin to increase its malleability before the melting process.
This careful selection and preparation creates the foundation for solder that’ll match your filigree work’s specific requirements.
Historical Coin Selection
When creating custom filigree solder, the specific Russian 50 Kopeks silver coin from 1924-1926 stands as the artisan’s preferred choice due to its excellent metal composition and exceptional malleability.
This historical coin selection transforms how filigree jewellery is made, providing superior results compared to modern sterling silver alternatives.
You’ll first roll and cut the coin thinner before melting it with copper to form a workable nugget.
The traditional approach to creating filigree jewelry demands this precise material selection for maximum craftsmanship.
- Russian 50 Kopeks coins contain perfect silver-to-alloy ratios for soldering
- Historical metallurgy provides superior malleability over modern alternatives
- Coin thickness requires rolling and cutting for proper preparation
- Copper addition creates ideal melting properties for nugget formation
- Traditional materials guarantee authentic filigree construction techniques
Metal Preparation Process
Once you’ve selected your 1924-1926 Russian 50 Kopeks coin, begin the metal preparation by rolling it through a mill to reduce thickness and increase malleability.
Cut the rolled silver into manageable pieces, then melt these alongside copper to create an alloy nugget. Shape this nugget and file it into fine metal shavings that’ll serve as your custom solder.
Mix these shavings with Borax to maintain cleanliness during the heating process. This prevents impurities from compromising your solder’s quality.
The metal preparation process guarantees your intricate wire designs can be soldered together precisely. When using this traditional filigree technique, you’ll achieve strong, secure connections that preserve the delicate aesthetic of your finished piece while maintaining structural integrity.
Melting and Rolling Silver for Wire Production
Before you can craft intricate filigree patterns, you’ll need to transform raw silver into the fine wires that form the foundation of your work. This melting process begins in a high-temperature crucible where raw silver becomes molten metal, then cools into manageable ingots.
Creating delicate filigree jewelry starts with melting raw silver in crucibles, transforming solid metal into molten material before cooling into workable ingots.
You’ll pass these ingots through rolling mill cylinders that rotate in opposite directions, reducing the metal’s thickness. Next, you’ll draw the rolled silver through drawplates and dies, creating wire as thin as 0.15 mm. Throughout this process, you must anneal the silver repeatedly to maintain its malleability.
- Melt raw silver at high temperatures in crucibles
- Cool molten metal into solid ingots for shaping
- Roll ingots through heavy rotating cylinders
- Draw wire through progressively smaller dies
- Anneal repeatedly to maintain silver’s workability
Finally, you’ll flatten the wire using rolling mills, ensuring your desired shape and quality for filigree work.
Drawing and Annealing Silver Wire
Drawing silver wire demands patience and precision as you pull thick silver bars through a drawplate’s series of progressively smaller holes.
You’ll continue this process until you achieve the desired thinness, often reaching as fine as 0.15 mm for delicate filigree work.
Annealing becomes essential after drawing, as you’ll need to heat the wire to specific temperatures that relieve internal stresses and enhance malleability.
This heating process makes your wire easier to manipulate for intricate designs.
For filigree jewelry, you’ll typically use 26-gauge round wire, which provides the perfect balance between strength and delicacy.
You’ll often repeat both drawing and annealing processes multiple times to maintain ideal flexibility and quality, preparing your wire for subsequent twisting and shaping into beautiful decorative patterns.
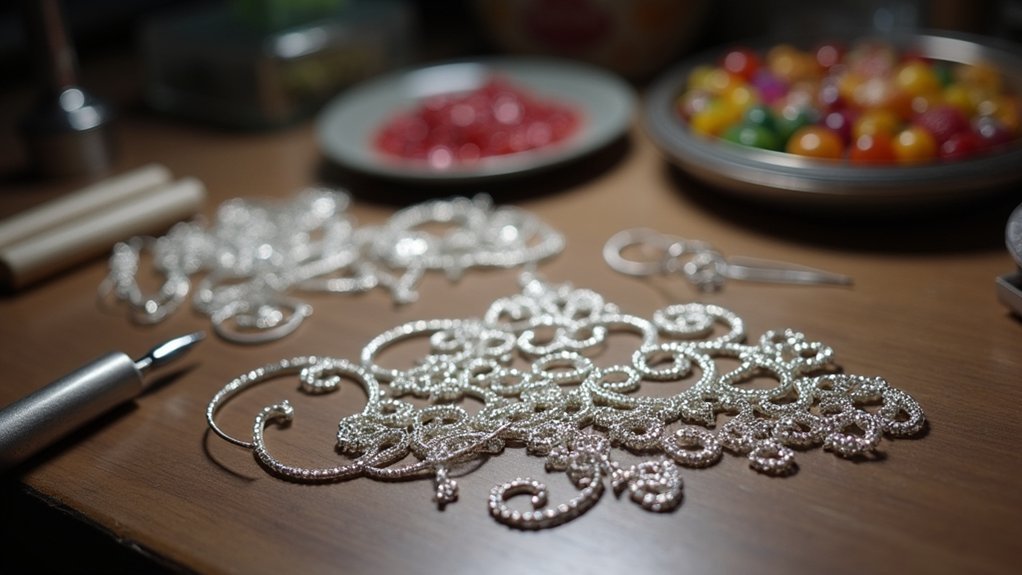
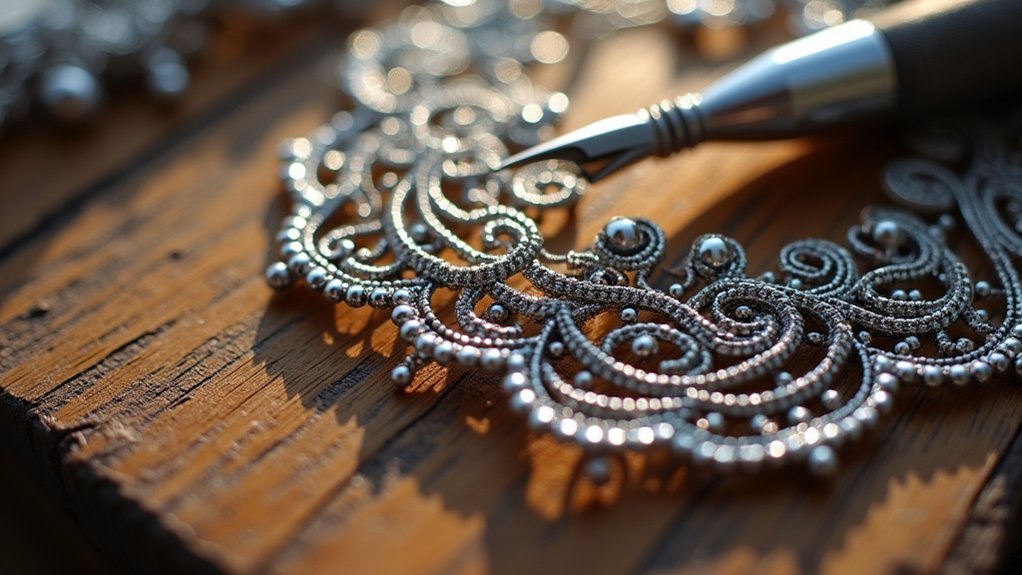
Twisting and Shaping Wire Into Patterns
Transform your carefully prepared silver wire into intricate patterns by securing it in a hand crank drill and rotating until you achieve the desired tightness and consistency. The twisting process creates the fundamental texture that defines filigree’s distinctive appearance.
Once you’ve achieved the proper twist, you’ll manipulate the wire through various shaping techniques including braiding, flattening, and careful positioning to form both openwork and closed designs.
Mastering wire manipulation through braiding, flattening, and strategic positioning transforms simple twisted elements into sophisticated openwork and closed filigree designs.
- Use precision tweezers to align twisted wire segments before soldering
- Create openwork patterns without backing for transparent, delicate effects
- Apply micro-soldering techniques when attaching wire to base structures
- Flatten certain sections to add dimensional variation to your patterns
- Anneal twisted wire multiple times to maintain ideal pliability during shaping
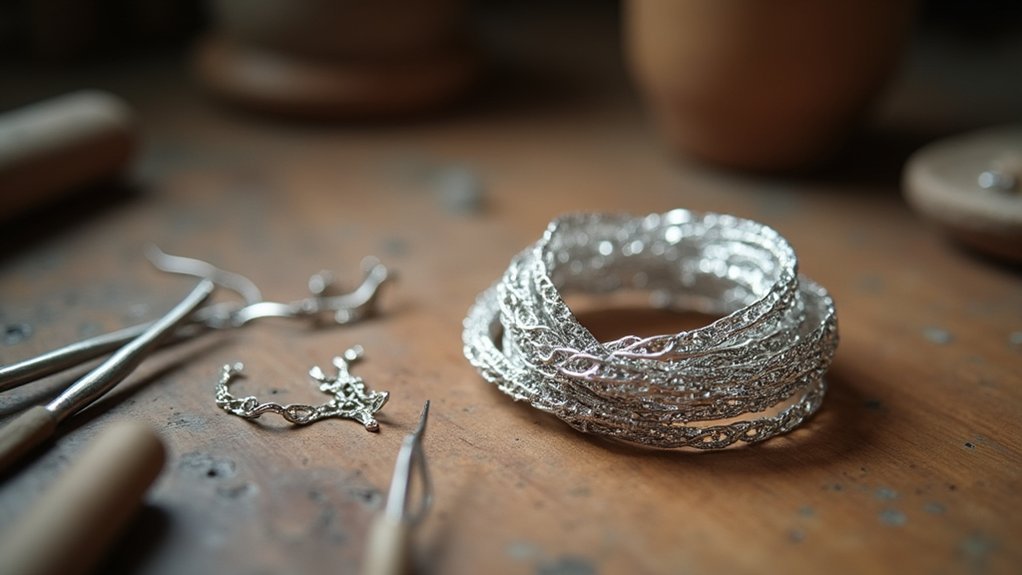
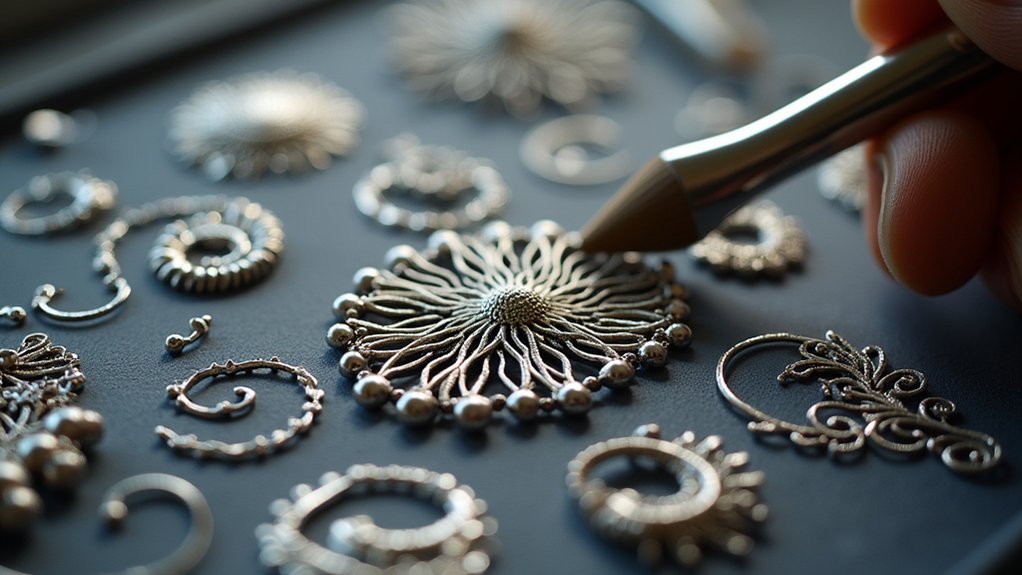
Assembling Filigree Elements and Framework
You’ll start by creating a steel tubing frame that outlines your jewelry’s shape, providing the structural foundation needed for intricate filigree work.
Next, you’ll use specialized tweezers to manipulate fine silver wire into detailed patterns, cutting and fitting each piece carefully to avoid open ends.
Before soldering, you’ll secure each wire element with glue to maintain your design’s integrity throughout the heating process.
Framework Construction Methods
Once you’ve prepared your filigree elements, creating a stable framework becomes the foundation that’ll support your entire jewelry piece.
You’ll start by gluing down burnable backing with special adhesive and rolling paper, providing essential support for delicate components during assembly. Steel tubing forms your main frame, ensuring structural integrity for intricate filigree work.
During design phases, you’ll meticulously cut and fit fine silver wire, avoiding open ends for seamless integration.
Secure wire elements with glue before final soldering, allowing necessary adjustments for precise fitting.
- Use burnable backing with rolling paper for temporary support
- Create main framework using steel tubing for stability
- Cut silver wire precisely to eliminate open ends
- Apply glue to secure elements before soldering
- Check alignment and fit before final assembly
Wire Assembly Techniques
Mastering wire assembly techniques requires precision and patience as you manipulate delicate silver elements into complex patterns.
You’ll start by gluing down a burnable backing that provides stability during construction. Steel tubing creates the framework used to create filigree structural support for your delicate wirework.
Two specialized tweezers enable careful manipulation of thin silver wire, allowing you to shape and position each element without leaving open ends. This process is methodical and time-consuming, requiring you to cut and fit each wire segment precisely.
You’ll guarantee clean connections without gaps that could compromise the integrity of your pieces of filigree jewelry.
Once you’ve secured the complete design with adhesive, you’ll prepare the assembly for soldering, where heat fuses all elements together permanently.
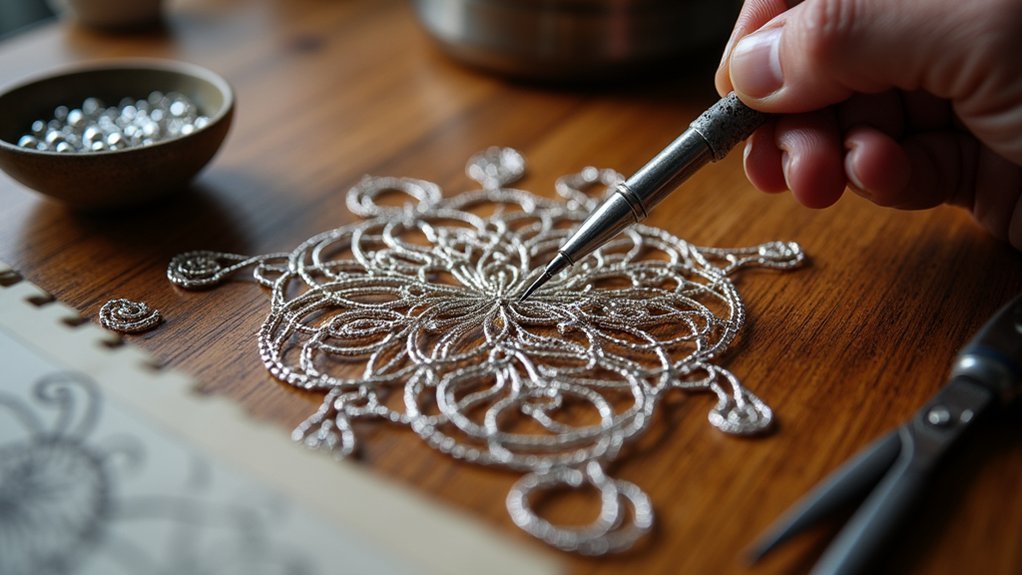
Soldering and Heating Techniques
The soldering process transforms your carefully assembled filigree components into a permanent, unified piece through precise heat application.
You’ll need to heat the piece with a torch until it reaches the proper soldering temperature, allowing the solder to flow and create strong bonds without damaging your intricate designs.
Before starting, gently burn off any rolling paper and glue from assembly. Use a bushy flame to distribute heat evenly and prevent overheating that could melt your delicate work.
- Always flip your filigree pieces during soldering to guarantee complete solder penetration
- Maintain consistent torch movement to avoid concentrated heat spots
- Watch for the telltale solder flow indicating proper bonding temperature
- Clean finished pieces in heated pickle solution for professional results
- Apply these finishing touches methodically for lasting durability
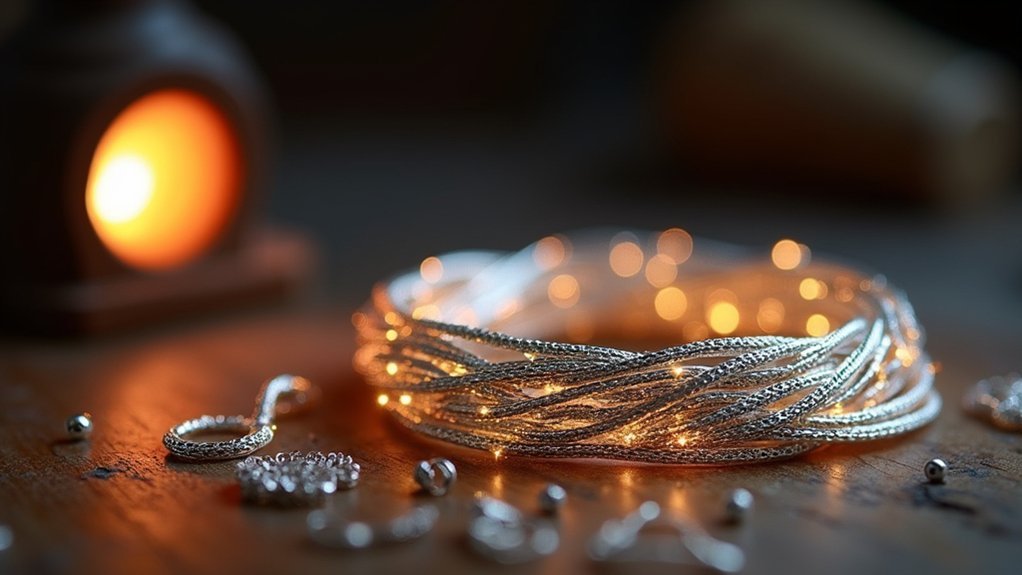
Finishing Touches and Polishing Methods
Having completed the soldering process, you’ll transform your silver filigree from a functional piece into a stunning work of art through meticulous finishing and polishing.
Begin your finishing touches by using a brush with pumice powder to clean the fine silver threads, removing any residual dirt and achieving an initial polish.
Next, thoroughly polish all surfaces using appropriate polishing methods to eliminate imperfections and create that refined, high-quality appearance.
For steel components, apply a patina to darken them, creating beautiful contrast against the bright silver filigree.
Once polishing is complete, apply a protective wax seal to prevent tarnishing and wear.
Finally, conduct a thorough inspection to verify quality and craftsmanship standards, ensuring your unique piece meets professional expectations.
Adding Gemstones and Final Assembly
With your filigree piece now beautifully polished and protected, you’re ready to elevate its elegance by incorporating gemstones and completing the final assembly.
Start by adding gemstones into pre-prepared spaces within your filigree structure, ensuring each stone achieves a secure fit. Next, attach essential components like clasps, earring studs, or chains through additional soldering or adhesive securing for maximum durability.
Place your assembled piece in heated pickle solution to eliminate oxidation and soldering residues. Conduct a thorough inspection checking alignment and confirming gemstones remain securely positioned.
Complete the process with final polishing to enhance shine and apply protective wax seal preventing tarnishment.
- Check gemstone alignment before final securing
- Use pickle solution for deep cleaning post-assembly
- Inspect all solder joints for strength
- Polish entire piece for consistent shine
- Apply protective coating for longevity
Frequently Asked Questions
What Is the Process of Silver Filigree Making?
You’ll start by preparing fine silver wire, then create custom solder, assemble pieces with backing and frames, carefully solder components together using controlled heat, and finish by polishing and applying patina for enhancement.
What Is the Filigree Technique of Jewelry?
You’ll create intricate jewelry designs by manipulating fine metal wires through twisting, coiling, and soldering. You’ll form delicate patterns using typically 26-gauge silver or gold wires, assembling them onto metal bases for stunning results.
Why Is Filigree so Expensive?
You’ll pay premium prices for filigree because it’s incredibly labor-intensive, requiring skilled artisans hours or days per piece. The precious metals, meticulous soldering process, and unique handcrafted nature all drive costs up considerably.
What Is the Difference Between Engraving and Filigree?
You’ll find engraving carves designs into metal surfaces by removing material, while filigree weaves thin metal threads into delicate, lace-like patterns without cutting away any material from the base.
In Summary
You’ve now mastered the intricate art of silver filigree jewelry making, from understanding its rich history to perfecting the final polish. You’ll find that each piece you create tells a unique story through twisted wire and delicate patterns. As you continue practicing these techniques, you’ll develop your own signature style while honoring this ancient craft. Your dedication to precision and patience will guarantee each creation becomes a treasured work of art.


Leave a Reply