You’ve probably admired handcrafted silver jewelry and wondered if you could create something equally stunning yourself. Silver clay opens up a world of possibilities that doesn’t require traditional metalworking skills or expensive equipment. With just a few basic tools and techniques, you’ll transform simple clay into genuine silver pendants that rival professional pieces. These ten projects will guide you from beginner-friendly pressed botanicals to intricate textured designs that’ll surprise you with their sophistication.
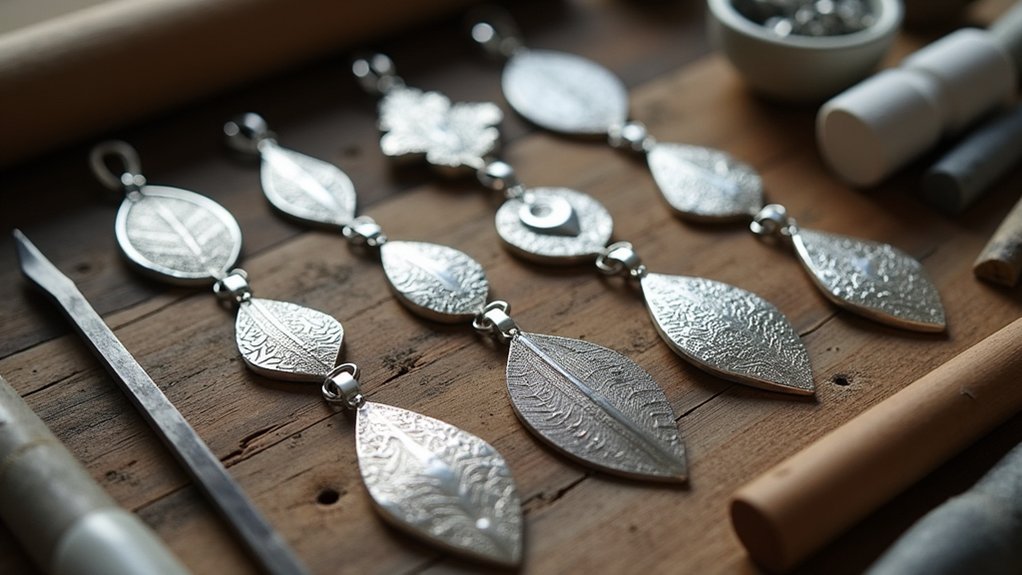
Pressed Leaf and Botanical Silver Clay Pendants

Three simple steps transform ordinary leaves into stunning silver clay pendants that capture nature’s intricate beauty.
Your first step involves gathering plants and creating detailed impressions using Sculpey clay as your base material. Apply a release agent, then use a clear acrylic roller to press chosen plants into the clay for sharp botanical details.
For intricate designs, you’ll create a second mold using two-part silicone compound that captures finer elements.
After assembling your silver clay pendants, air dry them completely before kiln firing. Treat finished pieces with liver of sulfur for a darkened finish that enhances botanical patterns.
Sand post-firing to create contrast by removing sulfur from raised areas, then tumble polish for smoothness before adding chains.
Embossed Flower Design Silver Clay Jewelry
Fresh flowers and delicate petals create stunning embossed designs that elevate your silver clay jewelry to gallery-worthy pieces.
You’ll start by gathering various plants and using Sculpey clay to press them into your silver clay for natural impressions. Use a clear acrylic roller to firmly press the plants into the Sculpey, ensuring details are well-defined for a beautiful embossed effect.
After forming your pendant shape, reinforce joints with water or silver clay paste before air drying and kiln firing.
Once fired, your pendant will appear unpolished. Darken it using liver of sulfur to enhance embossed flower details through contrast.
Finish by sanding high points to remove sulfur residue and achieve a polished look, then add a chain.
Heart Cutout and Geometric Silver Pendants
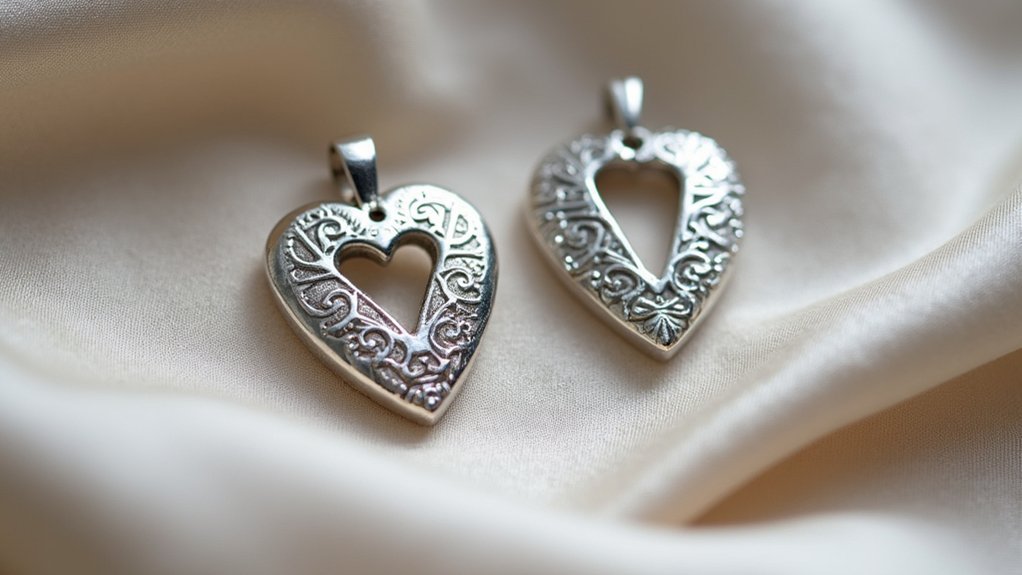
While floral designs showcase nature’s organic beauty, heart cutout and geometric silver pendants offer you the chance to explore clean lines and bold symmetry in your clay work. You’ll create heart cutouts by shaping silver clay into rounds, then using small heart-shaped cutters to remove centers for delicate designs that showcase skin beneath. For geometric pendants, roll Sculpey clay into various shapes using templates to guarantee precise cutting and clean lines.
| Design Type | Technique | Enhancement |
|---|---|---|
| Heart Cutout | Round base with heart removal | Layer different shapes |
| Geometric | Template cutting | Press plants for texture |
| Both styles | Kiln firing | Liver of sulfur darkening |
| Finishing | Tumble polishing | Enhanced shine and smoothness |
These techniques create striking contrasts highlighting intricate details.
Nature-Inspired Butterfly Wing Impressions
You’ll capture nature’s intricate beauty by pressing real butterfly wings into Sculpey clay to create detailed molds for your silver pendants.
Each wing species offers unique patterns and textures that’ll transfer into stunning impressions once you’ve carefully removed the wing and fired your piece.
The key’s preserving those delicate details through gentle handling and proper mold preparation before casting your silver clay.
Wing Pattern Molding
Since butterfly wings showcase nature’s most intricate patterns, they’re perfect subjects for creating stunning silver clay pendants that capture delicate beauty in metal.
You’ll need real butterfly wings or high-quality photographs for design reference. Start by flattening Sculpey clay and pressing the wing into it with even pressure to capture detailed impressions.
For superior results, create a two-part silicone mold that’ll preserve every intricate pattern and texture. This method produces more professional-looking impressions than simple clay pressing.
Once you’ve fired your silver clay pendant, treat it with liver of sulfur to enhance the design’s depth by darkening recessed areas.
Sand the high points for striking contrast, then polish the surface smooth. Finally, attach your chain and you’re ready to wear your nature-inspired masterpiece.
Delicate Detail Preservation
When working with butterfly wing impressions, the key to achieving museum-quality detail lies in your preparation and technique.
You’ll need to carefully position real butterfly wings on flattened Sculpey clay before transferring the pattern to silver clay. Use a clear acrylic roller to press wings into the clay, capturing every intricate vein and texture.
For consistent results across multiple pendants, create a secondary mold using two-part silicone compound.
Essential techniques for preserving delicate details:
- Apply gentle, even pressure when rolling to avoid tearing fragile wing structures
- Allow complete air drying before kiln firing to prevent detail distortion
- Use liver of sulfur after firing to darken recessed areas and highlight raised impressions
This careful approach guarantees your butterfly wing pendants showcase nature’s intricate beauty with professional-quality results.
Textured Tree Bark and Wood Grain Effects
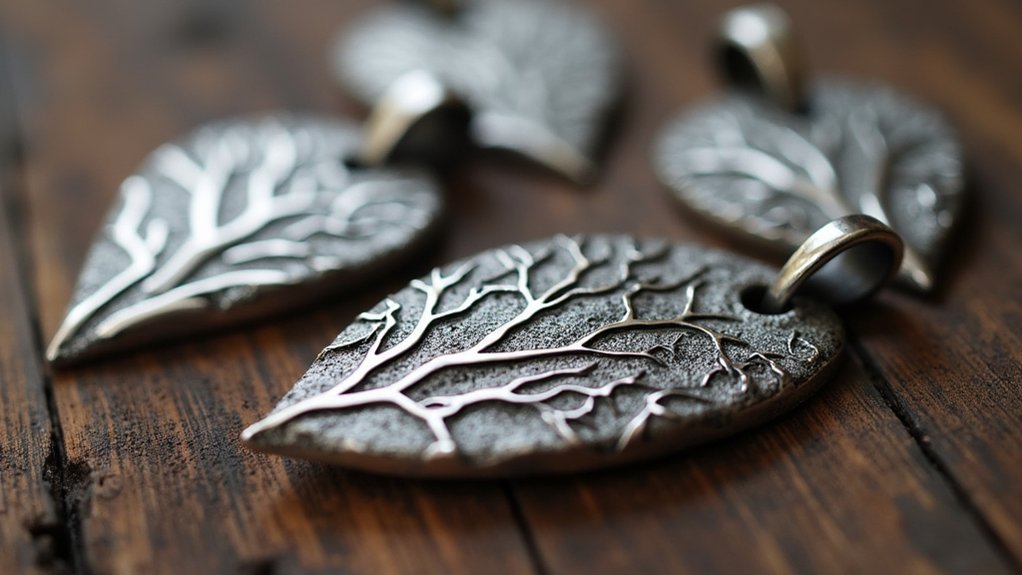
Nature’s intricate patterns offer endless inspiration for silver clay pendant designs, and capturing the rugged beauty of tree bark or the flowing lines of wood grain creates stunning organic jewelry pieces.
You’ll achieve detailed impressions by pressing actual tree bark or wood textures into your clay using a clear acrylic roller. Incorporate leaves or twigs to enhance the organic feel and add natural complexity to your design.
Create precise molds using two-part silicone compounds on intricately textured wood surfaces for future projects. Remember to account for shrinkage during firing when designing your pendant proportions.
After firing, apply liver of sulfur to darken textured areas, creating striking contrast that enhances the visibility of bark patterns and wood grain details.
Feather and Wing Pattern Silver Clay Designs
Feathers capture some of nature’s most delicate architectural details, making them exceptional templates for creating ethereal silver clay pendants with intricate textures and flowing lines.
You’ll want to gather real feathers or leaves as your molds, pressing them thoroughly into the clay to capture every delicate barb and vein. Start with Sculpey clay for practice runs since it’s affordable and captures textures beautifully before you commit to silver clay.
Experiment with pressing depths to create raised and recessed patterns that’ll catch light differently. After shaping your pieces, air dry them completely before kiln firing to preserve those intricate details.
- Use liver of sulfur finishing to darken recessed areas and highlight feather patterns
- Layer multiple feather impressions for complex, overlapping wing designs
- Combine feather textures with smooth surfaces for striking contrast effects
Seashell and Ocean-Themed Pendant Creations
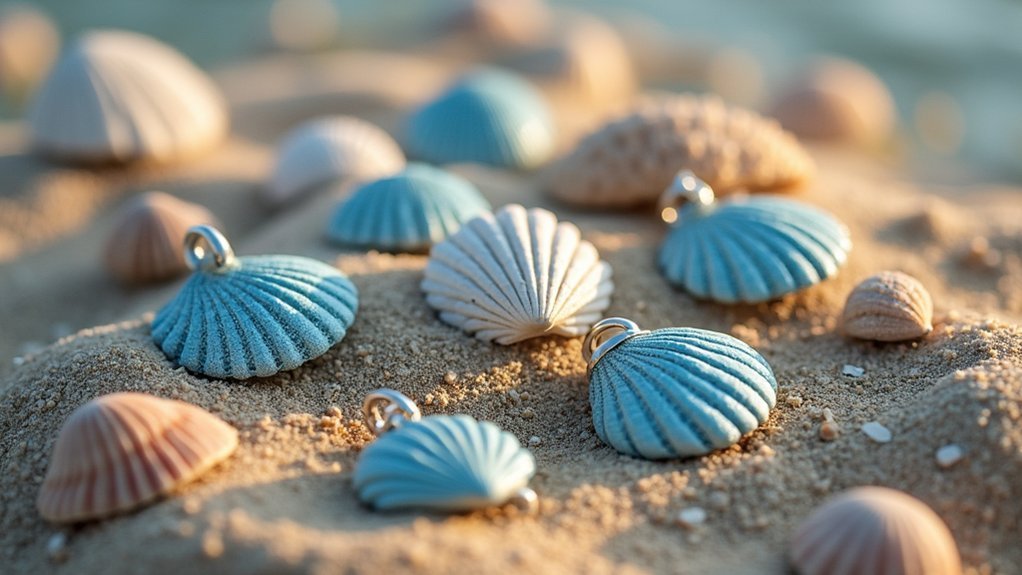
Three distinct textures define exceptional ocean-themed silver clay pendants: the ridged spirals of conch shells, the fan-like grooves of scallops, and the bumpy surfaces of sea urchins.
Ocean-inspired silver clay pendants come alive through three natural textures: conch spirals, scallop grooves, and sea urchin bumps.
You’ll achieve these textures by pressing real seashells directly into your clay before firing. Create custom molds using seaweed or coral to capture intricate natural details that machine-made tools can’t replicate.
Shape your pendants to mimic waves or shell forms, using templates that account for firing shrinkage.
After firing, apply liver of sulfur to darken the silver, creating dramatic contrast that emphasizes your raised designs. The darkened recesses will make textures pop beautifully.
Complete your ocean-inspired pendant with a simple chain or leather cord for a wearable piece that captures the sea’s natural beauty.
Lace and Fabric Texture Imprinted Pendants
You’ll discover that choosing the right lace materials makes all the difference in creating stunning texture imprinted pendants.
Press your selected fabric firmly into softened silver clay to capture every intricate detail and create deep, well-defined impressions.
The key lies in preserving those delicate fabric patterns while ensuring they translate beautifully into your finished silver piece.
Selecting Perfect Lace Materials
When creating lace-textured silver clay pendants, the foundation of your design lies in selecting the right lace materials. You’ll want to choose laces with varying patterns to create unique textures that’ll make your pendant stand out.
Different lace types offer distinct effects—embroidered lace provides bold, raised patterns while delicate lace creates subtle, intricate impressions.
Before using any lace, verify it’s completely clean and free from debris. Even tiny particles can interfere with pattern transfer, resulting in unclear impressions.
Test different lace weights and weaves on clay samples first to see how they’ll translate into your final design.
- Pattern variety: Mix geometric and floral lace patterns for dynamic visual interest
- Texture depth: Combine thick embroidered sections with fine mesh areas
- Scale consideration: Match lace pattern size to your pendant dimensions for maximum impact
Creating Deep Texture Impressions
With your lace materials chosen and prepared, the next step focuses on pressing these textures into your silver clay to achieve maximum depth and detail.
First, flatten your Sculpey clay to uniform thickness using a rolling pin. Apply a release agent to the clay surface—this prevents sticking and guarantees clean impressions.
Place your lace or textured fabric directly onto the prepared clay surface. Press firmly and evenly, experimenting with different pressure levels to discover unique patterns. The deeper you press, the more pronounced your final texture will be.
After firing your pendant, enhance the texture’s visual impact using liver of sulfur. This darkens recessed areas while keeping raised surfaces bright, creating dramatic contrast that highlights every intricate detail.
Preserving Delicate Fabric Details
Delicate fabrics require special handling techniques to capture their finest details without damaging the intricate patterns during the impression process.
You’ll need to flatten your Sculpey clay to the desired thickness first, then apply a release agent to prevent the fabric from sticking. Press your lace or fabric gently but firmly into the clay surface to transfer the texture.
- Use two-part silicone compound for intricate designs – This creates detailed molds that capture finer fabric textures better than direct impression
- Air dry completely before kiln firing – Rushing this step can cause cracking and loss of delicate imprinted details
- Apply liver of sulfur after firing – This darkens the silver and makes raised texture areas pop against the background
Miniature Landscape and Scene Pendants
Although traditional jewelry often features abstract or geometric patterns, miniature landscape and scene pendants offer you the chance to capture nature’s intricate beauty in wearable art. You’ll gather various plants and natural materials, arranging them thoughtfully for maximum visual impact. Press these elements into Sculpey clay to create detailed impressions that’ll become your silver pendant’s foundation.
| Design Type | Plant Materials | Texture Result |
|---|---|---|
| Forest Scene | Ferns, moss, twigs | Deep recesses |
| Garden View | Flower petals, leaves | Raised details |
| Mountain Vista | Pine needles, bark | Mixed textures |
| Coastal Scene | Seaweed, shells | Flowing lines |
Experiment with raised and recessed designs by varying your pressing technique. Air dry your assembled pendant thoroughly before kiln firing. Finally, darken with liver of sulfur and polish to enhance contrast between areas.
Abstract Pattern and Contemporary Silver Designs
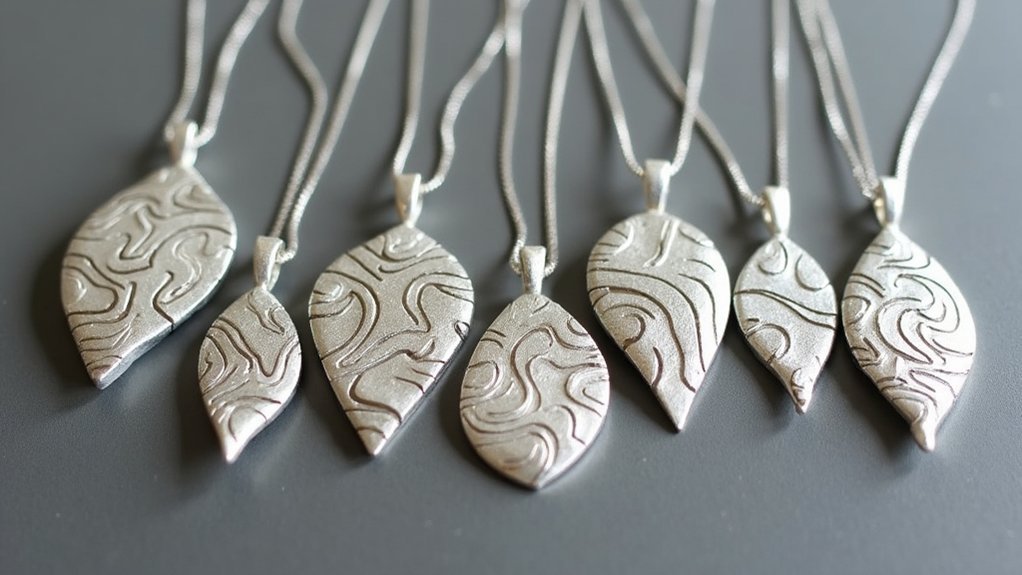
Moving beyond representational nature scenes, abstract patterns open up endless creative possibilities for your silver clay pendants.
You’ll discover that experimenting with plant textures pressed into Sculpey creates unique, intricate designs that highlight natural forms in unexpected ways. Contemporary silver designs shine when you incorporate raised and recessed impressions, providing striking depth and contrast.
Plant textures pressed into clay reveal nature’s hidden patterns, transforming organic forms into striking contemporary silver jewelry with unexpected depth and visual impact.
For more complex patterns, you can use two-part silicone molds that capture finer details and allow easy replication across multiple pendants.
Remember to account for shrinkage when creating templates for your firing process.
- Apply liver of sulfur during finishing to create darkened effects that accentuate your abstract patterns
- Use tumble polishing to achieve smooth finishes that elevate contemporary aesthetics
- Press various plant materials into temporary molds for organic texture inspiration
Frequently Asked Questions
Can You Use Silver Clay Without a Kiln?
Yes, you can use silver clay without a kiln. You’ll need a butane torch or stovetop method instead. Keep the flame moving evenly, monitor temperatures closely, and work in well-ventilated areas for safety.
Can You Set Sea Glass in Silver Clay?
You can set sea glass in silver clay by creating a bezel or mold that’ll hold it securely during firing. Clean the glass thoroughly first, then guarantee your clay’s thick enough to maintain integrity throughout the process.
What Are the Disadvantages of Silver Precious Metal Clay?
You’ll face higher material costs, 10-20% firing shrinkage affecting sizing, kiln requirements, steep learning curves for beginners, and additional finishing work that’s time-consuming and adds project complexity.
What Is the Binder in Silver Clay?
You’ll find the binder in silver clay is organic material that holds silver particles together during shaping. It burns away when you fire the clay, leaving pure silver behind.
In Summary
You’ve explored an amazing range of silver clay pendant possibilities, from delicate botanical impressions to bold geometric designs. With these ten projects, you’ll master essential techniques like texturing, firing, and finishing while creating truly personal pieces. Don’t be afraid to experiment with combining methods or adding your own creative twists. Each pendant you craft becomes a unique work of art that reflects your individual style and growing expertise.


Leave a Reply