
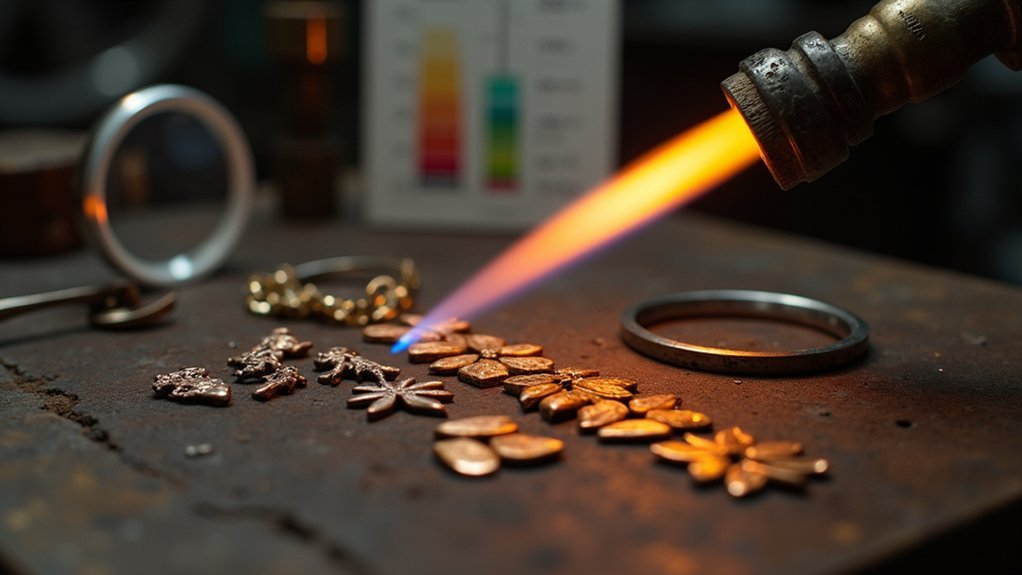
Annealing jewelry metals relieves internal stresses and restores ductility by heating to specific temperatures—silver at 590-650°C, gold at 650-700°C, and copper at 650-815°C. You’ll need a torch, soldering block, quenching container, and safety equipment. Heat your metal until it reaches a dull red color, then quench appropriately—water for silver and copper, oil for sensitive alloys. Follow with pickling to remove oxidation. Master these techniques to transform your metalworking results.
The Complete Jewelry Annealing Process Guide
Three essential stages define the annealing process that every jewelry maker should master.
These heat treatment processes—recovery, recrystallization, and grain growth—enhance your metal’s ductility and relieve internal stresses.
Through careful heat manipulation, metalworkers unlock strength and flexibility while eliminating tensions that would otherwise lead to breakage.
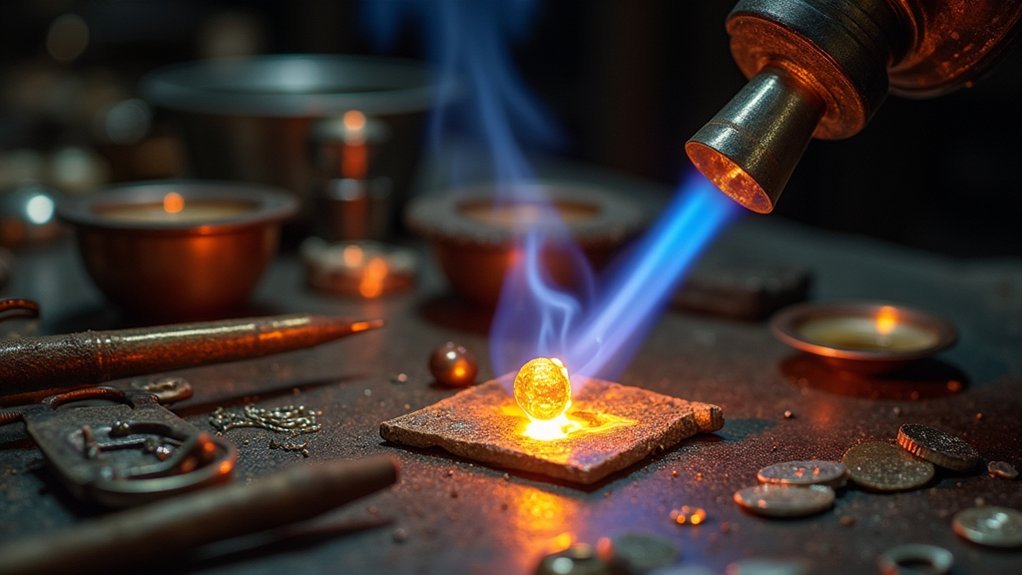
When you’re working with silver, heat it to 1100-1200°F (590-650°C) until it reaches a dull red color.
This temperature exceeds the recrystallization temperature, allowing the grain structure to reform and soften the metal for manipulation.
After heating, immediately quench your piece in cold water to lock in the relaxed state, then place it in a pickling solution to remove oxidation.
You’ll need proper tools: a torch, soldering block, and safety equipment.
This technique prevents cracking and allows you to create intricate designs that would otherwise break the metal.
The Science Behind Metal Annealing for Jewelry
As you heat your jewelry metal to annealing temperature, its crystalline structure reorganizes through recovery, recrystallization, and grain growth phases.
This molecular transformation relieves built-up stress from working the metal, returning hardened areas to a more stable state.
Your once-rigid metal becomes increasingly malleable, allowing you to continue shaping without the risk of cracks or breakage.
Crystal Structure Reorganization
When metalwork hardens from repeated hammering or forming, understanding the microscopic changes occurring within your jewelry materials becomes essential.
During annealing, your metal undergoes a transformative journey at the atomic level. This process begins around 50% of the metal’s melting point, triggering recrystallization where new, stress-free grains form as atoms gain mobility.
As you maintain the metal at high temperatures, the final phase—grain growth—allows atoms to rearrange into a more stable, lower-energy state. This reorganization of the crystal structure dramatically improves ductility while reducing hardness.
Different metals require specific temperatures: silver needs about 593°C, while copper and gold demand higher heat for proper reorganization.
Heat Stress Relief
The molecular structure of metal undergoes considerable strain during jewelry creation, making heat stress relief through annealing an essential technique in your workshop.
When you heat silver to 590-650°C, you’re allowing atoms within the material to reposition themselves, releasing tension accumulated during hardening processes.
- During heating, watch for the characteristic dull red color change that signals the ideal temperature for stress reduction.
- Proper cooling through quenching completes the process, enhancing ductility while preventing new stresses from forming.
- Regular annealing between working sessions prevents micro-fractures that compromise your piece’s integrity.
This controlled temperature cycle fundamentally transforms your metal’s workability.
Malleable Metal Transformation
Beneath every successful jewelry piece lies a fundamental scientific process that transforms rigid metal into workable art. When you heat silver to 590-650°C, you’re initiating a three-stage transformation that relieves internal stresses and increases ductility.
| Stage | Process | Temperature | Result |
|---|---|---|---|
| Recovery | Stress relief | Beginning of heat | Internal tensions release |
| Recrystallization | New grain formation | Dull red color | Stress-free structure |
| Grain Growth | Crystal stabilization | Maintained heat | Enhanced malleability |
| Cooling | Locking new structure | Controlled descent | Preserved ductility |
Proper temperature control throughout these stages guarantees your metal won’t crack during manipulation. You’ll know you’ve reached the ideal annealing point when silver shifts to that characteristic dull red glow—signaling the metal is ready for your creative vision.
Essential Tools and Equipment for Proper Annealing
Success in jewelry annealing depends entirely on having the right tools at your disposal.
The right tools aren’t optional luxuries—they’re the foundation of successful jewelry annealing.
During this heat treatment process, you’ll need heat sources like butane torches for small pieces or propane/oxygen systems for larger items to reach proper temperature ranges. Your soldering block provides the necessary support, preventing thermal shock while ensuring even heating.
- Temperature assessment tools such as pyrometers are vital for monitoring metal’s temperature without risking melting.
- Quenching containers filled with cold water allow for rapid cooling after heating, relaxing the metal structure.
- Safety equipment including heat-resistant gloves and eye protection protects you from burns and fumes.
Don’t underestimate the importance of these tools—they’re not just accessories but essential components that determine the quality and success of your annealing work.
Understanding Work Hardening in Precious Metals
When you repeatedly bend or shape precious metals, you’re disrupting their crystalline structure, causing dislocations to pile up and the metal to become increasingly resistant to deformation.
This work hardening process transforms your initially malleable gold or silver into a stiffer, more brittle material that’s prone to cracking under continued stress.
Understanding the balance between hardness and brittleness is essential, as it helps you recognize when to anneal your piece before it reaches the breaking point.
Metal Crystalline Structure
The molecular arrangement of precious metals reveals why they become difficult to work with over time. When you repeatedly manipulate silver or gold, dislocations accumulate within their crystalline structure, causing work hardening. This molecular stress makes your metal increasingly brittle and prone to breaking during complex designs.
Proper annealing techniques restore ductility by allowing atoms to reorganize themselves. For ideal results:
- Heat your silver to its ideal annealing temperature (590-650°C) to initiate crystalline restructuring
- Maintain precise temperature control throughout the process to prevent damage
- Allow sufficient time for complete molecular reorganization before cooling
Understanding this microscopic transformation explains why annealed metals become softer and more pliable. This knowledge lets you confidently create intricate jewelry pieces without fearing cracks or breaks from excessive hardening.
Stress Effects Analysis
Each time you manipulate your precious metal, you’re actually creating microscopic damage at the molecular level. This work hardening process increases hardness while simultaneously reducing ductility and flexibility, making your silver or gold increasingly brittle and prone to cracking.
As you continue bending, hammering, or shaping, the metal’s crystalline structure becomes progressively distorted, altering the physical properties of the material. Without intervention, these internal stresses accumulate, severely limiting further workability.
Annealing effectively counters these effects by heating the metal to its critical temperature—about 1100°F for sterling silver. This controlled heating allows the crystalline structure to reorganize and relieve internal stresses, restore ductility and reduce hardness to ideal levels.
Without proper annealing, your jewelry pieces may snap unexpectedly during the creation process.
Hardness vs. Brittleness
Understanding the relationship between hardness and brittleness provides essential insight for jewelry makers working with precious metals. As you manipulate metals like sterling silver through hammering or bending, you’re causing work hardening—a process that increases hardness while reducing ductility.
This crystalline structure change creates a stronger but more brittle material that’s prone to snapping when pushed beyond its limits.
- Work hardening occurs gradually as you shape your metal, creating dislocations that restrict molecular movement.
- A harder metal isn’t always better—increased brittleness means your piece becomes more vulnerable to fracturing under stress.
- Regular annealing (heating sterling silver to approximately 1100°F) resets the metal’s structure, restoring workability.
Recognizing when your metal needs annealing helps you maintain the perfect balance between strength and flexibility throughout your jewelry-making process.
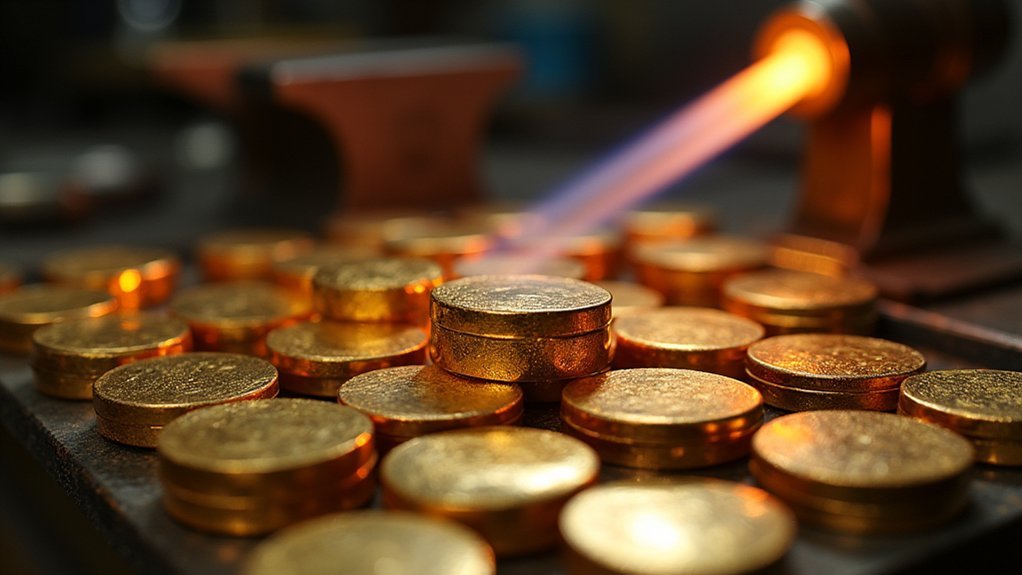
Annealing Temperatures for Different Jewelry Metals
When working with various metals in jewelry making, you’ll need to apply specific temperature ranges to achieve proper annealing results. This heating to a temperature reduces hardness while increasing ductility and workability of your materials.
Silver requires the lowest range at 590-650°C (1100-1200°F), making it easier to manipulate after proper heating.
Brass needs even less heat, annealing effectively between 427-482°C (800-900°F).
Bronze falls in the middle, requiring 538-650°C (1000-1200°F) for ideal softening.
For higher temperature metals, copper demands 650-815°C (1200-1500°F), while gold alloys typically need 650-700°C (1200-1300°F).
Yellow, green, and red gold varieties specifically require around 677°C (1250°F) for a period of 10 minutes to achieve the perfect annealing state.
Step-by-Step Annealing Process for Silver Jewelry
Silver jewelry requires a precise annealing technique to maintain its integrity while making it workable for your creative process.
Proper heating and cooling cycles relieve internal stresses, transforming rigid metal into a material that’s ready for your artistic vision.
To successfully anneal your silver pieces:
- Heat your silver evenly on a soldering block until it reaches a dull red color (1100-1200°F), indicating it’s ready for the changes in the material’s structure to begin.
- Wait until the silver darkens to black before quenching in cold water, making it softer and more pliable.
- Immerse in a pickling solution for 5 minutes to remove oxidation and flux, preparing it for further work.
Test your annealing by gently bending the metal—properly annealed silver should feel malleable without cracking.
Mastering the Annealing Process for Gold and Platinum
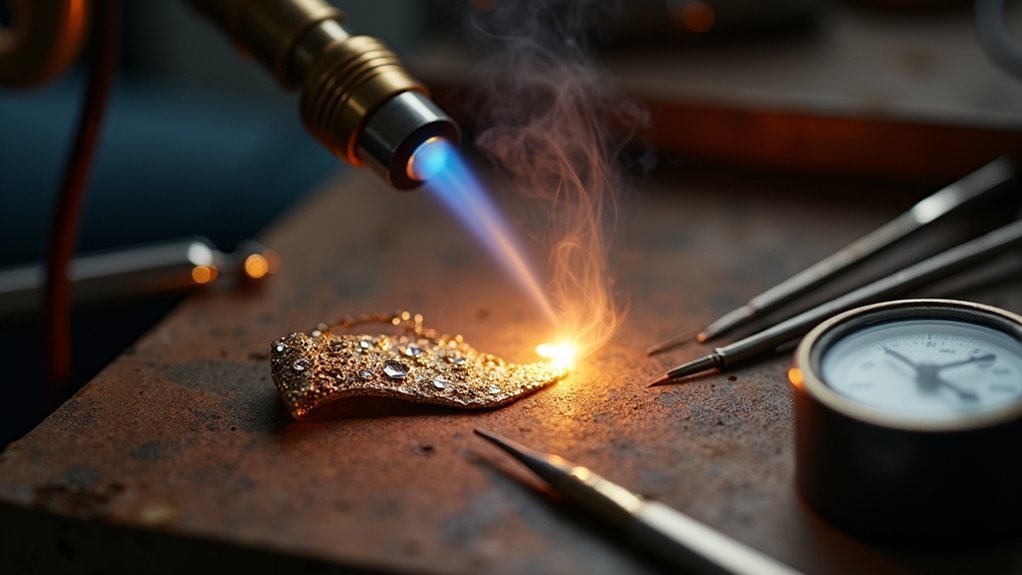
While silver responds well to straightforward annealing techniques, gold and platinum demand more precise temperature control and timing.
Gold alloys require temperatures of 1200-1300°F (650-700°C) for approximately 10 minutes before quenching to relieve internal stresses effectively. Watch carefully, as over-annealing can trigger grain growth stage, diminishing strength.
Platinum requires higher temperatures, reaching a bright orange color at about 1800°F (982°C). Unlike gold, you can air-cool platinum after heating, offering greater control over the process.
Both metals experience improved electric conductivity and enhanced ductility when properly annealed.
The process of annealing these precious metals enables intricate jewelry fabrication without compromising material integrity.
Mastering these temperature and timing parameters will help you create flawless pieces while maintaining the ideal working properties of your gold and platinum.
Quenching Techniques and Their Effects on Metal Properties
After annealing your jewelry metals, you’ll need to select the appropriate quenching technique to achieve your desired material properties.
Water immersion provides rapid cooling that’s ideal for silver and copper, while oil quenching offers a gentler progression that prevents warping in more sensitive alloys.
For complex pieces with varying thicknesses, you might consider selective cooling methods where different areas cool at controlled rates to maintain structural integrity while optimizing workability.
Quenching Techniques and Their Effects on Metal Properties
Once you’ve heated your metal to the proper annealing temperature, quenching becomes the critical next step that locks in the desired properties. The cooling rate directly impacts your metal’s final characteristics, with different quenching media producing varied results:
- Water provides the fastest cooling, creating softer, more malleable metal—but beware of thermal shock in high-carbon alloys.
- Oil quenching slows the process, reducing warping and cracking risks for sensitive materials.
- Air cooling offers the gentlest shift for highly reactive metals.
After quenching, you’ll notice your metal becomes noticeably softer and easier to manipulate.
Don’t skip the pickling process afterward—this acid bath removes oxides and flux residues that could compromise your piece’s appearance and longevity, leaving you with clean metal ready for further working.
Water vs. Oil Immersion
Choosing between water and oil immersion for quenching your jewelry pieces markedly impacts the final metal properties and workability. Water quenching offers rapid cooling rates that create finer grain sizes and increased hardness, while oil immersion quenching provides a gentler shift with reduced risk of thermal shock.
| Property | Water Quenching | Oil Immersion Quenching |
|---|---|---|
| Cooling Rate | Very rapid | Moderate |
| Risk of Cracking | Higher (especially high-carbon) | Lower |
| Grain Structure | Finer grains | Coarser grains |
| Residual Stress | Greater | Reduced |
| Best For | Aluminum alloys | High-alloy steels |
When working with precious metals, consider that water’s aggressive cooling can induce unwanted stress in your pieces. For delicate or intricate jewelry designs, you’ll often find oil’s more controlled cooling preserves mechanical properties while minimizing distortion—particularly important when finishing heirloom-quality work.
Selective Cooling Methods
Beyond the basic water versus oil decision, selective cooling methods offer jewelers precise control over specific areas of their pieces, allowing for customized hardness patterns within a single item.
When heating a metal to its annealing temperature, you can manipulate its grain structure through targeted quenching techniques.
- Partial immersion: By submerging only specific sections of your piece, you create varying material properties across the item—useful for pieces needing both flexibility and rigidity.
- Gradient cooling: Using directed airflow to create changeover zones between quenched and slow cooling areas preserves surface appearance while offering functional benefits.
- Selective masking: Applying heat-resistant compounds to areas you want to cool more slowly creates intentional hardness variations without multiple heating cycles.
Timing remains critical—each technique must be executed while the metal maintains its ideal temperature.
Pickling Solutions and Post-Annealing Treatment
After your silver piece undergoes the intense heat of annealing, it’ll require proper cleaning to remove oxidation and flux residues that inevitably form during the process.
A pickling solution, typically composed of 10-20% diluted hydrochloric or sulfuric acid, effectively dissolves these unwanted surface layers.
Submerge your work for 5-10 minutes in the pickling solution until the silver regains its shine. Watch the process carefully to avoid over-etching the metal.
Once complete, immediately rinse the piece thoroughly in clean water to neutralize the acid and prevent damage to your silver’s surface.
Always wear protective gloves and eye protection when handling these acidic solutions.
This post-annealing treatment is essential for preparing your silver for the next stages of your jewelry-making process.
Common Annealing Mistakes and How to Avoid Them
While proper post-annealing cleaning prepares your metal for further work, recognizing common mistakes can save you considerable time and frustration.
Annealing requires precision—exceeding the critical temperature causes grain growth and brittleness, while skipping the treatment entirely leads to cracking during shaping.
- Always quench promptly after heating to prevent internal stresses from reforming; slowly cooling negates annealing benefits and compromises workability.
- Apply heat uniformly across your piece to prevent stress concentrations and localized work hardening that can ruin intricate designs.
- Never skip the pickling solution after heating, as remaining oxidization affects both appearance and corrosion resistance of your metal.
Careful temperature monitoring and consistent heating technique will greatly improve your results and extend the life of your jewelry pieces.
Frequently Asked Questions
What Is the Annealing Process in Jewelry?
Annealing in jewelry is when you heat metals like silver to 1100-1200°F until they glow red, let them blacken, then quench them in water to restore pliability after work hardening.
What Are the Steps of the Annealing Process?
To anneal jewelry, you’ll heat the metal to relieve internal stresses (recovery), raise temperature for recrystallization, maintain heat for grain growth, then cool it gradually to prevent new stresses from forming.
How Long Should I Keep Copper in the Annealing Process for Jewellery Making?
You should keep copper in the annealing process for 10-15 minutes at 1200-1500°F. Don’t exceed this time as over-annealing can cause grain growth that reduces your metal’s workability and strength.
Do You Quench Sterling Silver After Annealing?
Yes, you should quench sterling silver after annealing. Immerse it in cold water when it reaches a dull red color to rapidly cool the metal, relieve internal stresses, and maintain workability for your jewelry making.
In Summary
Mastering the annealing process will transform your jewelry making. You’ll create more precise pieces with fewer frustrations when you understand the science, use proper techniques, and avoid common pitfalls. Whether you’re working with gold, silver, or platinum, proper annealing creates stability and workability in your metals. Remember, patience during heating and cooling pays off in the professional quality of your finished jewelry pieces.


Leave a Reply