
You’ll accelerate your Matrix CAD workflow by mastering the parametric history tree for instant design revisions, optimizing gemstone libraries for precise placement, and utilizing smart templates for consistent ring shanks. Focus on advanced prong setting techniques with automated placement tools, boolean operations for complex geometry, and rendering presets for photorealistic visualization. Don’t forget keyboard shortcuts like Ctrl+Z for efficiency, custom stone cutting tools, assembly features for multi-component designs, and proper wall thickness settings for 3D printing. These fundamental techniques will reveal Matrix Gold’s full potential.
Mastering the Parametric History Tree for Efficient Design Modifications

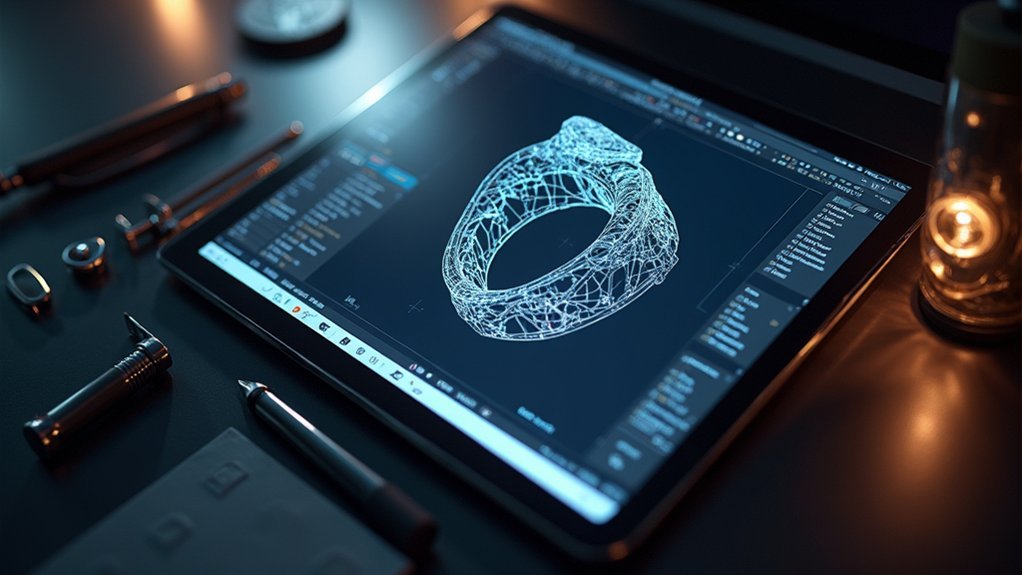
One of Matrix Gold’s most powerful features is its Parametric History Tree, which fundamentally changes how you approach design modifications. This chronological display tracks every action you’ve taken during your design process, creating a roadmap of your creative decisions. You can easily identify specific features or components that need revision without hunting through complex menus.
The real power lies in your ability to reorder or delete actions within the Parametric History Tree. This streamlines your workflow by eliminating unnecessary steps and optimizing your design path.
You’ll find yourself iterating through different options rapidly, making prototyping and experimentation more efficient than ever before. Master this tool, and you’ll reveal Matrix Gold’s full potential for improved design outcomes.
Optimizing Gemstone Libraries for Accurate Placement and Sizing
While the Parametric History Tree manages your design workflow, MatrixGold’s gemstone libraries handle the precision and accuracy of your stone placement. You’ll streamline your design process by utilizing pre-defined gemstone libraries to select and place stones consistently. Keep your libraries current by regularly updating them with the latest cuts, sizes, and shapes to match market trends.
| Library Feature | Benefit | Best Practice |
|---|---|---|
| Pre-defined stones | Consistency & efficiency | Use for standard placements |
| Custom measurements | Design flexibility | Add unique stone attributes |
| Automatic adjustments | Perfect prong fitting | Utilize placement tools |
| Dimension verification | Prevents misalignment | Check settings before finalizing |
| Updated collections | Market relevance | Refresh libraries quarterly |
Implement precise measurement tools to verify gemstone dimensions against settings, and customize your gemstone libraries by adding specific attributes for unique stones.
Streamlining Ring Shank Creation With Smart Template Usage
Building upon your optimized gemstone workflow, you’ll accelerate ring shank creation by leveraging MatrixGold’s smart template system. These templates standardize your shank designs while enabling quick modifications for consistent results across projects.
MatrixGold’s smart templates revolutionize ring shank creation, delivering standardized designs with instant customization capabilities for consistent professional results.
You’ll implement parametric features that dynamically adjust dimensions and profiles, allowing efficient customization for different client specifications. Use MatrixGold’s built-in tools to modify shank thickness, width, and profile shapes directly within templates.
This CAD approach streamlines your entire design process. Save frequently used configurations as templates to eliminate repetitive setup tasks for new ring shank projects.
MatrixGold’s realistic rendering capabilities let you visualize final designs effectively, ensuring clients see proposed modifications before production begins. This workflow reduces design time considerably while maintaining professional quality standards.
Advanced Prong Setting Techniques for Professional Results
You’ll achieve professional-quality prong settings by mastering MatrixGold’s automated placement tools that position prongs with mathematical precision around any stone shape.
The software’s parametric modeling capabilities let you adjust prong dimensions and angles instantly, ensuring perfect stone alignment regardless of whether you’re working with rounds, ovals, or fancy cuts.
These dynamic commands eliminate guesswork and create consistent results that maintain both security and visual appeal in your finished pieces.
Automated Prong Placement
When precision meets efficiency in jewelry design, MatrixGold’s automated prong placement feature transforms how you approach gemstone setting. You’ll quickly position gemstones with exceptional accuracy while reducing manual adjustment time and ensuring uniform settings across your designs.
The parametric modeling system lets you dynamically customize prong shapes and sizes to match various gemstone cuts. You can rely on automatic calculations that determine ideal prong thickness and length based on your gemstone’s specifications, enhancing both structural integrity and aesthetic appeal.
Preview your prong settings through realistic rendering before production, allowing adjustments that meet client expectations. This automated prong placement process streamlines your workflow while minimizing manual placement errors, delivering consistently higher quality in your finished jewelry pieces.
Precision Stone Alignment
Advanced prong setting demands more than automated placement—it requires meticulous stone alignment that transforms good designs into exceptional jewelry.
You’ll need MatrixGold’s CAD software tools to create accurately sized prongs matching your gemstone dimensions precisely. Use the “Align” command to center each stone and guarantee even spacing, which enhances both visual appeal and security.
Create prong profiles that match stone contours by designing in Rhino and importing into MatrixGold for superior alignment accuracy.
Regular practice with 3D modeling and rendering helps you visualize final products and make adjustments before production, preventing expensive errors.
MatrixGold’s simulation features let you test prong setting integrity under various conditions, guaranteeing stones remain securely positioned throughout their lifetime.
Utilizing Boolean Operations for Complex Jewelry Geometry
You’ll find Boolean operations are your most powerful tools for creating intricate jewelry designs that would be nearly impossible to achieve through traditional modeling methods.
When you master Boolean Union techniques, you can seamlessly combine multiple geometric elements to build complex forms like ornate settings, decorative flourishes, and interconnected structural components.
These operations transform simple shapes into sophisticated jewelry geometry by allowing you to add, subtract, and merge elements with mathematical precision.
Boolean Union Techniques
Although jewelry design software offers numerous modeling tools, Boolean Union stands as one of the most powerful techniques for creating complex geometries in Matrix Gold.
You’ll find this operation particularly valuable when designing intricate rings and pendants where multiple components must merge seamlessly.
To execute Boolean Union effectively, access the ‘Boolean’ menu where you’ll discover Union, Difference, and Intersection options.
Remember that your objects must properly intersect before attempting the operation—otherwise, you’ll encounter failures or unexpected results.
The key to success lies in precise modeling.
When you master Boolean Union techniques, you’ll greatly enhance your efficiency and creativity.
You can rapidly prototype designs and make iterative adjustments without restarting your entire project, streamlining your workflow considerably.
Complex Geometry Creation
Beyond basic union techniques, Boolean operations reveal the full potential for creating sophisticated jewelry geometries that would prove nearly impossible through traditional modeling methods alone.
You’ll discover that combining multiple operations transforms simple shapes into intricate masterpieces.
Advanced Boolean Strategies:
- Layer subtract operations to carve detailed filigree patterns and openwork designs in bracelets and pendants.
- Chain intersection commands to generate custom gemstone settings that perfectly conform to unique stone shapes.
- Alternate union and subtract sequences to build complex multi-level ring architectures with integrated prong systems.
- Combine all three operations to craft elaborate chandelier earring components with interlocking geometric elements.
These Boolean operations dramatically reduce modeling time while expanding your creative boundaries, enabling you to tackle previously challenging design concepts with confidence.
Keyboard Shortcuts That Accelerate Your Modeling Workflow
Mastering keyboard shortcuts transforms your MatrixGold modeling workflow from a series of time-consuming menu clicks into fluid, efficient design sessions.
You’ll immediately notice the difference when using “Ctrl + Z” to quickly undo actions instead of hunting through menus. Essential keyboard shortcuts like “Ctrl + C” and “Ctrl + V” streamline copying and pasting elements during model adjustments.
Transform hours of menu navigation into seconds with essential shortcuts that keep your creative momentum flowing uninterrupted.
Press “F2” to instantly rename objects, keeping your complex designs organized without interrupting your creative flow. You can customize shortcuts for frequently used commands, tailoring MatrixGold to match your specific modeling style and preferences.
These time-saving techniques eliminate repetitive tasks, allowing you to focus on intricate details and creative elements.
Your productivity will improve dramatically as keyboard shortcuts minimize workflow disruptions.
Leveraging Rendering Presets for Photorealistic Material Visualization

Once you’ve streamlined your modeling workflow with keyboard shortcuts, MatrixGold’s rendering presets transform your designs into stunning photorealistic visualizations with just a few clicks.
These rendering presets eliminate hours of manual material adjustments by providing optimized settings for lighting, shadows, and reflections. You’ll instantly visualize various textures like gold, silver, and gemstones with professional quality that impresses clients and stakeholders.
Key advantages of rendering presets:
- Real-time previews – View material changes instantly during design modifications
- Seamless texture application – Apply complex materials without technical expertise
- Customizable settings – Adapt presets to match specific project requirements
- Professional output quality – Deliver high-end visualizations that enhance presentations
You can customize these presets further while maintaining efficiency, creating the perfect balance between speed and creative control in your material visualization workflow.
Creating Custom Stone Cuts and Cabochons With Precision Tools
When you’re designing unique jewelry pieces, mastering stone cutting techniques and cabochon shaping methods in MatrixGold gives you complete creative control over your gemstone specifications.
You’ll find that the software’s precision tools let you define exact dimensions and angles for custom cuts, while the parametric modeling feature enables quick adjustments without rebuilding your entire design.
The extensive cabochon library serves as your starting point, allowing you to experiment with traditional shapes before developing completely original stone profiles that match your vision.
Stone Cutting Techniques
Precision transforms raw gemstones into spectacular works of art through carefully executed cutting techniques.
You’ll achieve superior results by understanding how different approaches affect your stone’s final appearance and value.
Your cutting success depends on these essential techniques:
- Faceting – Creates multiple flat surfaces that maximize light reflection and brilliance in transparent stones.
- Cabochon cutting – Produces smooth, rounded surfaces perfect for opaque or translucent gemstones with unique patterns.
- Water-cooled diamond blade cutting – Prevents heat damage while maintaining precise control during initial shaping.
- 3D modeling integration – Use MatrixGold’s modeling capabilities to visualize cuts before physical work begins.
Remember to consult the Mohs hardness scale when selecting your techniques.
Harder stones require different approaches than softer materials, ensuring you’ll avoid costly mistakes while maximizing each stone’s natural beauty.
Cabochon Shaping Methods
Start by selecting your stone and marking the desired shape, then rough grind to achieve the basic outline.
Refine using progressively finer grits for that perfect finish. Precision tools such as faceting machines or flat laps help you control angles and curvature, ensuring consistent results across multiple pieces.
Consider your gemstone’s hardness when choosing techniques—softer stones need gentler methods than harder varieties.
While CAD can’t physically cut stones, it’s invaluable for planning custom cabochon designs before you begin shaping, maximizing material usage and achieving your creative vision.
Assembly Features for Multi-Component Jewelry Designs

Modern jewelry designs often feature multiple interconnected components that must work together seamlessly, from articulating bracelet links to stackable ring sets with moving elements.
MatrixGold’s assembly features streamline this complex process, giving you powerful tools to manage multi-component designs efficiently.
You’ll find the Assembly tool invaluable for grouping related parts together, allowing modifications without disrupting individual components. The software’s parametric assembly creates dynamic links between parts that automatically update when you alter one component.
Key assembly capabilities include:
- Intuitive drag-and-drop interface with visual cues for efficient organization
- Clash detection simulation to verify components fit together properly
- Parametric linking that maintains relationships between interconnected parts
- Group management tools for complex multi-element designs
These features guarantee your multi-component jewelry designs function perfectly before production.
Preparing Models for 3D Printing With Proper Wall Thickness Settings
When you’re ready to shift from digital design to physical jewelry, proper wall thickness becomes the critical factor that determines whether your 3D print succeeds or fails.
Maintain wall thickness between 1.5mm to 3mm for ideal strength and material efficiency. Matrix CAD’s wall thickness analysis tool helps you identify problematic areas before printing begins.
Consider your printing technology carefully. FDM printers need thicker walls than SLA printers due to material differences.
Keep wall thickness uniform throughout your model to eliminate weak points that cause breakage.
Before committing to expensive high-resolution prints, run a test print at lower resolution. This verifies your wall thickness settings and confirms design integrity without wasting premium materials or time.
Frequently Asked Questions
How Can I Get Better at CAD Modeling?
Practice consistently with small projects, master your software’s interface and shortcuts, explore online tutorials and communities, experiment with different modeling approaches, and use real project files to build hands-on experience effectively.
What Is the Difference Between Rhino and Matrix?
Rhino’s a general-purpose CAD tool for various industries, while Matrix specifically targets jewelry design. You’ll find Matrix offers parametric modeling, specialized gem-setting tools, and built-in rendering that’s optimized for precious metals and stones.
Does CAD Allow Designers to Model a Product Quickly?
Yes, you’ll model products quickly with CAD software. You can rapidly prototype through 3D modeling, make real-time adjustments with parametric features, and use automation tools that eliminate repetitive tasks while accelerating your design process.
Where Is CAD Used in Design?
You’ll find CAD used across manufacturing, architecture, automotive, aerospace, jewelry design, and interior design industries. It helps you create detailed 2D drawings, 3D models, blueprints, simulations, and realistic renderings for various applications.
In Summary
You’ve now got nine powerful techniques to elevate your Matrix CAD workflow. Master these fundamentals—from parametric history management to 3D printing optimization—and you’ll design jewelry more efficiently while achieving professional results. Don’t try implementing everything at once; instead, focus on one technique per project until it becomes second nature. Your clients will notice the improved quality and precision in your work as you continue refining these essential Matrix CAD skills.


Leave a Reply