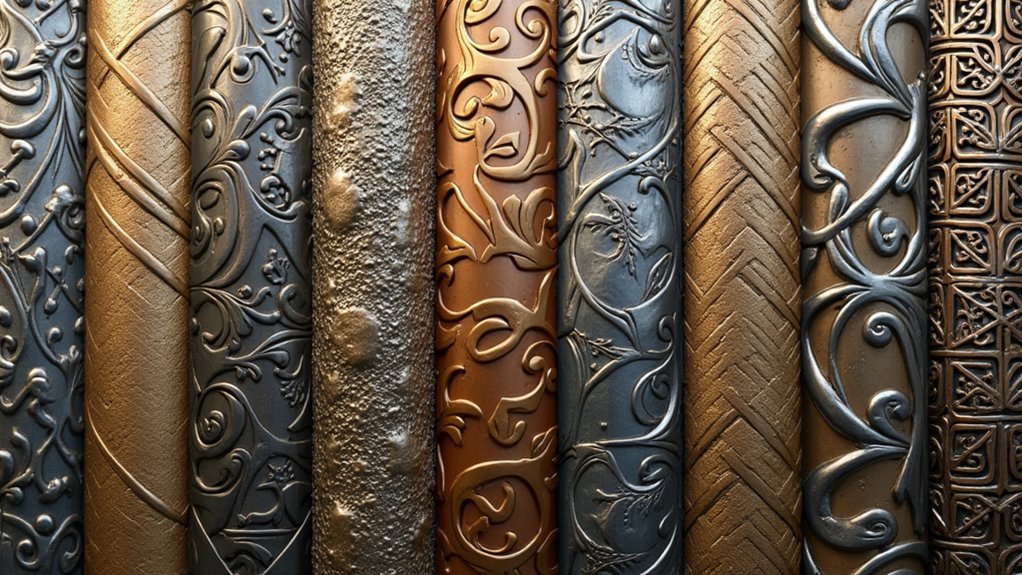
You’ll transform your pierced jewelry from ordinary to extraordinary when you master these ten striking metal texture patterns that combine traditional hammering techniques with modern artistic approaches. Cross pein hammered bark textures create natural organic lines, while Fibonacci spiral patterns add mathematical precision using the golden ratio. Mandala-inspired circular texturing brings meditative symmetry, and random ding patterns mimic naturally weathered surfaces. Rolling mill fabric impressions on copper produce unique dimensional effects, enhanced by engraved line work with dramatic patina contrasts. Explore these thorough techniques to elevate your metalworking artistry.
Hammered Bark Texture Using Cross Pein Techniques
When you’re seeking to add organic character to your pierced jewelry, the cross pein hammer becomes your go-to tool for creating stunning bark textures that mimic nature’s own artistry.
You’ll achieve the most authentic hammered bark texture by applying consistent pressure while striking your metal at various angles. This technique produces natural-looking lines and surface variations that enhance any rustic design.
Work on a sturdy bench block to maintain stability and create clean, defined textures.
A solid bench block provides the essential foundation needed for achieving consistent, professional-quality bark textures in your metalwork.
Experiment with different hammer sizes and weights to produce diverse bark patterns unique to each piece. For added dimension, incorporate a doming block to create depth through strategic dips and rises.
These techniques transform flat metal surfaces into compelling textured elements perfect for pierced jewelry applications.
Fibonacci Spiral Patterns in Sterling Silver
You’ll find that Fibonacci spiral patterns demand mathematical precision when translating the golden ratio into sterling silver designs.
Start by calculating the proportional measurements for each curve segment, then use your jeweler’s saw to carefully cut the spiral pathways with smooth, controlled motions.
The golden ratio’s 1.618 proportion creates naturally pleasing compositions that’ll guide your piercing layout and determine the ideal spacing between decorative elements.
Mathematical Precision in Design
As you explore the mathematical foundations of jewelry design, Fibonacci spiral patterns offer a compelling way to infuse sterling silver pieces with natural harmony and visual balance.
When you apply this sequence to metal work, you’ll achieve proportions that naturally please the eye, creating intricate designs that echo nature’s own geometry.
You’ll find that sterling silver’s malleability perfectly supports the precise calculations required for Fibonacci-based pieces.
As you hand-pierce these mathematical patterns, you can maintain the exact ratios that make each curve and spiral mathematically accurate.
This precision translates into jewelry that feels both structured and organic.
Your finished pieces will demonstrate how mathematical concepts can transform simple metal into sophisticated art, where every measurement serves both aesthetic and structural purposes in your design.
Sawing Spiral Curves
Transforming your mathematical calculations into physical reality requires mastering the art of sawing spiral curves in sterling silver. You’ll need a jeweler’s saw frame equipped with fine-toothed blades, ensuring teeth face downward for maximum cutting efficiency.
Start by creating a paper template of your Fibonacci spiral, then transfer this design onto your silver sheet as your cutting guide.
When you cut and shape these intricate curves, maintain smooth, controlled motions to achieve clean edges that preserve the design’s mathematical elegance. The spiral’s organic flow naturally creates different textures as light plays across the curved surfaces.
After sawing, refine your edges using needle files and progressive sandpaper grits. This finishing process enhances the visual impact of your Fibonacci-inspired piece, creating stunning texture patterns that capture the eye through mathematical beauty.
Golden Ratio Applications
Precision becomes paramount when applying the golden ratio’s 1.618 proportion to your sterling silver designs.
You’ll discover that Fibonacci spiral patterns create naturally flowing curves that guide the viewer’s eye through your pierced jewelry. Start by mapping spiral dimensions using the golden ratio to determine placement points on your metal surface.
When texturing the surface of your metal, use a chasing hammer to create depth variations that follow the spiral’s progression. Each strike should correspond to the mathematical sequence, building texture intensity as the spiral expands.
This technique works exceptionally well on pendants and earrings where the organic curves complement the wearer’s natural movements.
Your customization options remain limitless—adapt spiral patterns to seasonal motifs while preserving the mathematical elegance that makes these designs timelessly appealing.
Mandala-Inspired Circular Texturing Methods
You’ll discover that mandala-inspired texturing transforms ordinary pierced jewelry into meditative art pieces through sacred geometry piercing patterns that mirror ancient spiritual designs.
When you master radial symmetry cutting techniques, you’re able to create perfectly balanced circular motifs that radiate from a central point with mathematical precision.
Your layered circle design methods will build visual depth by combining multiple textural elements, typically incorporating three distinct circular patterns that work together to achieve the complex beauty characteristic of traditional mandalas.
Sacred Geometry Piercing Patterns
While ancient spiritual traditions have long celebrated mandala patterns as symbols of unity and cosmic order, modern jewelry makers can harness these sacred geometries to create stunning circular textures in pierced jewelry.
These intricate designs transform ordinary metal into meaningful art pieces that resonate with spiritual significance.
You’ll find that mandala patterns naturally lend themselves to pierced work, where negative space becomes as important as the metal itself.
Essential techniques for incorporating sacred geometry include:
- Using specialized hammers and stamps to create repeating circular motifs
- Employing precision jewelers’ saws for delicate geometric outlines
- Applying patinas to enhance depth and visual contrast
- Combining multiple mandala elements for complex layered designs
Each piece becomes a meditation in metal, where geometric harmony meets masterful craftsmanship.
Radial Symmetry Cutting Techniques
As you shift from basic mandala concepts to actual execution, radial symmetry cutting techniques become the foundation for creating authentic circular textures that mirror nature’s most perfect patterns.
You’ll master these designs by using a piercing saw with various blade sizes, positioning teeth downward for effective cutting through sheet metal. Start from a central point and work outward, maintaining consistent spacing between radiating elements.
Enhance your radial symmetry by incorporating a doming block to create raised sections that add dimensional depth.
Experiment with texturing tools like hammers or rolling mills to develop unique surface treatments that complement your circular patterns.
For precision work, employ a rotary tool with cutting attachments to achieve uniform curves and maintain perfect symmetrical balance throughout your intricate mandala-inspired jewelry pieces.
Layered Circle Design Methods
Building upon your radial symmetry foundation, layered circle design methods transform flat mandala patterns into dimensional masterpieces through strategic stacking and texturing techniques.
You’ll create stunning depth by combining multiple textured circles of varying sizes, each contributing unique visual elements to your pierced jewelry.
Essential techniques for achieving professional layered circles include:
- Using a rolling mill to apply uniform pressure across metal sheets, ensuring consistent circular textures that stack beautifully.
- Incorporating stencils or templates for precise symmetrical designs that maintain harmony between layers.
- Experimenting with varying degrees of pressure during hammering to create distinct textures on each layer.
- Applying patina treatments to accentuate textural contrasts and highlight intricate design details.
Different hammer head shapes allow you to develop unique textures reminiscent of traditional mandala artistry.
Random Ding Patterns for Aged Metal Effects
When you’re seeking to create authentic aged metal effects in your pierced jewelry, random ding patterns offer an excellent technique for achieving that weathered, time-worn appearance. I’d recommend using an old ball pein hammer to strike your metal surface with varying pressure and angles. I’ve seen artisans create stunning results by experimenting with different approaches.
| Metal Type | Hammer Size | Technique Result |
|---|---|---|
| Copper | Small | Delicate indentations |
| Silver | Medium | Moderate texture depth |
| Brass | Large | Bold weathered patterns |
Strike the metal randomly to create irregular indentations that mimic naturally weathered surfaces. Soft metals like copper allow easier manipulation without excessive force, making them perfect for beginners. Each piece becomes unique through this random approach, which jewelry artisans favor for one-of-a-kind designs.
Rolling Mill Fabric Impressions on Copper

While hammered textures create compelling aged effects, you’ll discover that rolling mill fabric impressions on copper open up an entirely different domain of textural possibilities. This technique, perfected by metalworkers years ago, transforms ordinary copper sheets into stunning textured surfaces by passing fabric and metal through rollers together.
To achieve ideal results, you’ll need:
- Properly annealed copper for maximum malleability
- Flat fabric with clear, defined patterns
- Consistent pressure through the rolling mill
- Various fabric types for experimental effects
Different fabrics yield dramatically varying impressions, letting you customize each piece’s aesthetic appeal. The fabric’s weave transfers intricate details onto the copper surface, creating depth and visual interest.
After rolling, you can refine the texture through selective sanding or polishing, highlighting specific pattern elements while maintaining the overall textured character.
Repousse Hammer Dramatic Surface Treatments
You’ll achieve bold dimensional relief effects with repousse hammers by striking metal from the reverse side, creating raised designs that dramatically transform flat surfaces.
Master controlled impact force techniques by varying your hammer pressure and strike angles to produce consistent depths and textures across your pierced jewelry pieces.
Focus on surface depth pattern creation by combining strategic tool positioning with proper metal thickness selection to build complex, layered textures that enhance your jewelry’s visual impact.
Bold Dimensional Relief Effects
Although traditional texturing methods can enhance metal surfaces, the repousse hammer technique transforms ordinary jewelry pieces into dramatic works of art through bold dimensional relief effects.
You’ll create stunning three-dimensional patterns that catch light beautifully and add substantial visual weight to your designs.
Your repousse hammer work produces exceptionally bold results when you:
- Apply varied pressure angles to create deep, sculptural reliefs
- Focus on softer metals like copper and brass for easier manipulation
- Layer multiple texturing techniques for complex dimensional effects
- Maintain safety protocols with protective eyewear during hammering
The technique’s strength lies in creating pronounced surface variations that standard texturing can’t match.
You’ll achieve dramatic contrasts between raised and recessed areas, giving your pierced jewelry pieces distinctive character and professional-quality craftsmanship that stands out.
Controlled Impact Force Techniques
Mastering controlled impact force transforms your repousse work from simple surface decoration into sophisticated sculptural texturing. Your repousse hammer becomes a precision instrument when you learn to vary angle and pressure systematically.
Strike the metal from the reverse side with calculated force to raise dimensional areas that catch light beautifully on the front surface.
Develop your feel for different metal types through consistent practice. Each strike should be deliberate, building depth gradually rather than attempting dramatic changes in single blows.
You’ll discover that lighter, repeated impacts often yield better control than heavy strikes.
Combine repousse with hammering and patinas to create complex, layered surfaces. This integration allows you to develop a distinctive artistic voice while achieving the dramatic textures that make pierced jewelry truly enchanting.
Surface Depth Pattern Creation
When creating surface depth patterns with repousse hammers, strategic placement of raised elements becomes your foundation for dramatic visual impact.
You’ll achieve the most striking results by varying your pressure and angles throughout the process, allowing deep, intricate designs to emerge naturally from the metal’s surface.
Focus on these essential techniques for maximum effect:
- Experiment with different hammer heads to create diverse textures ranging from subtle dimples to bold, pronounced patterns
- Work exclusively with non-ferrous metals like copper and silver for superior detailing without material compromise
- Apply heat treating after repousse work to develop unique color variations and enhanced depth
- Layer your patterns strategically to build complex visual narratives that complement pierced elements
This approach transforms ordinary metal into extraordinary textured jewelry pieces.
Engraved Line Work Enhanced With Patina
While most metal textures rely on surface manipulation alone, engraved line work enhanced with patina combines precision cutting techniques with chemical treatments to create dramatic visual contrast in pierced jewelry. You’ll find that applying patina to engraved designs accentuates depth and makes lines stand out dramatically against the metal surface.
| Patina Solution | Effect on Engraved Lines |
|---|---|
| Liver of Sulphur (weak) | Light contrast, subtle definition |
| Liver of Sulphur (strong) | Dark background, bright lines |
| Pre-textured + LOS | Complex layered appearance |
| Selective application | Controlled contrast areas |
| Heat-activated patina | Varied color gradations |
Pre-treating metal with textured finishes before engraving creates unique visual effects when patina’s applied. The chemical interacts differently with textured areas, allowing you to achieve striking contrast where engraved lines remain bright while surrounding areas develop rich, dark hues.
Domed and Raised Relief Texture Combinations
Building on surface-level engraving techniques, domed and raised relief texture combinations push your pierced jewelry into three-dimensional territory.
You’ll create visually striking effects that add depth and dimension while enhancing light reflection throughout your pieces.
Using doming blocks and punches, you can elevate specific design elements above the surface to achieve various shapes and patterns.
When you combine these raised areas with domed textures, you’ll develop intricate designs that masterfully play with light and shadow, making each piece dynamic and eye-catching.
Consider these enhancement techniques:
- Apply different hammering methods to raised relief areas for unique characteristics
- Experiment with various metal thicknesses for diverse textural results
- Layer multiple relief heights to create complex dimensional landscapes
- Combine smooth domed areas with heavily textured raised elements
This approach transforms flat metal into sculptural wearable art.
Layered Texture Techniques for Visual Depth
Three distinct texturing methods combined on a single piece create extraordinary visual depth that transforms ordinary pierced jewelry into mesmerizing works of art.
You’ll achieve the most compelling results by balancing light and heavy textures strategically. Use subtle hammering or rolling techniques as your background foundation, then layer heavier textures like deep cross pein hammer strikes as focal points.
Experiment with fabric impressions during your texturing process to add innovative detail layers. Press different materials into heated metal to create unique patterns that complement your hammer work.
Ball pein and cross pein hammers offer versatile texture options you can overlay for complex visual effects.
Combining at least three different texturing techniques encourages personal style exploration while creating richer visual experiences that’ll make your pierced jewelry designs truly stand out.
Heat-Treated Color and Texture Integration
Once you’ve mastered layering multiple textures, heat treatment opens up entirely new possibilities for enhancing both color and surface detail in your pierced jewelry.
Each metal responds differently to heat, creating unique patinas that complement your textured surfaces beautifully.
Your torch technique directly affects the final result:
Mastering torch distance and flame movement transforms ordinary pierced jewelry into vibrant, multi-dimensional artworks with stunning color variations.
- Control flame distance and movement to achieve varying color depths from subtle hints to vibrant hues
- Pre-texture surfaces before heating to create distinct color patterns that follow your design lines
- Apply liver of sulphur strategically for dramatic effects that enhance your metal’s natural characteristics
- Use careful masking techniques to prevent unwanted coloration and maintain clean contrasts
Pre-texturing before heat treatment creates the most striking results, as colors settle differently into raised and recessed areas, amplifying your pierced design’s visual impact.
Frequently Asked Questions
What Metals Are Best for Beginners Learning Texture Techniques?
You’ll find copper’s perfect for practicing since it’s soft and forgiving. Sterling silver works well once you’ve gained confidence. Avoid harder metals like stainless steel initially—they’ll frustrate you while you’re developing your texturing skills.
How Do I Prevent Cracking When Texturing Thin Metal Sheets?
You’ll prevent cracking by annealing your metal first, using lighter hammer blows, and working gradually. Don’t over-texture in one area. Keep the metal supported on a solid surface while texturing to distribute force evenly.
What Safety Equipment Is Essential When Creating Textured Jewelry Pieces?
You’ll need safety glasses to protect from metal fragments, leather gloves for handling sharp edges, a dust mask when filing, and proper ventilation when using chemicals or torches during texturing work.
How Much Does Professional Texturing Equipment Typically Cost?
You’ll spend $200-800 for basic texturing hammers and stakes, while professional rolling mills cost $1,500-5,000. Hydraulic presses run $3,000-15,000. You can start affordably with hammers, then upgrade as your skills develop.
Can Textured Jewelry Be Repaired if Damaged During Wear?
You can repair most textured jewelry damage through professional restoration. Simple scratches often polish out, but deep gouges may require re-texturing sections. Always consult experienced jewelers who understand your specific texture pattern.
In Summary
You’ve discovered ten powerful texturing techniques that’ll transform your pierced jewelry from ordinary to extraordinary. Whether you’re hammering bark patterns or creating Fibonacci spirals, each method offers unique possibilities for expressing your artistic vision. Don’t be afraid to experiment and combine techniques—layering different textures can create stunning visual depth. Start with one technique that speaks to you, master it, then gradually expand your toolkit to develop your signature style.


Leave a Reply