
You’ll create stunning textured silver through reticulation by first preparing your metal with depletion gilding—heating sterling silver up to fifteen times at 1000°F to build a fine silver surface layer. Use a GoSystem Tech torch with precise flame control, positioning it at a 45-degree angle while monitoring color changes. The different melting points between the fine silver surface and copper core create characteristic flowing patterns. Master these fundamental techniques to reveal advanced creative possibilities.
Understanding the Reticulation Process for Silver Texturing
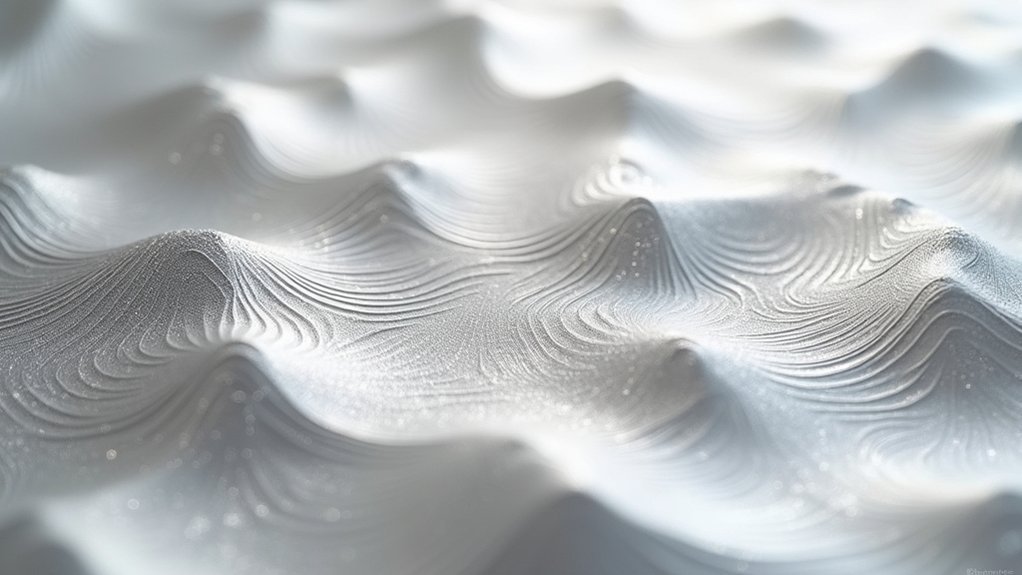
When you’re looking to create stunning textures on silver, reticulation stands out as one of the most dramatic and rewarding techniques available. This controlled heating process causes your metal to shimmer and crinkle, producing beautiful undulating ripples and ridges across the surface.
The magic happens because surface silver and the core have different melting temperatures. To reticulate silver successfully, you’ll need to perform depletion gilding first. This involves repeated annealing and pickling cycles that concentrate fine silver on the surface.
You’ll typically heat your metal up to 15 times to build the necessary fine silver layer. Once prepared, careful heating creates the desired texture as the surface responds differently than the core, resulting in those characteristic flowing patterns that make reticulated silver so enchanting.
Essential Tools and Materials for Successful Reticulation
Now that you understand how reticulation works, you’ll need specific tools and materials to achieve those enchanting textures. A GoSystem Tech Torch provides the precise heating control vital for successful reticulation.
You’ll also need a soldering block for safe metal heating and safety pickle to remove fire stains afterward.
For materials, sterling silver or copper sheets work well, though reticulation silver offers superior results with its fine silver layer over a copper core. This specialized metal provides better texture control than standard sterling silver.
A brass brush is essential for cleaning oxidized copper without causing plating issues.
Consider Kernowcraft’s crinkle metal sheet as a pre-prepared option that eliminates multiple annealings while ensuring uniform texture.
Proper preparation through annealing and cleaning creates the foundation for achieving those desired shimmering, crinkling effects.
Preparing Silver Through Depletion Gilding Techniques
Before you can achieve stunning reticulation textures, you’ll need to prepare your silver through depletion gilding—a crucial process that builds up the fine silver layer on your metal’s surface.
This technique involves repeatedly cycling between heating and pickling your silver. You’ll heat the piece to approximately 1000°F (538°C), then immerse it in safety pickle solution to remove copper oxides while preserving the fine silver layer.
| Cycle | Temperature | Duration | Pickle Time | Result |
|---|---|---|---|---|
| 1-3 | 1000°F | 2-3 min | 10-15 min | Initial buildup |
| 4-8 | 1000°F | 2-3 min | 10-15 min | Layer development |
| 9-15 | 1000°F | 2-3 min | 10-15 min | Maximum thickness |
Repeat this depletion gilding process up to fifteen times. Each cycle strengthens the fine silver surface while maintaining the copper core beneath, creating the perfect foundation for successful reticulation textures.
Heat Application Methods for Creating Textured Surfaces
You’ll need to master three critical heat application techniques to achieve professional reticulation results on your silver surface.
First, select the right torch and maintain precise control over your flame intensity throughout the heating process.
Next, you must carefully manage temperature levels while strategically positioning your flame to guarantee the metal’s core melts while keeping the surface layer intact.
Torch Selection and Control
When selecting the right torch for reticulation, the GoSystem Tech Torch stands out as the preferred choice for creating textured silver surfaces. This torch selection provides an ideal flame for both larger and delicate jobs, guaranteeing controlled heat application throughout your project.
You’ll need a sharper flame to achieve better control over the melting process, enabling you to create more defined and intricate textures. Gradually heat your metal while applying the flame in circular motions to guarantee even heat distribution.
This technique helps develop the fine ripples and wrinkles that characterize reticulated surfaces. Maintain consistent heat to avoid uneven textures caused by overheating or underheating specific areas.
Your controlled approach creates the perfect balance where the core melts while keeping the surface intact.
Temperature Management Techniques
Since achieving proper reticulation depends on precise temperature control, you must master the delicate balance between heating and cooling your silver.
Temperature management begins with heating your metal to the point where the copper core melts while keeping the fine silver surface intact. This controlled heat application requires careful timing and observation of color changes in the metal.
Start by annealing your silver, then repeat the heating and pickling process multiple times.
You’ll need to watch for the subtle moment when the surface begins to ripple without overheating. Move your torch steadily across the surface, maintaining consistent distance and flame intensity.
If you overheat, you’ll lose texture; insufficient heat won’t activate the reticulation process effectively.
Flame Positioning Methods
Proper flame positioning controls the intensity and distribution of heat across your silver’s surface, making it the foundation of successful texture creation. Position your flame at a 45-degree angle to achieve the best heat distribution and prevent localized overheating.
Use a softer, bushy flame for delicate work, allowing controlled texture development without reaching melting temperature too quickly. For larger areas, apply a more concentrated flame while moving it in circular motions to avoid burning through the metal.
Adjust the distance between flame and silver based on your desired texture—closer flames create intense ripples, while further positioning produces subtle effects. These flame positioning methods guarantee you maintain proper temperature control.
Monitor your silver’s color change carefully; a shimmering effect indicates you’ve reached the perfect temperature for reticulation.
Working With Alternative Metals and Pre-Prepared Sheets
Alternative metals like brass and copper offer exciting opportunities for creating textured surfaces beyond traditional silver reticulation. You’ll need proper preparation through annealing, cooling, and cleaning to achieve desired textures with these materials.
Pre-prepared sheets like Kernowcraft’s crinkle metal eliminate multiple annealings, letting you pre-shape without collapse during heating. These sheets provide more uniform texture control than standard reticulation silver.
| Metal Type | Preparation Time | Texture Control |
|---|---|---|
| Standard Silver | High | Variable |
| Brass/Copper | Medium | Good |
| Pre-prepared Sheets | Low | Excellent |
You can incorporate scrap silver by melting dust or tiny pieces onto copper for unique surface effects. Remember that reticulated metal’s porosity requires additional solder during assembly, affecting your final piece construction.
Troubleshooting Common Reticulation Challenges

While reticulation creates stunning textures, you’ll encounter specific challenges that can frustrate even experienced metalsmiths.
If your texture appears insufficient, increase heating time and intensity for more dramatic crinkling effects. Thicker gauge metal retards reticulation, so start with thinner sheets for better results.
Combat excessive porosity by using adequate solder during assembly to fill texture-created gaps. When setting gemstones, pre-drill holes or employ flexible setting methods to accommodate irregular surfaces.
Address porosity with generous solder application and accommodate gemstone setting challenges through pre-drilling or adaptable mounting techniques for irregular reticulated surfaces.
Always clean your reticulated metal thoroughly afterward, removing fire scale and oxides that compromise appearance and interfere with subsequent soldering processes.
These preventive measures and adjustments will help you achieve consistent, professional results while avoiding the most common pitfalls that derail reticulation projects.
Creative Applications and Project Ideas Using Reticulated Silver
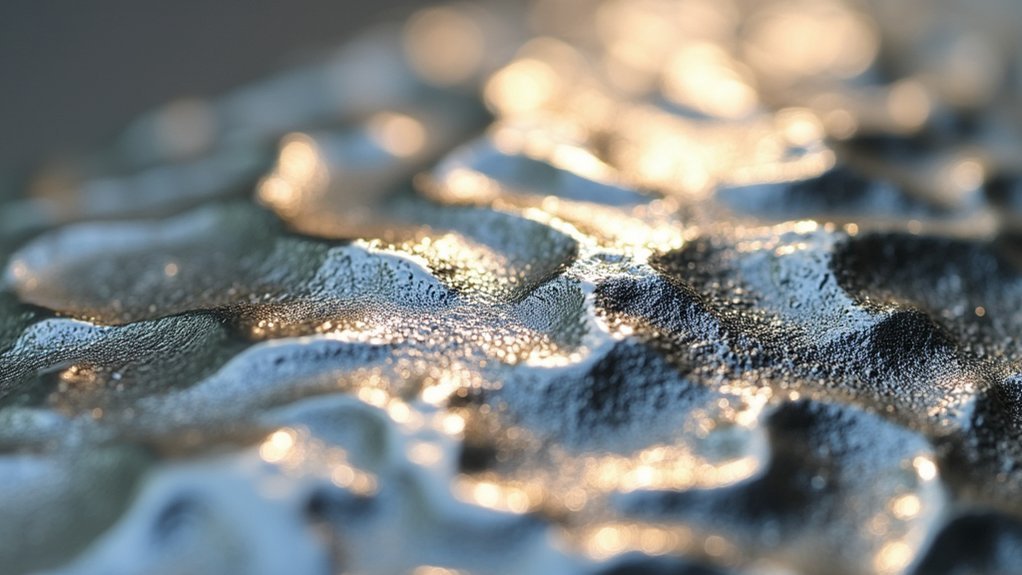
You can transform reticulated silver into stunning jewelry pieces like rings and pendants where the undulating textures create enchanting visual depth.
Try combining reticulated silver with contrasting metals or smooth finishes to highlight the dramatic surface variations and enhance your design’s impact.
Experiment with advanced techniques like fusing tiny silver elements onto the reticulated surface to build complex, layered textures that’ll set your work apart.
Jewelry Design Applications
Reticulated silver transforms ordinary jewelry designs into extraordinary wearable art through its distinctive undulating surfaces and organic textures.
You’ll find that textured rings and pendants showcase the metal’s dramatic visual impact, with light dancing across the irregular surface patterns created through controlled heat application.
When incorporating gemstones into your reticulated silver jewelry designs, you’ll need careful soldering techniques that accommodate the metal’s porous nature.
For consistent results without extensive annealing, you can use pre-prepared crinkle metal sheets that deliver uniform textures perfect for intricate pieces.
You can enhance depth by fusing tiny silver pieces or applying silver dust to create additional surface interest.
The enchanting interplay of light on these textured surfaces elevates your jewelry’s aesthetic appeal considerably.
Mixed Metal Projects
Mixed metal combinations reveal new creative possibilities when you pair reticulated silver with copper, brass, or other base metals. The dramatic contrast between smooth, polished surfaces and reticulated silver’s crinkled textures creates striking visual interest in your designs.
You can use fusing techniques to attach tiny silver pieces or silver dust directly to copper surfaces, eliminating traditional soldering. This method creates intricate textures without complex joining processes.
When incorporating gemstones into mixed metal projects, remember that reticulated silver’s porous nature may require additional solder for secure settings.
Pre-prepared reticulated silver sheets from suppliers like Kernowcraft simplify your workflow by providing consistent textures and reducing multiple annealings. The random patterns achieved through reticulation let you explore unique designs that celebrate the interplay between different metals and surface treatments.
Advanced Texture Combinations
When you combine reticulated silver with multiple texturing techniques, you’ll discover endless possibilities for creating one-of-a-kind jewelry pieces that showcase depth and visual complexity.
Experimenting with layering techniques opens up new creative avenues—try fusing small silver scraps onto your reticulated base to build dimensional surfaces that catch light beautifully.
You can incorporate silver dust or granules onto textured areas for striking visual effects. Each combination produces distinct results that make your pieces truly unique.
For advanced projects, consider using Kernowcraft’s crinkle metal sheet, which gives you better texture control during pre-shaping without risking collapse during heating.
When setting gemstones into reticulated silver, plan carefully since the porous texture requires additional solder for secure mounting.
Frequently Asked Questions
How Do You Texture Silver Without a Rolling Mill?
You can texture silver through reticulation by applying controlled heat with a focused flame. First, enrich the surface through depletion gilding using repeated annealing and pickling to create stunning ripples and ridges.
How to Harden Silver at Home?
You’ll heat your silver with a torch until it glows red at around 1,500°F, then let it cool naturally. Hammer or roll the cooled metal to work-harden it further, increasing its strength and density.
Can Fine Silver Be Reticulated?
Yes, you can reticulate fine silver effectively. You’ll need to heat it to high temperatures multiple times, often up to fifteen annealings, creating beautiful rippled textures while maintaining the metal’s structural integrity throughout.
How to Turn Fake Silver Back to Silver?
You can’t truly convert fake silver back to real silver since it’s made from different base metals. Instead, you’d need to remove plating, then fuse or plate genuine fine silver onto the surface.
In Summary
You’ve learned the fundamentals of silver reticulation, from depletion gilding to heat application techniques. Now you can create stunning textured surfaces that’ll transform your metalwork projects. Don’t get discouraged if your first attempts aren’t perfect – reticulation takes practice to master. Experiment with different heating patterns and times to develop your own signature textures. With patience and persistence, you’ll soon be producing beautifully reticulated silver pieces that showcase this unique surface treatment technique.


Leave a Reply