
To solder jump rings without gaps, you’ll need to cut cleanly using fine saw blades, align ends precisely with tweezers, and apply flux evenly to the joint area. Use small solder pieces and gentle, controlled heat until you see a dull red color, ensuring the metal warms uniformly. Keep ends tightly closed during heating and allow natural cooling to prevent separation. Master these techniques alongside proper tool selection and workspace preparation for consistently seamless results.
Essential Tools for Creating Professional Jump Rings
Creating professional-quality jump rings starts with having the right tools in your workspace. You’ll need parallel pliers to maintain even pressure when twisting rings, preventing distortion that standard pliers often cause.
A mini mandrel or collet punch guarantees perfectly round shapes while minimizing material waste during jewelry making.
For cutting, use fine saw blades—cut six is recommended—to create cleaner cuts with minimal metal removal. This precision is essential for achieving neat solder joints.
A punch helps round the outside edges before soldering, aligning rings for stronger joins and preventing gaps.
Finally, invest in a toggle system to hold silver pieces securely during the soldering process. This prevents distortion and guarantees your jump rings close tightly without unwanted gaps.
Selecting the Right Wire and Mandrel Size
When creating jump rings, you’ll need to evaluate wire gauge carefully since 18 to 20 gauge provides the best balance of strength and workability for most jewelry projects.
Your mandrel diameter should match your intended ring size, with 4mm to 10mm being the most versatile range for various designs.
Make sure you’re pairing thicker wire with larger mandrels to prevent distortion during the wrapping process.
Wire Gauge Considerations
Although jump rings may appear simple, selecting the proper wire gauge and mandrel size determines whether your soldered connections will be strong and visually appealing.
You’ll want to choose 18 to 20 gauge wire for the best balance of strength and flexibility. This range gives you durability while remaining easy to manipulate during soldering.
Your mandrel size must match your intended jump ring diameter. A 1/8-inch mandrel works well for small rings, while larger designs need bigger mandrels.
Remember that thicker wire gauges require larger mandrels to maintain proper shape without distortion.
Don’t use a mandrel that’s too small for your wire gauge. This creates tight coils that are difficult to cut and solder, ultimately causing gaps in your finished jump rings.
Mandrel Diameter Selection
Three key factors determine your mandrel diameter choice: wire thickness, desired ring size, and intended application.
Your mandrel diameter directly controls the final size of your jump rings, so select one that matches your project’s requirements. Use a mandrel that corresponds to your wire gauge – thicker wires need larger diameters to wrap smoothly without distortion.
For precision work, choose mini mandrels or collet punches that enable tight winding. This creates consistent coils essential for gap-free soldering.
The wire gauge must complement your mandrel size to maintain proper ring shape during wrapping.
Test various wire and mandrel combinations on practice material before starting your actual project. This experimentation helps you identify the best setup for achieving clean, professional jump rings.
Proper Cutting Techniques to Minimize Burrs
Achieving clean cuts on jump rings starts with selecting the right tools and technique. You’ll want to use finer saw blades, such as a cut six, when cutting jump rings to minimize metal removal and reduce burr creation that interferes with soldering.
Always cut from the inside edge to guarantee cleaner cuts and better alignment for soldering.
After cutting, use a needle file to carefully smooth any burrs on the edges, promoting stronger joins when soldered. If needed, employ a punch to round the outside of jump rings, eliminating irregularities that cause gaps during soldering.
Maintain steady hands and consistent pressure while cutting to prevent distortion, which complicates the soldering process and compromises your final results.
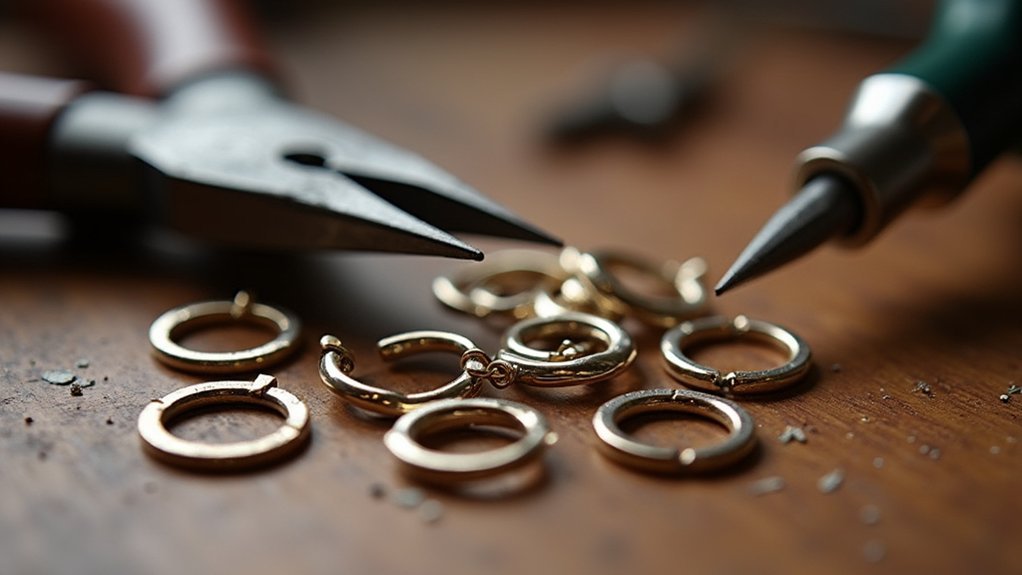
Aligning Jump Ring Ends for Perfect Closure
Once you’ve created clean cuts with minimal burrs, the next step focuses on precise alignment of your jump ring ends. You’ll need tweezers to hold the ends together while positioning them for soldering. If the ends don’t fit perfectly, use a punch or mandrel to round them for better closure.
| Tool | Purpose | Technique |
|---|---|---|
| Tweezers | Hold ends together | Grip firmly during alignment |
| Punch/Mandrel | Round uneven ends | Gentle tapping motions |
| Flux | Aid solder flow | Apply to joint area |
| Fine brush | Flux application | Thin, even coating |
| Gentle heat | Check alignment | Monitor while heating |
Apply flux to the joint before heating, as it helps solder flow into gaps. While soldering jump rings, regularly check alignment and gently tap if needed to maintain perfect positioning for strong joints.
Preparing Your Workspace and Safety Setup

You’ll need to organize your essential soldering tools—including your torch, solder, flux, tweezers, and pickle solution—within easy reach on a heat-resistant surface.
Set up proper ventilation by working near an open window or using a small fan to direct fumes away from your breathing space.
Keep fire safety equipment like a bowl of water or small extinguisher nearby, since you’re working with open flame and flammable materials.
Essential Soldering Tools Setup
Before you begin soldering jump rings, create a well-organized workspace that prioritizes both safety and efficiency. Your jewelry soldering tools should include solder, flux, tweezers, and a soldering torch arranged within easy reach to streamline your workflow.
Place everything on a heat-resistant surface like a soldering board or ceramic tile to protect your work area from damage.
Always wear safety goggles and a mask to shield yourself from harmful fumes and splashes. Keep a small water container nearby for quickly quenching your soldered pieces, preventing overheating and distortion.
Arrange your tools strategically to minimize unnecessary movement and distractions. This focused setup allows you to concentrate on achieving clean, gap-free joins while maintaining consistent results throughout your soldering session.
Proper Ventilation Requirements
While proper tool setup forms the foundation of safe soldering, establishing adequate ventilation prevents dangerous fume buildup that can compromise your health and workspace safety.
You’ll need a fume extractor or access to an open window to minimize exposure to harmful vapors released during the soldering process. Position a fan to circulate air throughout your workspace, effectively dispersing hazardous particles generated by flux and soldering materials.
Create a designated soldering area away from flammable materials with consistent airflow to reduce fire risks. Protect your respiratory system by wearing a mask specifically rated for chemical fumes. This barrier shields you from inhaling dangerous particles that standard masks can’t filter.
Regularly inspect your ventilation system to guarantee it’s functioning properly and delivering adequate fresh air circulation while you work.
Fire Safety Precautions
Since soldering involves open flames and heated metals that can reach temperatures exceeding 1,000°F, establishing thorough fire safety measures safeguards both you and your workspace from potentially catastrophic accidents.
You’ll need essential safety equipment within arm’s reach before beginning any soldering project.
Implement these critical fire safety protocols:
- Position a fire extinguisher rated for flammable materials nearby for immediate emergency access.
- Use a soldering board or ceramic tile as your fireproof work surface to prevent heat damage.
- Keep water or damp cloth handy for quickly cooling hot tools and extinguishing small fires.
Don’t forget your personal protective equipment—safety goggles and heat-resistant gloves shield you from sparks and molten metal.
These precautions guarantee you’re prepared for any fire-related emergencies during soldering.
Flux Application Methods for Optimal Adhesion
Although proper flux application might seem straightforward, mastering the technique greatly impacts your soldering success. These flux application methods guarantee ideal adhesion during soldering by creating smooth solder flow between metal surfaces.
Use a small brush or applicator to apply flux precisely on the jump ring’s joint area. You’ll want to focus only on surfaces that’ll be joined rather than coating the entire piece, preventing unwanted solder flow during heating. This targeted approach minimizes excess flux that creates cleanup issues later.
Choose the appropriate flux type for your specific metal, as different metals require specific formulations for best results. Regularly check for even coverage since gaps or inconsistencies lead to weak joints.
Proper flux distribution guarantees your solder flows smoothly, creating strong, gap-free connections.
Solder Selection and Cutting Preparation
You’ll need to select solder with a melting point that matches your jump ring metal to create a strong bond without damaging surrounding material.
Cut your solder into small 1-2 mm sections using straight, clean cuts to guarantee precise placement and proper fit against the ring.
Use a fine saw blade like a cut six when preparing your jump rings to minimize burrs that can interfere with clean closure and effective soldering.
Proper Solder Size Selection
Three critical factors determine successful jump ring soldering: metal compatibility, solder size, and cutting precision. You’ll need to match your solder’s metal type and gauge exactly to your jump rings for ideal bonding strength. This compatibility prevents weak joints that could fail under stress.
When selecting proper solder size, follow these guidelines:
- Cut solder into 1-2 mm sections for manageable handling during placement.
- Use straight cuts to create clean edges that fit precisely without gaps.
- Choose quantities that bridge the jump ring opening without excess material.
You should align your jump ring ends closely before positioning the solder. Excess material creates misalignment issues, while insufficient amounts leave vulnerable gaps.
Using a finer saw blade (cut six recommended) when preparing jump rings minimizes metal removal, maintaining edge integrity for superior soldering results.
Clean Cutting Techniques
Master the fundamentals of clean cutting to guarantee your jump rings achieve professional-quality solder joints. You’ll need finer saw blades like cut six to minimize metal removal and create cleaner edges. Always cut from the inside of one side to ascertain proper edge alignment.
| Cutting Element | Technique | Result |
|---|---|---|
| Saw blade type | Use cut six or finer | Minimal metal removal |
| Cut direction | From inside outward | Perfect edge alignment |
| Solder preparation | Slice into small sections | Easier handling |
| Edge finishing | Punch outside edges round | Uniform surfaces |
| Ring positioning | Secure alignment first | Gap-free joints |
These clean cutting techniques make achieving seamless connections much easier. Slice your solder into manageable sections for precise placement, and consider punching the outside edges round for uniform contact surfaces.
Heat Control and Temperature Management
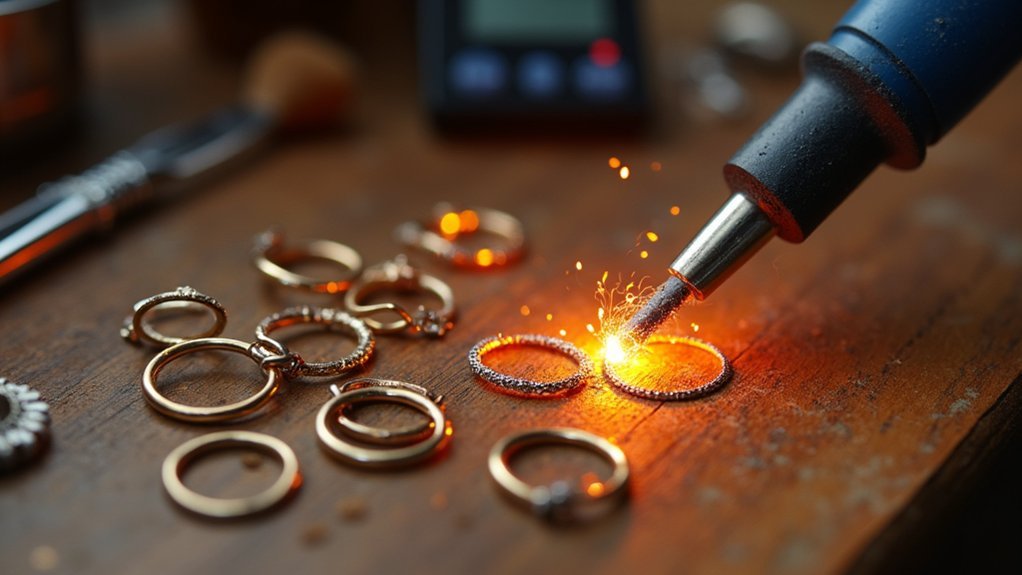
When soldering jump rings, achieving proper heat control separates successful joints from frustrating failures. Temperature management requires patience and precision to prevent gaps and misalignment.
Mastering heat control is the cornerstone of flawless jump ring soldering—patience and precision create perfect joints every time.
You’ll need to apply gentle, even heat from a distance, gradually warming the metal to achieve uniform temperature without distortion.
Monitor these critical indicators for successful soldering:
- Color changes – Watch for a dull red hue indicating proper temperature; bright red signals dangerous overheating
- Flame adjustment – Use a torch with adjustable controls to fine-tune heat output throughout the process
- Natural cooling – Allow jump rings to cool gradually after soldering to prevent stress-induced gaps
Your heat control technique directly impacts joint quality, so resist rushing the heating process for consistently gap-free results.
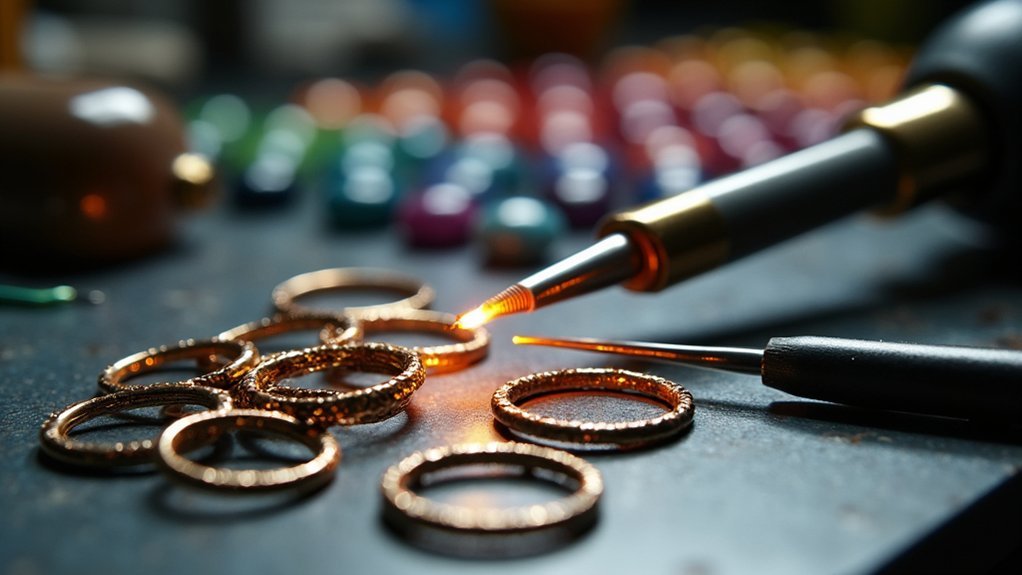
Positioning Solder for Even Distribution
Perfect heat control sets the foundation for successful jump ring soldering, but solder placement determines whether you’ll achieve a seamless joint or frustrating gaps. Position your solder directly on the jump ring joint where the two ends meet. Use rice-grain-sized pieces for precise control and even distribution.
| Step | Action | Result |
|---|---|---|
| 1 | Check jump ring alignment | Eliminates pre-existing gaps |
| 2 | Apply flux to joint area | Promotes solder adhesion |
| 3 | Position solder on seam | Guarantees targeted placement |
| 4 | Use small solder pieces | Allows controlled melting |
| 5 | Heat gradually and evenly | Prevents uneven distribution |
Proper alignment before soldering prevents gaps that even perfectly placed solder can’t fill. Apply flux first to help the solder flow smoothly around the entire joint, creating that professional, gap-free finish you’re after.
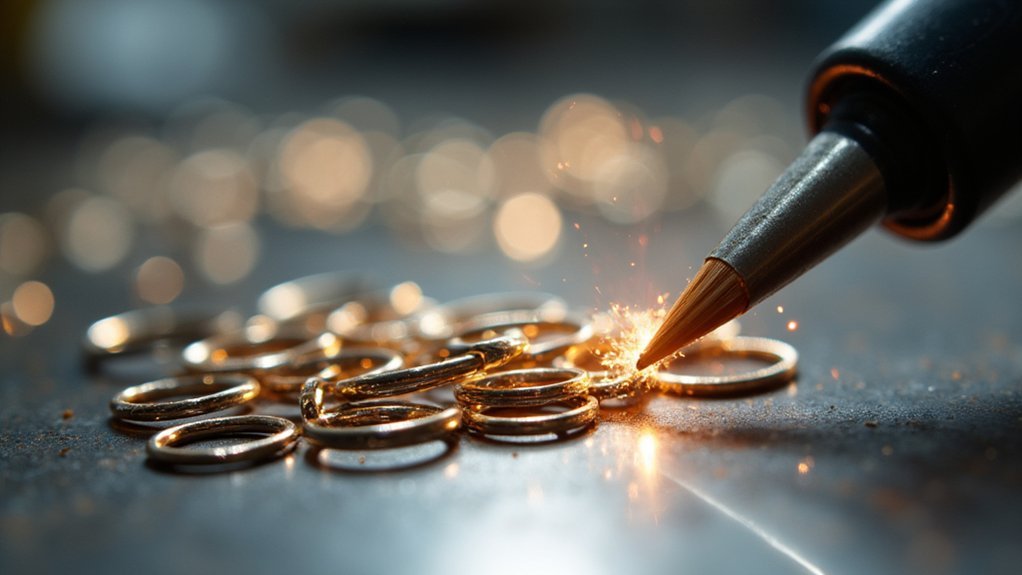
Step-by-Step Soldering Process
Three vital actions determine your soldering success: steady positioning, controlled heating, and precise timing.
Begin by aligning the jump ring ends for a snug fit, then apply flux to enhance solder flow and prevent gaps.
Follow this essential soldering sequence:
- Secure the ring – Use tweezers to hold the jump ring steady while heating gently to avoid blowing off the solder.
- Heat gradually – Apply controlled heat to guarantee even solder distribution without creating incomplete joins.
- Inspect and refine – Check for gaps by examining the joint closely, then use a needle file to clean excess solder.
After soldering, gently tap the ring to reshape it and guarantee it remains perfectly round.
This final step is vital for achieving a seamless join without visible gaps in your finished piece.
Post-Soldering Cleanup and Filing Techniques
After completing the soldering process, you’ll need to refine your work through careful cleanup and filing to achieve a professional finish. When making jewelry, precision during this stage determines your final quality.
Use a needle file to carefully remove excess solder from seams. While filing, regularly check your jump ring’s roundness to prevent distortion. I’m going to emphasize using a magnifying glass here—it’ll help you spot any gaps or imperfections before finalizing cleanup.
| Step | Tool | Purpose |
|---|---|---|
| 1 | Needle file | Remove excess solder |
| 2 | Magnifying glass | Identify imperfections |
| 3 | Hammer & bench block | Reshape if needed |
| 4 | Rubber wheel | Clean flux residue |
| 5 | Final inspection | guarantee seamless join |
Clean with a rubber wheel to eliminate flux residue and restore shine. If necessary, use gentle hammer taps on a bench block for reshaping, guaranteeing tight, seamless joins throughout your making process.
Final Shaping and Quality Assessment
Once you’ve completed the initial cleanup, achieving the perfect shape and guaranteeing quality becomes your primary focus. Use gentle taps to reshape your jump ring, regularly checking for roundness to guarantee proper fit and aesthetic quality. This careful reshaping process is vital for maintaining the ring’s structural integrity.
Your quality assessment should follow these essential steps:
- Visual Inspection – Hold the jump ring up to light and carefully examine the join for gaps or misalignment that could compromise integrity and appearance.
- Surface Refinement – Use a needle file to smooth rough edges, then employ a rubber wheel for a clean finish that removes residual flux.
- Final Assessment – Check for inconsistencies or gaps that might affect functionality and visual appeal before incorporating into jewelry pieces.
Frequently Asked Questions
How to Keep Jump Rings From Coming Apart?
You’ll prevent jump rings from separating by perfectly aligning their ends before soldering, using fine saw blades when cutting, applying flux, heating gently, and filing away excess solder afterward.
How Do You Close the Gap in a Jump Ring?
You’ll close the gap by aligning the ends perfectly with parallel pliers, twisting gently to avoid distortion. Apply flux, then solder carefully to fill the joint completely and maintain structural integrity.
Can You Solder Jump Rings Together?
Yes, you can solder jump rings together. You’ll need to align them properly, guarantee clean cuts, apply flux, and maintain even heat. This creates permanent connections that’re much stronger than simply closing the rings mechanically.
How to Permanently Close Jump Rings Without Solder?
You’ll permanently close jump rings by using quality pliers to squeeze the ends together until they’re perfectly aligned. Choose strong materials like stainless steel, and roughen the ends first for better bonding.
In Summary
You’ve now mastered the essential techniques for creating seamless jump rings. Remember that practice makes perfect—don’t get discouraged if your first attempts aren’t flawless. Focus on consistent wire cutting, proper alignment, and controlled heat application. With each ring you solder, you’ll develop better muscle memory and timing. Keep your tools clean, maintain steady hands, and take breaks when needed. Soon you’ll be producing professional-quality jump rings every time.


Leave a Reply