Start by cleaning your enamel surface with degreaser and lightly sanding for better adhesion. Choose flexible stencil materials like Oramask that work well with enamel surfaces. Master the dabbing technique using a stiff brush, working from center outward while offloading excess paint. Apply thin, even layers and remove stencils while paint’s still tacky for crisp edges. Keep temperatures at 70°F or below and follow proper curing instructions for durability. These fundamentals will set you up for exploring advanced professional techniques.
Prepare Your Enamel Surface for Perfect Adhesion

The success of your stenciling project depends entirely on how well you prepare the enamel surface beforehand.
Clean the enamel thoroughly with a degreaser or mild soap to eliminate oils, dust, and residues that could prevent proper paint adhesion. You’d rather spend time on preparation now than deal with peeling paint later.
Lightly sand the surface with fine-grit sandpaper to create texture for improved bonding. Make sure the surface is completely dry after cleaning and sanding to avoid trapping moisture.
Apply a primer specifically designed for slick surfaces to enhance paint adhesion and durability.
Before you use a stencil on the entire surface, test it on a small, inconspicuous area first.
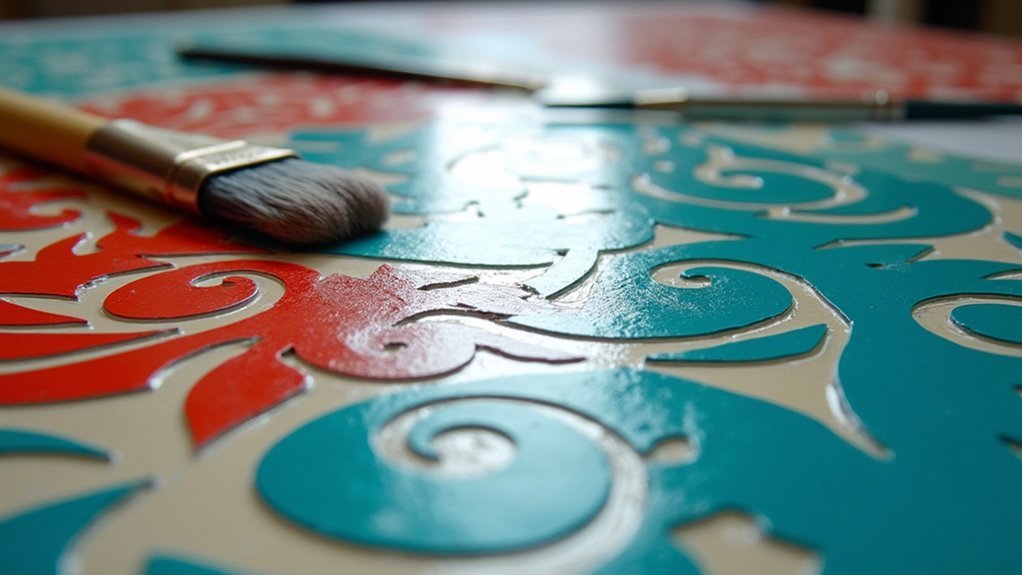
Choose the Right Stencil Material and Adhesive
Selecting proper stencil materials and adhesives will make or break your enamel project’s final appearance. You’ll want flexible options like Oramask by Oracal, which adheres well to enamel surfaces while delivering clean paint lines. When your site uses automotive urethanes, verify stencil compatibility since some materials melt under high temperatures.
| Material Type | Thickness | Best For | Adhesive Method | Heat Resistance |
|---|---|---|---|---|
| Oramask Vinyl | Thin | Detail Work | Built-in Adhesive | Moderate |
| Acrylic Sheet | 1/32″ | Large Areas | Repositionable Spray | High |
| Painter’s Tape | Standard | Simple Lines | Self-Adhesive | Low |
| Transfer Film | Ultra-thin | Curves | Adhesive Spray | Moderate |
| Mylar | Medium | Reusable Stencils | Temporary Spray | High |
Test compatibility on scrap enamel first—this approach yields pretty good results. Once you’ve confirmed everything works, go ahead with your project confidently.
Master the Dabbing Technique for Clean Application

You’ll achieve professional-looking results by mastering the proper dabbing motion with your stencil brush or makeup sponge.
Start by gently tapping the tool straight up and down rather than dragging it across the surface, which prevents paint from seeping under the stencil edges.
This controlled vertical motion, combined with starting from the center and working outward, creates the clean, sharp lines that define quality enamel stenciling.
Proper Dabbing Motion
Mastering the dabbing technique starts with choosing the right tool—either a stiff, condensed stencil brush or a makeup sponge that’ll give you the control required for clean, precise application.
Begin your dabbing motion at the center of your stencil design, then work outward toward the edges. This approach prevents paint from seeping underneath the stencil.
Before applying paint, offload excess onto a paper towel to avoid pooling and bleeding. Use a controlled dabbing motion with consistent pressure—don’t lift the stencil edges during application.
Apply thin layers, allowing each to dry slightly before adding more. This technique guarantees uniform paint distribution and creates that crisp, professional finish you’re after on enamel surfaces.
Preventing Paint Bleeding
When paint bleeds beneath your stencil edges, it destroys the crisp lines that make stenciling worthwhile. You’ll prevent this by offloading excess paint from your brush before applying it to the stencil surface. Use the dabbing technique rather than brushing motions—this gives you superior control and prevents paint from seeping under edges.
| Technique | Best Practice |
|---|---|
| Paint Loading | Offload excess on paper towel |
| Application Method | Dab, don’t brush |
| Stencil Security | Hold edges firmly with fingers |
| Coverage Building | Apply thin, gradual layers |
| Removal Timing | Lift while paint remains tacky |
Hold your stencil’s edges firmly to prevent lifting during application. Build coverage gradually with thin layers instead of achieving opacity in one pass. Remove the stencil while paint’s still tacky, lifting straight up.
Apply Paint in Thin, Even Layers
You’ll achieve the cleanest stencil results by applying paint in thin, even layers rather than trying to cover the surface in one thick coat.
This gradual buildup prevents paint from bleeding under your stencil edges while giving you complete control over coverage intensity.
Building layers slowly guarantees you’ll get that crisp, professional finish that makes your enamel stenciling project stand out.
Build Up Gradually
Although it might seem faster to apply thick coats of paint, building up your stencil design gradually with thin, even layers produces far superior results on enamel surfaces.
You’ll gain better control over your color’s opacity while greatly reducing drips and runs that can ruin your design.
Plan for approximately 2-3 light coats, allowing each layer to dry completely before applying the next. This patience pays off with crisp, professional-looking edges and even coverage.
Use a dabbing technique with your stencil brush or sponge to apply paint evenly without oversaturating the stencil.
Always offload excess paint from your brush before application—this simple step prevents paint from seeping under stencil edges and maintains those sharp lines you’re after.
Prevent Paint Bleeding
Paint bleeding under stencil edges represents one of the most common frustrations when working on enamel surfaces.
You’ll prevent this issue by applying thin, even layers rather than thick coats, which seep under stencil edges more easily. Use a dabbing technique with your stencil brush or sponge to control paint application and minimize pooling underneath the stencil.
Before applying paint, offload excess onto a paper towel to reduce bleeding potential. Start stenciling from your design’s center and work outward to maintain clean lines and prevent paint accumulation at edges.
Secure your stencil firmly to the surface using painter’s tape, which prevents lifting and subsequent bleeding during application. These techniques guarantee crisp, professional-looking results.
Achieve Professional Coverage
When stenciling on enamel surfaces, building up color gradually through multiple thin coats creates superior results compared to attempting full coverage in a single application.
You’ll achieve professional-looking results by using a dabbing technique with your stencil brush or makeup sponge, which gives you precise control over paint distribution. Before each application, offload excess paint onto a paper towel to prevent oversaturation that leads to bleeding under stencil edges.
Allow each layer to dry slightly before adding the next coat. This approach builds opacity while preserving your design’s integrity.
Remove your stencil while the paint remains tacky, lifting straight up to maintain those crisp, clean edges.
- Paint dabbed gently like stamping ink onto paper
- Layers building like watercolor washes gaining depth
- Stencil lifting away revealing sharp, defined borders
Remove Stencils at the Optimal Time
Since timing determines the difference between crisp, professional-looking stenciled designs and messy, peeled edges, you’ll need to remove your stencils while the paint remains tacky to the touch.
Perfect timing is everything—remove stencils while paint is still tacky for crisp, professional edges instead of messy disasters.
If you wait too long and the paint dries completely, it’ll adhere to the stencil and cause unwanted lifting or smudging when removed.
Aim to remove your stencil within 10-30 minutes after application, depending on your paint type.
When you’re ready, lift the stencil straight up rather than pulling at an angle, which can disrupt the wet paint and blur your design edges.
If you’re uncertain about timing, test the removal process on a small, inconspicuous area first.
This lets you gauge the ideal timing without risking your entire project.
Handle Temperature Considerations for Enamel Work

Temperature control becomes essential when working with enamel surfaces, as heat can sabotage even your most carefully planned stenciling project.
You’ll need to guarantee your enamel surface is completely cured and cooled to room temperature before applying any stencils. Hot enamel can warp thin stencil materials or cause them to melt, creating distorted designs that’ll ruin your work.
Wait for temperatures to drop to 70°F (21°C) or below for ideal paint application. This temperature range prevents adhesion problems and maintains surface integrity throughout your project.
- Steam rising from a freshly enameled surface that’s still releasing heat
- Thin plastic stencils curling and bubbling against warm metal surfaces
- Paint bleeding under warped stencil edges on improperly cooled enamel
Achieve Professional Finishing and Curing
Although proper temperature management sets the foundation for stenciling success, you’ll achieve truly professional results only through meticulous finishing and curing techniques.
Apply stencil paint in thin, even layers to prevent drips and guarantee uniform coverage. Let each coat dry completely before adding subsequent layers if needed. Remove your stencil while the paint remains tacky—this prevents peeling and creates crisp, clean edges that define professional work.
Once you’ve removed the stencil, follow the manufacturer’s curing instructions precisely. This typically involves allowing proper drying time followed by a specific heat setting process.
Don’t rush this critical step, as proper curing guarantees your design’s durability and longevity. The time invested in correct curing techniques will reward you with a finish that withstands daily use.
Frequently Asked Questions
How to Prevent Paint Bleeding When Stenciling?
Secure your stencil with painter’s tape, dab paint in thin layers instead of brushing, offload excess paint from your brush, use quality stencils, and remove them while paint’s still tacky.
How Do You Get Crisp Lines When Stenciling?
You’ll get crisp lines by securing your stencil tightly with painter’s tape, dabbing paint with a stiff brush, offloading excess paint first, and removing the stencil while paint’s still wet.
What Is Better for Stenciling, Brush or Sponge?
You’ll find both brushes and sponges work well for stenciling. Stiff stencil brushes give you better control and precision, while cheap makeup sponges provide smoother finishes and easier cleanup since you can discard them.
What Is the Trick to Using Stencils?
You’ll master stenciling by securing your stencil with tape, using light dabbing motions, and offloading excess paint first. Don’t oversaturate your brush, and remove the stencil while paint’s still wet.
In Summary
You’ve learned the essential techniques for stenciling on enamel surfaces. By preparing your surface properly, selecting quality materials, and mastering paint application, you’ll achieve crisp, professional results. Remember to work in suitable temperatures and remove stencils at the right moment. Don’t rush the curing process—patience yields the best finish. With these seven tips, you’re ready to transform any enamel surface with beautiful, long-lasting stenciled designs.


Leave a Reply