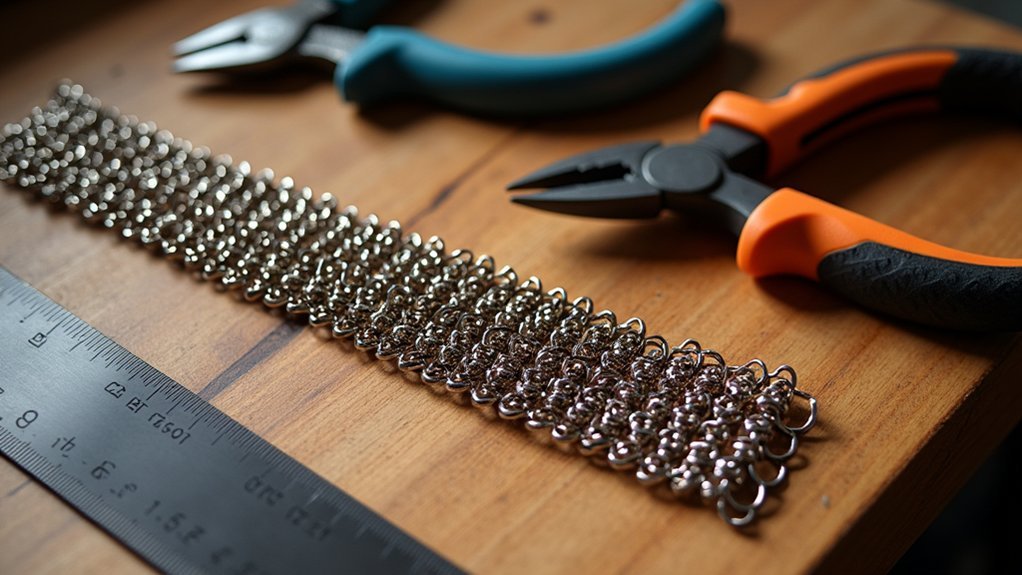
You’ll need five essential tools for professional-quality chainmaille bracelets: chain-nose pliers with rubber grips for jump ring manipulation, flush-cut pliers or a jeweler’s saw for clean cuts, and ring mandrels for uniform sizing. Choose saw-cut rings over machine-cut for superior closures, and select 16-gauge aluminum for balanced strength and flexibility. Consider ergonomic handles to reduce hand fatigue during longer projects. Master these fundamentals and you’ll discover advanced techniques that transform basic materials into stunning jewelry pieces.
Essential Pliers for Jump Ring Manipulation
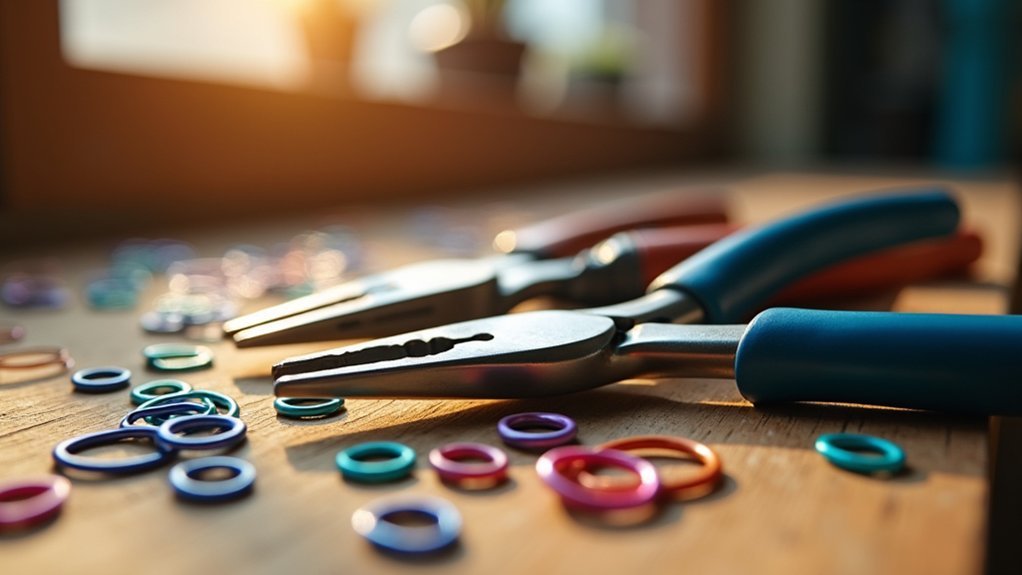
When you’re crafting chainmaille bracelets, selecting the right pliers makes the difference between frustrating struggles and smooth, precise work. Chain nose or flat-nose pliers are your primary tools for manipulating jump rings effectively. These provide superior leverage and precision compared to standard jewelry pliers.
You’ll want square-tip pliers with shorter jaw designs for ideal control. The shorter jaws concentrate pressure at the tip, giving you better grip and manipulation power when opening and closing jump rings.
Ergonomic handles become essential during lengthy chainmaille projects, reducing hand fatigue considerably.
Keep multiple pliers with different jaw shapes in your toolkit. Various chainmaille techniques require different approaches, and having options guarantees you can tackle any design challenge.
Proper tool selection prevents jump ring damage and delivers clean, professional results.
Wire Cutters and Cutting Tools
When you’re cutting wire for jump rings, you’ll quickly discover that your choice of cutting tool dramatically affects the quality of your finished chainmaille.
Saw-cut rings create perfectly smooth, flat edges that close seamlessly together, while standard wire cutters often leave pinched or jagged ends that prevent proper ring closure.
You can avoid the frustration of poorly fitting rings by investing in a jeweler’s saw or high-quality flush-cut pliers that won’t deform your wire during cutting.
Saw-Cut Ring Benefits
Although wire cutters might seem like the obvious choice for making jump rings, saw-cut rings deliver superior results that’ll transform your chainmail bracelets from amateur-looking to professional-quality pieces.
When you use saw-cut rings for jewelry making, you’ll achieve clean, flush-cut edges that create perfect closures without gaps. This precision eliminates the jagged edges that wire cutters typically produce, which can compromise your chainmail jewelry’s structural integrity.
Key benefits of saw-cut rings include:
- Enhanced durability – Clean cuts guarantee stronger connections that won’t weaken over time
- Smoother movement – Perfect edges allow for better flexibility in intricate weave patterns
- Professional appearance – Flush-cut rings create polished, seamless-looking finished pieces
Investing in a quality jeweler’s saw will dramatically improve your crafting efficiency and help you create stunning chainmail bracelets.
Avoiding Wire Cutter Damage
Wire cutters pose significant risks to your chainmail project that extend beyond creating poor-quality cuts. When you use wire cutters on jump rings, you’ll create jagged, uneven edges that prevent proper closure in your chain maille bracelets.
These rough cuts compromise the structural integrity of each ring, making it nearly impossible to achieve the tight, secure connections essential for quality jewelry making. The damage from wire cutters isn’t just aesthetic – it’s functional.
Jagged edges won’t align properly when you attempt to close jump rings, leaving gaps that weaken your entire bracelet. Additionally, rough cuts can snag on other rings during assembly, potentially deforming multiple components.
You’ll spend more time fighting with damaged rings than actually creating your chainmail pattern, ultimately compromising your finished piece’s durability and appearance.
Ring Mandrels for Shaping and Sizing
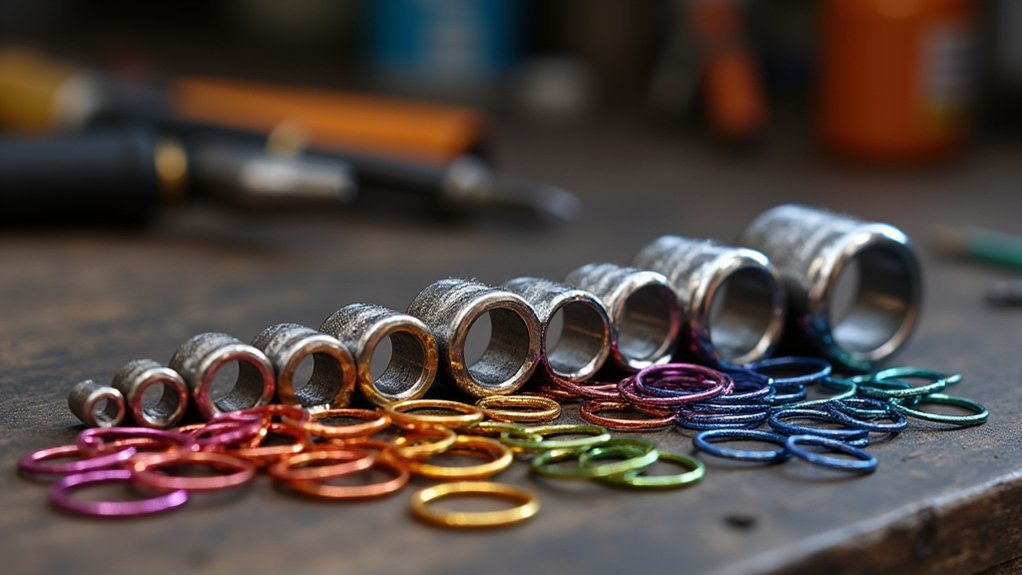
One essential tool you’ll need for crafting consistent chainmaille bracelets is a ring mandrel, which shapes and sizes your jump rings with precision.
Ring mandrels guarantee your chainmaille components maintain uniform dimensions throughout your project. You can use various materials as mandrels, including metal knitting needles, wooden dowels, or gas pipe lengths. The mandrel’s diameter directly determines your jump ring size, so choose accordingly.
- Mark different mandrel sizes with colored tape for quick identification when switching between ring diameters
- Select mandrels with smooth surfaces to prevent wire snagging and guarantee clean wraps without damage
- Experiment with various mandrel materials and sizes to create unique jump ring designs and improve your techniques
Using proper ring mandrels transforms your chainmaille crafting from guesswork into precise artistry, delivering professional-looking bracelets every time.
Selecting Quality Jump Rings
How do you guarantee your chainmaille bracelet maintains its structural integrity and visual appeal?
You’ll need to focus on selecting quality jump rings that meet specific standards for your chainmail projects.
Start with saw-cut rings, which provide flush-cut edges for perfect closures. Source all rings from a single manufacturer to guarantee consistent sizing throughout your bracelet.
Choose the appropriate gauge carefully, as ring thickness directly affects both appearance and durability.
For lightweight, flexible bracelets, consider anodized aluminum or neoprene jump rings that offer excellent stretchability.
Always purchase extra rings—at least one additional inch worth—to replace any that bend or get lost during construction.
This preparation guarantees you’ll complete your project without interruption.
Saw-Cut Vs Machine-Cut Ring Options
Two primary cutting methods determine the quality and performance of your jump rings: saw-cutting and machine-cutting.
Saw-cut rings feature flush-cut edges that create perfect closures, which is essential for chainmail integrity. Machine-cut rings often have burrs preventing tight connections.
You’ll find saw-cut rings offer superior consistency in size and shape, making them ideal for intricate patterns where precision matters.
- Saw-cut rings: Premium quality with flush edges, perfect for wearable jewelry
- Machine-cut rings: Budget-friendly option but may have burrs and inconsistencies
- Home cutting: Use a saw instead of wire cutters for cleaner results
While machine-cut rings cost less and produce faster, professional jewelers prefer saw-cut rings for their durability and appearance.
Professional jewelers consistently choose saw-cut rings over machine-cut alternatives for superior durability and polished appearance in quality jewelry work.
Choose saw-cut jump rings for any jewelry you’ll actually wear.
Gauge and Size Considerations
Since gauge determines both the strength and flexibility of your chainmaille bracelet, you’ll need to balance durability with comfort when selecting jump rings. Gauges typically range from 16 to 20, with 16 gauge being thicker and providing superior structural integrity for your projects.
| Gauge | Inner Diameter | Best Use |
|---|---|---|
| 16 | 5/16″ | Robust cuffs |
| 18 | 1/4″ | Standard bracelets |
| 20 | 3/16″ | Delicate designs |
For European 4-1 patterns, you’ll want an inner diameter around 5/16 inches for ideal flexibility. Larger outer diameters increase pattern visibility, while smaller ones create tighter weaves. Always source your jump rings from the same supplier to maintain consistency throughout your chainmaille project, ensuring uniform appearance and structural reliability.
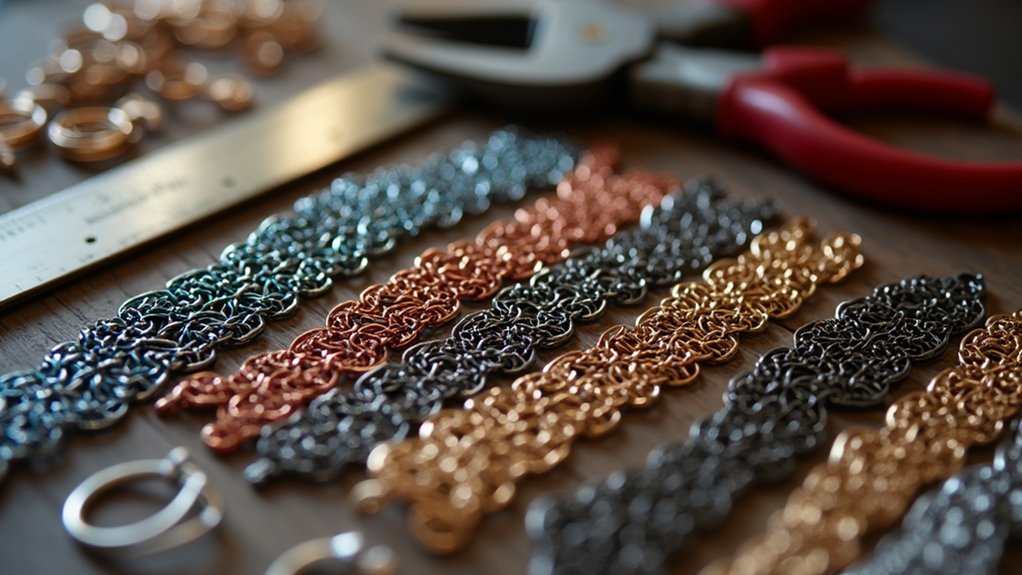
Metal Types and Their Properties
You’ll find that aluminum’s lightweight nature and corrosion resistance make it perfect for beginners, while steel offers superior strength but requires more effort to manipulate.
Each metal type exhibits different springback characteristics that’ll affect how your links hold their shape after bending. Understanding these properties helps you choose the right material for your bracelet’s intended durability and appearance.
Aluminum Properties and Benefits
When choosing materials for your chainmaille bracelet, aluminum stands out as an exceptional option that combines practicality with aesthetic appeal.
You’ll find aluminum’s lightweight nature makes it perfect for creating larger chain designs without the burden of excessive weight. Its natural corrosion resistance guarantees your jewelry maintains its appearance over time, while its malleability allows you to shape jump rings easily without compromising structural integrity.
- 16-gauge aluminum wire provides the ideal balance of strength and flexibility for sturdy yet workable chainmaille pieces
- Anodized aluminum jump rings offer vibrant color options plus enhanced surface protection against scratches and tarnishing
- Low density properties enable comfortable everyday wear, even with elaborate chain designs
You’ll appreciate aluminum’s versatility in chainmail crafting applications.
Steel Strength Characteristics
While aluminum offers excellent workability, steel brings unmatched durability to your chainmaille projects through its superior tensile strength and resistance to deformation.
When making jewelry projects, steel strength characteristics vary considerably between alloys. Stainless steel provides excellent corrosion resistance, while carbon steel delivers enhanced strength but requires protective coatings to prevent rust.
Your wire gauge selection directly impacts both strength and flexibility—thicker gauges offer greater durability but reduce pliability.
You’ll need to account for springback variations when cutting jump rings, as different steel alloys behave differently. Heat treatment processes allow you to customize hardness levels, letting you tailor jump ring properties for specific applications.
Steel’s superior tensile strength makes it ideal for chainmaille pieces requiring exceptional wear resistance.
Springback Effects by Metal
Steel’s impressive strength characteristics come with an important consideration that affects your jump ring dimensions: springback behavior varies considerably across different metals.
When you release coiled wire, it naturally wants to return to its original shape, creating larger inner diameters than your mandrel size. This effect becomes particularly noticeable with stiffer metals like stainless steel.
Understanding springback helps you create consistent chainmaille patterns. Softer metals like aluminum show minimal springback, while harder alloys exhibit more dramatic size changes. Wire gauge and composition directly influence this behavior.
- Test your metals first – Make sample jump rings to measure actual springback before starting your project
- Adjust mandrel size accordingly – Use smaller mandrels for high-springback metals to achieve desired dimensions
- Avoid mixing incompatible metals – Different springback rates create sizing inconsistencies in finished bracelets
Tumbling Equipment for Finishing
After you’ve assembled your chainmaille bracelet, tumbling equipment transforms rough, dull jump rings into polished, professional-looking components. A rotary tumbler is vital for achieving that smooth, refined finish that enhances your bracelet’s overall appearance.
Instead of traditional steel shot, use a “silver flower” made from soldered 10-gauge silver hoops. This prevents potential damage to your delicate jewelry while effectively polishing the metal surfaces.
Silver flower tumbling media protects delicate chainmaille while delivering professional polish results without steel shot damage.
Organization becomes essential during tumbling to prevent losing rings. Use containers or mesh bags to keep everything contained and sorted. Heavy gauge craft wire improves efficiency by maintaining organization and preventing tangling.
Remember that different metals exhibit varying springback characteristics, so adjust your tumbling process accordingly to achieve ideal results for each metal type you’re working with.
Organization and Storage Solutions
You’ll find that keeping your jump rings and tools properly organized makes chainmaille work much more enjoyable and efficient.
Smart storage solutions prevent you from wasting time searching for the right size ring or missing tool in the middle of a project.
Let’s explore practical methods for organizing your jump ring collection and setting up an effective tool storage system.
Jump Ring Storage
Three essential storage principles will transform your chainmaille workspace from chaotic to efficient: categorization, visibility, and accessibility.
Proper jump ring storage prevents chaos when you’re creating each piece of chain for your bracelet project.
You’ll want labeled plastic bins or tackle boxes to separate different gauges and metal types. Clear, resealable bags protect your rings from dust while maintaining visibility. A magnetic strip keeps rings secure during active work, preventing scattered supplies across your workspace.
Essential jump ring storage solutions:
- Inventory tracking system – Record gauge, metal type, and diameter measurements
- Dedicated organizer drawers – Sort by size and material for quick access
- Extra supply buffer – Keep additional rings whether online or made locally
Tool Organization Methods
Efficient tool organization doubles your crafting speed while reducing workspace frustration. You’ll need strategic storage solutions to maintain productivity when working with delicate components like each open ring used to Make a Chain.
Implement these proven tool organization methods for maximum efficiency:
| Storage Solution | Best For |
|---|---|
| Magnetic strips/pegboards | Hanging pliers and cutters |
| Color-coded containers | Quick material identification |
| Stackable drawer units | Larger tools and bulk supplies |
Use small, labeled tackle boxes for different jump ring sizes, ensuring quick access during intricate chainmaille work. Color-coding streamlines your process by allowing instant recognition of materials needed for specific patterns. Install magnetic strips near your workspace to keep pliers within arm’s reach. Regularly assess your collection, eliminating unused items to maintain an efficient, creativity-focused environment.
Springback Compensation Techniques
When working with coiled wire to create jump rings, springback becomes your biggest challenge as the metal naturally wants to expand once you remove it from the mandrel. This phenomenon affects your ring dimensions and varies considerably between different metals.
Stiffer materials like stainless steel produce more dramatic springback than softer alternatives.
To achieve consistent results, you’ll need to compensate by selecting a mandrel size slightly smaller than your desired final ring diameter. Test your metal’s springback characteristics before starting your bracelet project, as each material behaves differently.
Always test your wire’s springback behavior first, then choose a mandrel slightly smaller than your target ring size.
Key springback compensation strategies:
- Pre-test your wire – Make sample rings to measure actual springback amounts
- Adjust mandrel diameter – Choose smaller mandrels based on your metal’s expansion rate
- Document your findings – Keep notes for future projects using the same materials
Ergonomic Tool Selection
While precise jump ring creation forms the foundation of quality chainmaille, selecting ergonomic tools determines whether you’ll complete your bracelet project comfortably or struggle through hand fatigue and strain.
Choose square-tip or flat-nose pliers with shorter jaws for superior leverage and increased pressure at the tip. These ergonomic tools greatly reduce the physical demands of extended chainmaille sessions.
You’ll want lightweight yet sturdy pliers that won’t compromise your dexterity or strength during detailed jewelry work.
Look for pliers featuring rubber grips, which enhance comfort and control while enabling more precise movements throughout the intricate weaving process.
Investing in high-quality ergonomic tools pays dividends by improving your overall crafting efficiency and reducing repetitive strain injury risks that commonly affect chainmaille artisans.
Budget-Friendly Tool Alternatives
Creating beautiful chainmaille doesn’t require expensive specialized equipment, and you can achieve professional results using common household items and basic craft supplies.
The art of making chainmaille becomes accessible when you discover budget-friendly alternatives that work just as effectively as costly tools.
Flat-nose pliers provide excellent grip and control for manipulating jump rings, replacing expensive chainmaille-specific pliers. Simple wire cutters handle ring cutting tasks efficiently, while metal knitting needles or dowel rods serve as perfect mandrels for creating various ring sizes.
You’ll save money by repurposing these everyday items.
- Use a sturdy box or container to organize rings and tools, preventing workspace clutter
- Replace expensive tumblers with sealed containers filled with marbles and cleaning solution for polishing
- Repurpose household metal rods as mandrels for consistent ring sizing
These budget-friendly tools deliver professional results without breaking your budget.
Maintenance and Care of Chainmaille Tools
Three simple maintenance habits will extend your chainmaille tools’ lifespan and keep them performing at their best.
First, regularly clean your pliers with a soft cloth to remove grime and prevent rust buildup—watch any instructional video in step one of your Full Persian weave tutorial to see how clean tools make ring manipulation smoother.
Store tools in a dry environment using organizers or pouches to prevent moisture damage.
Second, check plier jaw alignment periodically since misaligned jaws create uneven pressure when you Connect the Ends of jump rings.
Third, lubricate pivot points with sewing machine oil to maintain smooth movement.
Replace worn tools promptly to guarantee quality results and comfortable crafting sessions throughout your bracelet projects.
Frequently Asked Questions
What Tools Do You Need to Make Chainmail?
You’ll need chain nose wire pliers for precision work and flat-nose pliers for secure gripping. Choose ergonomic options to reduce hand fatigue. Keep extra saw-cut jump rings available for uninterrupted crafting sessions.
How Many Jump Rings to Make a Byzantine Bracelet?
You’ll need approximately 200 to 300 jump rings for a Byzantine bracelet, depending on your desired length and width. It’s smart to buy 10-20% extra rings to handle mistakes during construction.
Is Making Chainmail Jewelry Hard?
Making chainmail jewelry isn’t inherently hard, but you’ll face a learning curve initially. With proper tools like quality pliers and saw-cut jump rings, plus consistent practice, you’ll master the techniques relatively quickly.
How to Make 6 in 1 Chainmail?
You’ll create a 2x2x2 foundation with six rings, then add pairs by threading through four existing rings. Position right rings over left, use speedweaving techniques, and connect ends without clasps.
In Summary
You’ve got everything you need to start crafting stunning chainmaille bracelets. Don’t let tool anxiety hold you back—start with basic pliers and cutters, then upgrade as your skills develop. Remember to maintain your tools properly and compensate for springback when sizing rings. Whether you’re working with saw-cut or machine-cut rings, consistent practice with quality tools will elevate your chainmaille game and produce professional-looking results every time.


Leave a Reply